Google Cloud VPC Flow Logs Input Configuration
Prerequisites
Google Cloud Platform (GCP) generates VPC Flow logs for each subnetwork.
GCP has to be configured to send VPC Flow Logs to the EDFN agent. The agent uses GCP service account for retrieving enrichment data, such as VM names, subnetwork names, VPC names, etc., and for flow logs ingestion. VPC Flow logs are received using Pub/Sub service.
This section has instructions how to configure service account, enable flow logs and configure Pub/Sub subscription.
Configuration Steps
- Configure GCP Service Account
- Configure GCP VPC Flow logs
- Configure EDFN Agent for ingestion of Google VPC Flow Logs
- Enable and Configure NFO Modules for Google VPC Flow Logs reporting
Configure GCP Service Account
NetFlow Optimizer and EDFN support ingestion of GCP VPC Flow Logs using service account.
For more information on GCP VPC Flow Logs, visit https://cloud.google.com/vpc/docs/using-flow-logs.
Service Account Configuration
You have two choices to configure EDFN Agent to access GCP: use a service account assigned to a Compute Engine instance or provide a credentials file. In both cases you need to create a service account or use an existing one. You have to grant the following IAM roles to the service account:
- Compute Network Viewer
- Pub/Sub Subscriber
Using Service Account Assigned to EDFN Compute Engine Instance
When EDFN is installed on Compute Engine instance, this method is preferred. This method does not require the credentials file. Make sure that appropriate IAM roles are granted to the service account and at least following Cloud API access scopes are set for the EDFN instance:
- Cloud Pub/Sub – Enabled
- Compute Engine – Read Only
To create the service account:
- Open GCP console
- In the navigation pane choose IAM & Admin -> Service Accounts (https://console.cloud.google.com/iam-admin/serviceaccounts), and then choose Create service account
- Enter the service account name and then choose Create
- Select the following roles: Compute Engine -> Compute Network Viewer, Pub/Sub -> Pub/Sub Subscriber. Choose Continue
- Access Key is not needed for this authentication method, so don’t create any keys
- Click Done
To assign the service account to the instance (https://cloud.google.com/compute/docs/access/create-enable-service-accounts-for-instances#changeserviceaccountandscopes):
- Navigate to the Compute Engine -> VM instances page: https://console.cloud.google.com/compute/instances
- Click the VM instance name where EDFN is installed
- Click the Stop button. Wait for the instance to be stopped
- Click the Edit button
- Scroll down to the Service Account section
- From the dropdown menu, select the desired service account
- In the Access scopes section set values: Cloud Pub/Sub – Enabled, Compute Engine – Read Only
- Save changes
Providing Service Account Credentials
Use this option if your EDFN is installed on premises. This method requires an access key in the json credentials file.
To create a service account:
- Open GCP console
- In the navigation pane choose IAM & Admin -> Service Accounts (https://console.cloud.google.com/iam-admin/serviceaccounts), and then choose Create service account
- Enter the service account name and then choose Create
- Select following roles: Compute Engine -> Compute Network Viewer, Pub/Sub -> Pub/Sub Subscriber. Choose Continue
- Click Create Key, leave JSON selected and click Create
- Click Done
- Copy json file with credentials to the EDFN installation server, the agent will use it for GCP services access
- Change file permissions to read only for root user (if EDFN is running as root): chmod 400
Multiple Projects Configuration
If flow logs have to be collected from several projects, perform the following steps:
- Open GCP console, select project to ingest VPC Flow Logs from
- In the navigation pane choose IAM & Admin -> IAM (https://console.cloud.google.com/iam-admin/iam), and then choose Add
- Enter the service account email address
- Select the following Compute Engine -> Compute Network Viewer role
- Click Save
Configure GCP VPC Flow Logs
VPC flow logs are configured on VPC network details page or on Subnetwork details page.
- Open GCP console
- In the navigation pane choose VPC Network -> VPC Networks (https://console.cloud.google.com/networking/networks/list), and then choose Network for which flow logs should be enabled
- Choose one or several subnetworks, then on Flow Logs dropdown choose Configure
- Configure Aggregation Interval, Include metadata and Sample rate
- Click Save
VPC flow logs are stored in the Cloud Logging. You have to export logs to Pub/Sub: https://cloud.google.com/logging/docs/export. To export flow logs using Logs Viewer perform the following steps (for details visit https://cloud.google.com/logging/docs/export/configure_export_v2):
- Open GCP console
- In the navigation pane choose Logging -> Logs Router (https://console.cloud.google.com/logs/exports), and then choose Create sink
- Select GCE Subnetwork in the first pull-down menu
- Select compute.googleapis.com/vpc_flows in the second pull-down menu. Important, only vpc_flow logs must be selected!
- On the right panel enter the sink name, select Pub/Sub as a destination service, then create a new Cloud Pub/Sub topic or use an existing one. Also logs can be exported to a Cloud Pub/Sub topic in another project
- Click Create sink
When sink and Cloud Pub/Sub topic are created, you have to create a subscription. EDFN agent will receive flow logs using this subscription. Perform the following steps for the subscription creation:
- In the navigation panel choose Pub/Sub -> Topics (https://console.cloud.google.com/cloudpubsub/topic/list), and then choose the topic where flow logs are exported
- Select Create Subscription (simple subscription) in the Create subscription pull-down
a. Enter subscription ID
b. Delivery type: Pull
c. Acknowledgement deadline: 60 seconds
d. Retain acknowledged message: leave unchecked
e. Click Create - When subscription is created, you’ll be navigated to the Subscription details page. Copy Subscription name for EDFN agent configuration, it looks like following template: projects/{projectID}/subscriptions/{subscriptionID}
In case of successful configuration, you will to see Unacked message count increasing on subscription details page, if EDFN agent is not running.
Configure EDFN Agent
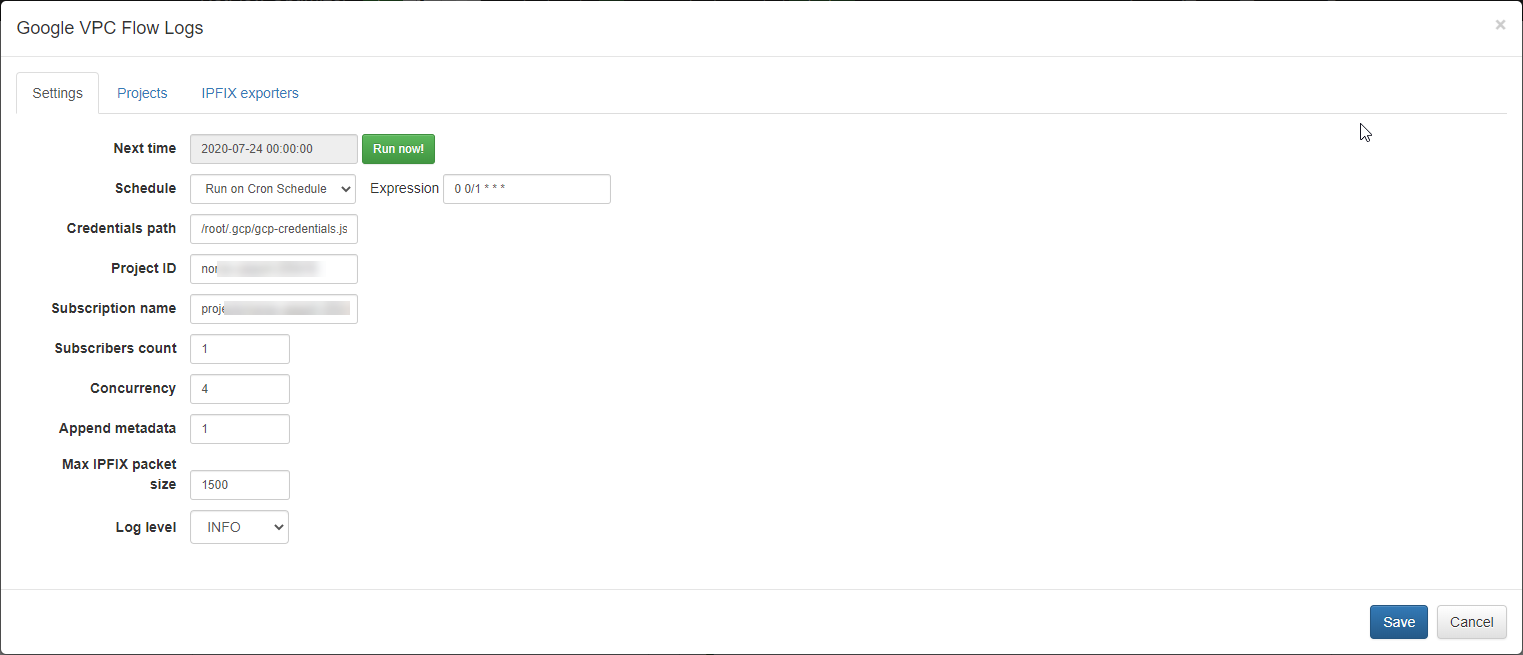
When you click on Google VPC Flow Logs in NFO Input summary panel you will be presented with the the following configuration screen.
On this screen you can configure the following parameters:
Cron Schedule
GCP VPC Flow Logs processing includes data enrichment with fields such as VM names, subnetwork names, VPC names, etc. This information is updated on cron schedule set here.
Credentials File Path
Set path to the service account credentials file here. Credentials file should be in the json format. If not provided and EDFN is installed on Compute Engine instance, the service assigned to the instance is used.
Project ID
Enter your main project ID here.
Subscription Name
Enter Pub/Sub subscription name or ID. Subscription name expected format is: projects/{projectID}/subscriptions/{subscriptionID}, where {projectID} may be same as Project ID from the previous parameter or it could be different.
Subscribers Count
Enter the desired number of parallel connections to the subscription.
Concurrency
Enter the number of parallel message processors per connection (subscriber).
Append Metadata
EDFN agent can append VM metadata and it will be reported in Module 10301: GCP VPC Flow Logs. Possible values: 0 – metadata is not added, 1 – metadata is added if available.
Max IPFIX Packet Size
This is NFO internal parameter – maximum IPFIX UDP message size. It is expected to be less or equals to MTU. When NFO and EDFN are installed on the same host, the parameter may be increased up to 3900 to increase processing speed.
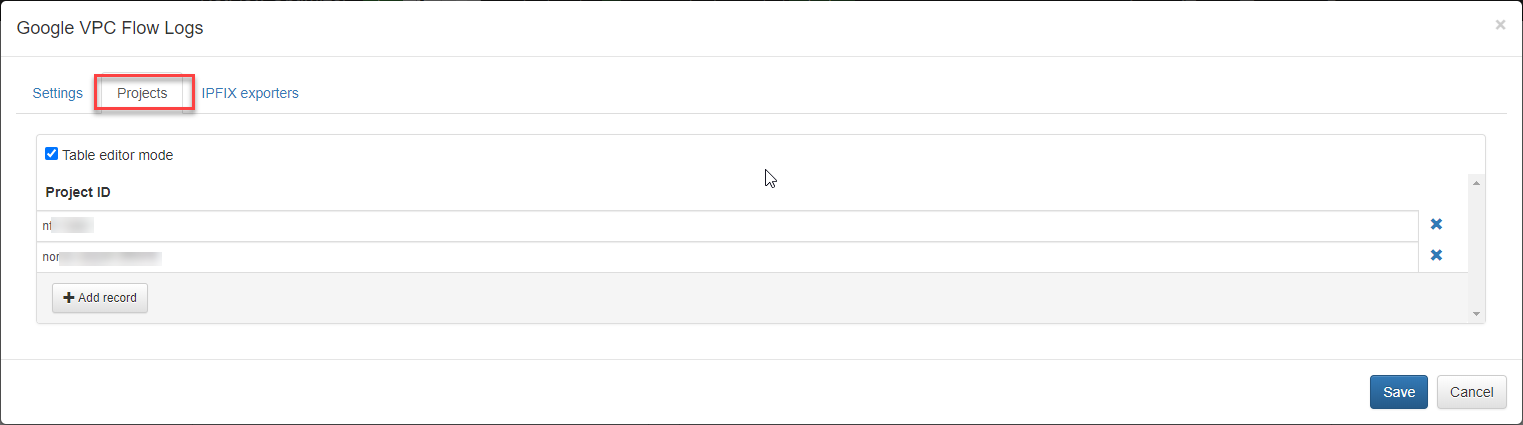
Projects
Main project ID is automatically added after you press Run now button. Main project should not be deleted. When more than one Project is going to be monitored, additional project IDs may be added. Service account must have access (Compute Network Viewer, Compute Viewer) to all projects in the list. Also when VPC Flow Logs from undefined project is received, project ID is automatically added to the list. The list is updated according to the agent’s cron schedule interval (by default once per hour).
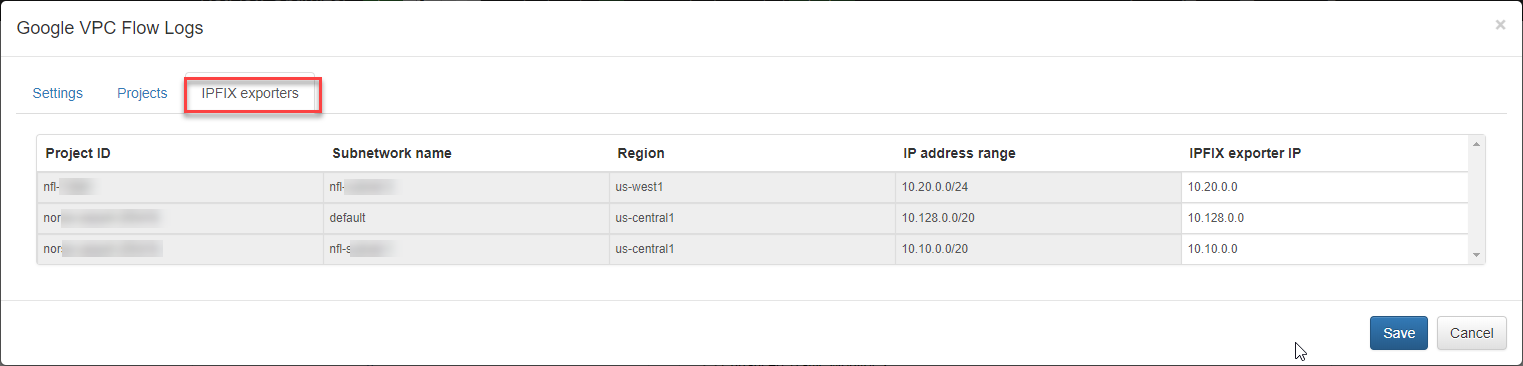
Verify GCP Access and Set IPFIX Exporters
Press the “Run now” button to retrieve the list of VPC subnetworks which generates VPC Flow logs and associated Project ID, Region, and IP address range. This action will close the input configuration. It may take from several seconds to a few minutes to retrieve the list.
Open the IPFIX Exporters section to review and assign an exporter IP to each subnetwork. By default NFO will use the first IP from the range as an exporter IP. This IP will be reported as exp_ip= field in syslogs. It is used for compatibility with physical network device *flow reporting in visualizations and alerting.
You may change the exporter IP to better identify your subnetworks, especially if you have several subnetworks with same or overlapping IP address ranges.