Azure Log Analytics Workspace
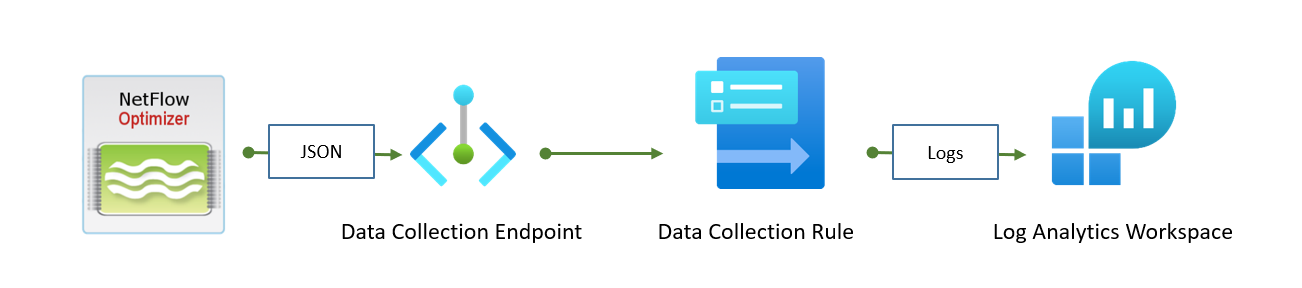
Use this output type to send NetFlow Optimizer (NFO) data to Microsoft Azure Log Analytics Workspace, which serves as the data collection layer for services like Azure Monitor and Microsoft Sentinel.
NFO supports two different Azure APIs to send NFO JSON logs to Azure:
- Logs Ingestion API: This is the preferred method. NFO sends JSON logs to a Data Collection Endpoint (DCE), then a Data Collection Rule (DCR) is applied, and finally, the transformed data is sent to the Log Analytics workspace. For details, visit Logs Ingestion API in Azure Monitor.
- HTTP Data Collector API (deprecated): This older method is deprecated and has been replaced by the Logs Ingestion API. However, it can still be used until 9/14/2026.
For more information on migration from depricated API to new API, visit Microsoft migration document.
Logs Ingestion API Configuration Steps
The configuration requires several steps to be performed in Azure before configuring the NFO output:
- Configure the Data Collection Endpoint (DCE).
- Configure the Log Analytics workspace table.
- Configure the Data Collection Rule (DCR).
- Register an application in Microsoft Entra ID (Azure AD) for NFO authentication or use a system-assigned managed identity.
- Configure the NFO output.
Data Collection Endpoint (DCE) Configuration
A single DCE may be used for different DCRs, so you may not need to create a new one. To create a DCE using the Azure portal:
- Navigate to Monitor > Data Collection Endpoints.
- Click “+ Create” and enter required parameters (name, subscription, resource group, and region).
- Navigate to Review + create page and press Create.
Log Analytics Workspace Configuration
A Log Analytics workspace will have to be selected in the next step. If you do not have one or would you use a new one for this project, you can create one using the Azure portal:
- In the search bar search for Log Analytics workspaces.
- Select the Log Analytics workspaces service.
- Click + Create.
- In the opened wizard, enter required parameters such as name, subscription, resource group, and region.
- Navigate to the Review + create page and press Create.
Log Analytics Workspace Table and Data Collection Rule Configuration
A Log Analytics workspace table and Data Collection Rule (DCR) may be created using two different methods: manually uploading JSON log samples or using an Azure Resource Manager (ARM) template file. For the Network Conversation Monitor module (10062/20062 output), the ARM template may be used. For other modules, a list of JSON sample logs is required.
The workspace and Data Collection Endpoint (DCE) must be created beforehand.
Resource Manager Template for Network Conversations (10062/20062) Module
The ARM template {nfo_20062_azure_logs_ingestion_arm_template.json} (Click here to download) may be used for table and DCR creation.
1. Importing the Template
- Navigate to Azure portal > Template specs > Import template.
- Select the template file and press Import.
- Enter required fields such as name, subscription, resource group, location, and version.
- Navigate to the Review + Create page and click Create.
2. Deploying the Resources
- Select the template in the list of Template Specs and click the Deploy button on the Overview page.
The template has the following configurable parameters:
-
Table name – Specify the name of the Workspace Table to create (the
_CLsuffix will be added automatically). -
Data collection rule name – Specify the name of the DCR to create.
-
Workspace name – Specify the name of the Log Analytics workspace to use.
-
Endpoint resource name – Specify the name of the DCE to use.
-
To finish the deployment, click the Review + create button and then Create after final validation.
Table and Data Collection Rule for Other Modules
To configure a table and DCR for other modules (except 10062/20062), you need to prepare a JSON file with a list of log samples. For detailed instructions, visit Create new table in Log Analytics workspace.
1. Sample JSON Log Format
The sample JSON log file must contain one or more NFO JSON output objects structured as an array, for example:
[
  {“nfc_id”: 20067, “exp_ip”: “10.0.0.1”, “src_ip”: “10.0.0.100”, …},
  {“nfc_id”: 20067, “exp_ip”: “10.5.0.1”, “src_ip”: “10.5.0.200”, …}
]
2. Creating the Custom Log Table
-
Navigate to Azure Portal > Log Analytics workspaces.
-
Select the workspace > in the left panel click Settings > Tables > click “+ Create” > New custom log (Direct Ingest).
-
On the opened wizard, enter the table name, DCR, and DCE.
-
Press “Next” and upload the sample file.
-
Verify that all fields are parsed correctly.
-
Configure the following transformation, as NFO output does not contain the
TimeGeneratedfield:source | extend TimeGenerated = todatetime(["time"])| project-away ["time"] -
Finally, click “Next” to navigate to the Review page and click “Create” to create the table.
The table schema may be verified by clicking on “...” in the list of tables. If any column has an invalid type or is missing, you can add a new one.
Authentication and Access Control (IAM) Configuration
NFO requires access to the DCR to ingest logs. There are two methods for configuring this access:
| Identity Method | Use Case | Required NFO Credentials |
|---|---|---|
| Service Principal Identity | NFO is installed on premises or outside of Azure. | Secret key, Application (client) ID, and Tenant ID. |
| System-assigned managed identity | NFO is installed on an Azure Virtual Machine resource. | No access credentials required. |
For more information, visit What is managed identities for Azure resources?.
Service Principal Identity Authentication
An Azure service principal is an identity created for use with applications. NFO uses this service principal for secure access to Azure resources.
1. Create the Application Registration and Client Secret
- Open the Azure portal.
- Navigate to Microsoft Entra ID (Azure AD) and select App registrations under the Manage section.
- Select “+ New registration“.
- Enter a Name (e.g.,
nfo-app). - Select Register to save the application. You will be navigated to the application overview page.
- Select Certificates & secrets in the left panel.
- Select “+ New client secret” and enter a name for the secret.
- Select Save and copy the secret key value. You will need this key for NFO output configuration.
2. Record Required Credentials
From the application overview page, you will need the following properties for the NFO configuration:
- client: Application ID: The Application (client) ID.
- tenant: Tenant ID: The Directory (tenant) ID.
- key: Secret Key: The client secret string value.
3. Assign Permissions to the Data Collection Rule (DCR)
- Navigate to Monitor.
- Select Data Collection Rules in the left panel.
- From the list of rules, select the DCR to be configured.
- Select Access control (IAM) in the left panel.
- Select “+ Add” and choose Add role assignment.
- Select the Monitoring Metrics Publisher role and click “Next”.
- Leave the “Assign access to” radio button unchanged (set to User, group, or service principal).
- Click “+ Select members”.
- Enter the service principal name in the Select field (e.g.,
nfo-app). When the service principal appears in the results, select it. - Click Save and then Review + assign to save the assignment.
System-assigned Managed Identity Authentication
This method uses the identity of the Virtual Machine (VM) hosting NFO, removing the need to manage application secrets.
1. Enable System-assigned Managed Identity on the NFO VM
- For detailed instructions on enabling the identity, see the official Microsoft documentation: Enable system-assigned managed identity on an existing VM.
- Open the Azure portal.
- Navigate to Virtual machines.
- From the list of VMs, select the VM where NFO is installed.
- Select Identity, under the Settings group in the left panel.
- Under the System assigned tab, set Status to On and then click Save.
- Confirm enabling the system-assigned managed identity for the VM.
2. Configure VM Access to the Data Collection Rule (DCR)
- Navigate to Monitor.
- Select Data Collection Rules in the left panel.
- From the list of rules, select the DCR to be configured.
- Select Access control (IAM) in the left panel.
- Select “+ Add” and choose Add role assignment.
- Select the Monitoring Metrics Publisher role and click “Next”.
- For “Assign access to”, select the Managed identity radio button.
- Click “+ Select members”.
- In the Subscription dropdown, choose the subscription where the VM is placed.
- In the Managed identity dropdown, choose Virtual Machine.
- Search and select the VM.
- Click Save and then Review + assign to save the assignment.
Configure NFO Output
NFO sends JSON logs to the configured Data Collection Endpoint (DCE).
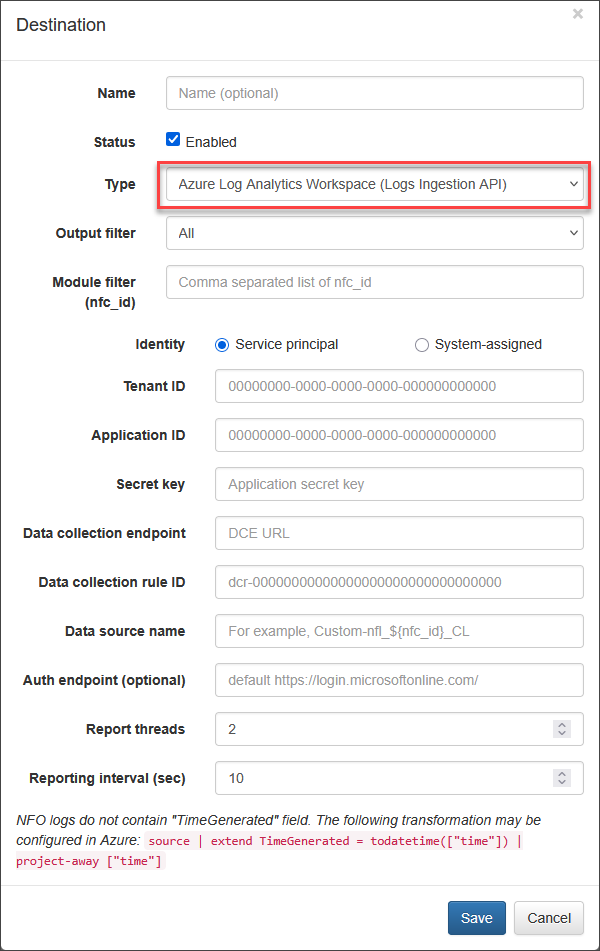
The NFO web interface requires the following parameters:
| Parameter | Description |
|---|---|
| Type | Select Azure Log Analytics Workspace (Logs Ingestion API) for logs ingestion. |
| Output filter | Change to Modules output only if you are not sending original flows to Azure. |
| Identity | Select Service principal or System-assigned identity. |
| Tenant ID | Tenant ID of the application (service principal). |
| Application ID | The application ID (service principal). |
| Secret key | The application secret key (service principal). |
| Data collection endpoint | The DCE URL, obtained from the DCE’s Overview page Logs Ingestion property value. (Azure portal > Monitor > Data Collection Endpoints > select DCE > copy Logs Ingestion) |
| Data collection rule ID | The DCR identifier, which is the immutableId field value from the DCR's JSON View (includes the dcr- suffix). (Azure portal > Monitor > Data Collection Rules > select DCR > on the Overview page click JSON View and copy the immutableId field value. DCR ID has dcr- prefix.) |
| Data source name | The data source of the DCR, usually Custom-{tableName}_CL, where {tableName} is the workspace table name. (Azure portal > Monitor > Data Collection Rules > select DCR > Data sources on the left panel > copy a value from the Data source column. If you are going to ingest logs from different modules, you may want to parametrise this field. For example, Custom-nfo_${nfc_id}_CL, where ${nfc_id} is substituted from the json message.) |
| Auth endpoint (optional) | Custom authentication endpoint (only for service principal), may be empty. |
| Report threads | Output threads count (default is 2). The number of threads allocated to send messages to DCE. |
| Reporting interval (sec) | Time interval in seconds between report threads executions (default is 10). |
| nfc_id filter | Comma-separated list of NFO Module nfc_ids to be sent to Azure (optional). |
HTTP Data Collector API (Deprecated)
This method requires the Log Analytics Workspace ID and the workspace Primary key.
| Parameter | Description |
|---|---|
| Type | Select Azure Log Analytics Workspace (Data Collector API, deprecated) for logs ingestion. |
| Output filter | Change value to Modules output only if you are not going to send original flows to Azure. |
| Workspace ID | Log Analytics workspace ID. |
| Workspace Key | Logs Analytics workspace primary key. |
| Log Type | Logs identifier in Azure (Custom Logs table name with suffix _CL automatically added). Can be a constant string or a pattern like nfo_${nfc_id}. |
| Resource ID | The resource ID of the Azure resource to assign custom logs to (optional). |
| Report threads | Output threads count (default is 2). |
| Report interval (sec) | Time interval in seconds between report threads executions (default is 10). |
| Max message size (bytes) | Maximum message size in bytes (default is 8,000,000). |
| nfc_id filter | Comma separated list of NFO Modules’ nfc_ids to be sent to Azure (optional). |