AWS VPC Flow Logs Input Configuration
Prerequisites
AWS VPC flow logs are generated by an ENI - network interface - in your VPC, whether it is attached to an EC2 instance, a service, or even to a task in AWS Forgate.
NetFlow Optimizer and EDFN support ingestion of VPC Flow Logs from both, S3 and CloudWatch. One NFO instance can ingest VPC Flow Logs from S3 for certain VPCs and at the same time receive VPC Flow Logs from CloudWatch for other VPCs in your AWS environment.
You have two choices to access AWS and ingest VPC Flow Logs: using IAM Role or using AWS account.
Configuration Steps
- Configure AWS VPC Flow Logs
- Configure AWS User and Policy
- Configure EDFN Agent for ingestion of AWS VPC Flow Logs
- Enable and Configure NFO Modules for AWS VPC Flow Logs reporting
Configure AWS VPC Flow Logs
To publish VPC Flow Logs to S3 visit: https://docs.aws.amazon.com/vpc/latest/userguide/flow-logs-s3.html.
To publish VPC Flow Logs to CloudWatch Logs visit: https://docs.aws.amazon.com/vpc/latest/userguide/flow-logs-cwl.html.
Kinesis Stream Configuration
When VPC Flow logs are stored in the CloudWatch Logs, NFO can receive them using CWL API, or, subscribe to a Kinesis stream.
There are two ways to configure logs publishing to a Kinesis stream:
- use CloudFormation or
- manually create required resources using Amazon console and CLI
CloudFormation
Logs group and Kinesis stream may be created using CloudFormation per region. Download the CloudFormation templates from here: https://nfo-ami.s3-us-west-2.amazonaws.com/2.7.0.0/NFOCwlKinesisSubscription.template
Create a stack using the template. Open the Amazon CloudFormation console https://console.aws.amazon.com/cloudformation/home and create a stack following these instructions https://docs.aws.amazon.com/AWSCloudFormation/latest/UserGuide/cfn-console-create-stack.html.
During the stack creation, the following parameters may be changed:
- CloudWatch Logs group: Logs retention period in days (default 30 days)
- Kinesis stream: Data retention period in hours (default 24 hours, min 24 hours, max 168 hours)
- Kinesis stream: Number of shards (default 1)
The CloudFormation template automatically creates the following resources:
- NFLVpcFlowLogRole- – the IAM role for publishing Flow Logs to CloudWatch Logs.
- NFLCwlToKinesisRole- – the IAM role for publishing Flow logs from CloudWatch Logs group to a Kinesis Stream.
- NFLVpcFlowLogGroup – the CloudWatch Logs group for Flow Logs.
- NFLVpcKinesisStream – Kinesis Stream.
- NFLVpcFlowLogsSubscriptionFilter – the CloudWatch Logs group NFLVpcFlowLogGroup subscription filter. All Flow Logs are published to the Kinesis Stream NFLVpcKinesisStream.
After that you only have to create VPC Flow Logs for your VPCs, subnets, or network interfaces (see https://docs.aws.amazon.com/vpc/latest/userguide/flow-logs-cwl.html#flow-logs-cwl-create-flow-log for details).
Select NFLVpcFlowLogGroup as the destination and NFLVpcFlowLogRole-<region_id> as the IAM role.
Amazon Console
If the CloudFormation template isn’t suitable for you, all these resources can be created using the Amazon console or CLI. For example, you may want to collect Flow Logs from several Amazon accounts in one Kinesis Stream and so on.
-
Create an IAM role for publishing Flow Logs to CloudWatch Logs (see https://docs.aws.amazon.com/vpc/latest/userguide/flow-logs-cwl.html#flow-logs-iam for details).
-
Create a Flow Log that publishes to CloudWatch Logs (see https://docs.aws.amazon.com/vpc/latest/userguide/flow-logs-cwl.html#flow-logs-cwl-create-flow-log for details).
-
Configure Kinesis Stream.
CloudWatch log group may be configured to publish logs to a Kinesis stream. The stream can be created using GUI, but the subscription can be created only using CLI (see Subscription Filters with Kinesis https://docs.aws.amazon.com/AmazonCloudWatch/latest/logs/SubscriptionFilters.html#DestinationKinesisExample for details). On step 7 the filter-pattern parameter may be left "" (empty string).
The EDFN agent is working as a Kinesis steam consumer, and it can be with or without Enhanced Fan-Out, see Reading Data from Amazon Kinesis Data Streams https://docs.aws.amazon.com/streams/latest/dev/building-consumers.html for details.
If you decide not to use Enhanced fan-out, you may deregister the consumer
EDFN_KINESIS_VPC_FLOW_LOG_CONSUMERmanually. To do this, please navigate to AWS console - Services - Kinesis - Data Streams, then select your stream(s), open the Enhanced fan-out tab, and deregisterEDFN_*consumer.Also, if you decide to use CloudWatch Logs API instead of Kinesis stream consumer, you may remove unused streams too.
Enhanced fan-out consumers may result in additional charges from AWS.
S3 and SQS Configuration
VPC Flow logs may be sent to an S3 bucket. For more information visit Publishing Flow Logs to Amazon S3 https://docs.aws.amazon.com/vpc/latest/userguide/flow-logs-s3.html. The EDFN agent doesn’t monitor the S3 bucket for new object creation directly. It assumes that the S3 bucket sends “s3:ObjectCreated:*” notifications to the Simple Queue Service (SQS).
EDFN agent expects that the queue account has access to “s3:GetObject” action. The S3 bucket region and SQS region must be the same.
To configure SQS:
- Sign in to the Amazon SQS console https://console.aws.amazon.com/sqs/.
- Change the region to the S3 bucket’s region.
- Choose Create New Queue.
- Enter the Queue name.
- Leave Standard queue selected.
- Choose Configure Queue.
- Change Receive Message Wait Time from 0 to 20 seconds.
- Choose Create Queue.
When the queue is created, add permission to the queue allows the S3 bucket to send messages to it:
{
 "Version": "2012-10-17",
 "Id": "QUEUE-PERMISSION-POLICY-ID",
 "Statement": [
  {
   "Sid": "STATEMENT-ID",
   "Effect": "Allow",
   "Principal": {
     "AWS": "*"
   },
   "Action": [
    "SQS:SendMessage"
   ],
   "Resource": "arn:aws:sqs:REGION:ACCOUNT-ID:QUEUE-NAME",
   "Condition": {
      "ArnLike": { "aws:SourceArn": "arn:aws:s3:*:*:BUCKET-NAME" }
   }
  }
 ]
}
When the queue permissions are configured, add S3 bucket notifications:
- Sign in to the Amazon S3 console https://console.aws.amazon.com/s3/.
- Select the bucket and choose Properties.
- Choose events and press Add notification.
- Enter the event name.
- In the Events section, select All object create events.
- Optionally enter prefix and suffix. For example, suffix may be “.log.gz”.
- Choose the SQS destination and select your queue name or enter the queue ARN. The SQS and bucket region must be the same.
- Choose Save.
Configure AWS User and Policy
You have two choices to configure EDFN Agent to access AWS and ingest VPC Flow Logs: using IAM Role or using AWS account. In both cases you need to create an AWS Permissions Policy - see below.
Using IAM Roles
Use this option if your NFO/EDFN is installed on an EC2 instance. Make sure that an appropriate IAM role is attached to the EC2 instance running EDFN. This method does not require the credentials/default region files.
Using AWS User
Use this option if your NFO/EDFN is installed on premises or outside of your AWS cloud. This method requires an access key and a secret access key in the credentials file. You also need to create a file with the default AWS Region.
AWS Permissions Policy
Create an IAM Policy to allow the EDFN Agent to access AWS resources. To create such a policy, open the IAM console, navigate to the Policies page and press the Create Policy button. Then select the JSON tab and insert the following policy:
{
    "Version": "2012-10-17",
    "Statement": [
        {
            "Sid": "EdfnMinPermissions",
            "Effect": "Allow",
            "Action": [
                "ec2:DescribeRegions",
                "ec2:DescribeInstances",
                "ec2:DescribeFlowLogs",
                "ec2:DescribeNetworkInterfaces",
                "ec2:DescribeVpcs",
                "ec2:DescribeNatGateways",
                "ec2:DescribeVpcEndpoints",
                "ec2:DescribeRouteTables",
                "ec2:DescribeVpcPeeringConnections",
                "ec2:DescribeTransitGatewayAttachments",
                "ec2:SearchTransitGatewayRoutes",
                "logs:DescribeSubscriptionFilters",
                "logs:GetLogEvents",
                "logs:DescribeLogStreams"
            ],
            "Resource": "*"
        },
        {
            "Sid": "S3Permissions",
            "Effect": "Allow",
            "Action": [
                "s3:GetBucketLocation",
                "s3:GetBucketNotification",
                "s3:GetObject",
                "sqs:GetQueueAttributes",
                "sqs:GetQueueUrl",
                "sqs:ChangeMessageVisibility*",
                "sqs:DeleteMessage*",
                "sqs:ReceiveMessage"
            ],
            "Resource": "*"
        },
        {
            "Sid": "KCLPermissions",
            "Effect": "Allow",
            "Action": [
                "cloudwatch:PutMetricData",
                "dynamodb:CreateTable",
                "dynamodb:DescribeTable",
                "dynamodb:GetItem",
                "dynamodb:PutItem",
                "dynamodb:DeleteItem",
                "dynamodb:UpdateItem",
                "dynamodb:Scan",
                "kinesis:GetRecords",
                "kinesis:GetShardIterator",
                "kinesis:ListShards",
                "kinesis:ListStreamConsumers",
                "kinesis:SubscribeToShard",
                "kinesis:DescribeStream*",
                "kinesis:RegisterStreamConsumer"
            ],
            "Resource": "*"
        }
    ]
}
IAM Roles Configuration
When EDFN is installed on the EC2 instance, AWS access can be configured using the following steps:
- Open the IAM console https://console.aws.amazon.com/iam/home.
- In the navigation pane, choose Roles, then Create New Role.
- On the Select Role Type page, under AWS Service Roles, choose Amazon EC2.
- On the Permissions page, choose the already created policy EdfnAgentPolicy from the policy list or create a new one with permissions from the previous section, then choose Next Step.
- Enter a name for the role, and then select Next Step.
- On the Review page, choose Create Role.
- Launch an Amazon EC2 instance with the IAM role that you’ve created previously:
- Open the Amazon EC2 console
- Go to the Instances page
- Select the instance, then Actions, Instance Settings, and Attach/Replace IAM Role.
NFO may collect flow logs from different accounts using the “Switch Role” action. For detailed information, visit Delegate Access Across AWS Accounts Using IAM Roles https://docs.aws.amazon.com/IAM/latest/UserGuide/tutorial_cross-account-with-roles.html. The EC2 Instance assumes the IAM role from another account and thus has access to resources in this account. The assumed role must have permissions from the EdfnAgentPolicy policy.
For example, if your NFO is installed in the account 111111111111 and the second account is 999999999999, access delegation may be configured using the following steps for account 999999999999:
- Open the IAM console: https://console.aws.amazon.com/iam/home
- In the navigation pane on the left, choose Roles and then choose Create role.
- Choose the Another AWS account role type.
- For Account ID, type first the account ID: 111111111111
- Optionally type External ID (must be unique across assumed accounts) or leave it blank.
- Choose Next: Permissions, to set the permissions that will be associated with the role.
- Select EdfnAgentPolicy.
- Then choose Next: Tags.
- Choose Next: Review and type the role name.
- After reviewing the role, choose Create role.
- Open the just created role and copy the role ARN.
After that, configure the EC2 Instance Role permission, for account 111111111111 by doing the following steps:
-
Open the IAM console: https://console.aws.amazon.com/iam/home
-
In the navigation pane on the left, choose Roles and then choose your EC2 Instance role.
-
Choose the Permissions tab and click + Add inline policy.
-
Insert the following JSON policy (don’t forget to replace role ARN):
-
Choose Review policy and then type the policy name.
{
    "Version": "2012-10-17",
    "Statement": {
        "Effect": "Allow",
        "Action": "sts:AssumeRole",
        "Resource": "arn:aws:iam::999999999999:role/YourRoleName"
    }
} -
After reviewing the policy, choose Create policy.
After that, the EC2 instance role in the account 111111111111 has access to some of account’s 999999999999 resources. You only have to add the assumed role ARN, and optionally, external ID to the EDFN agent’s “IAM Roles” configuration list.
After that, the EC2 instance role in the account 111111111111 has access to some of account’s 999999999999 resources. You only have to add the assumed role ARN, and optionally, external ID to the EDFN agent’s “IAM Roles” configuration list.
IAM User Configuration
This section describes configuration, if your AWS environment is accessed using IAM user.
Create one IAM User per AWS account and attach the policy EdfnAgentPolicy created from the previous section (see Sign up for AWS and Create an IAM User https://docs.aws.amazon.com/sdk-for-java/v2/developer-guide/signup-create-iam-user.html for details).
Configure EDFN Agent
When you click on Amazon VPC Flow Logs in NFO Input summary panel you will be presented with the the following configuration screen.
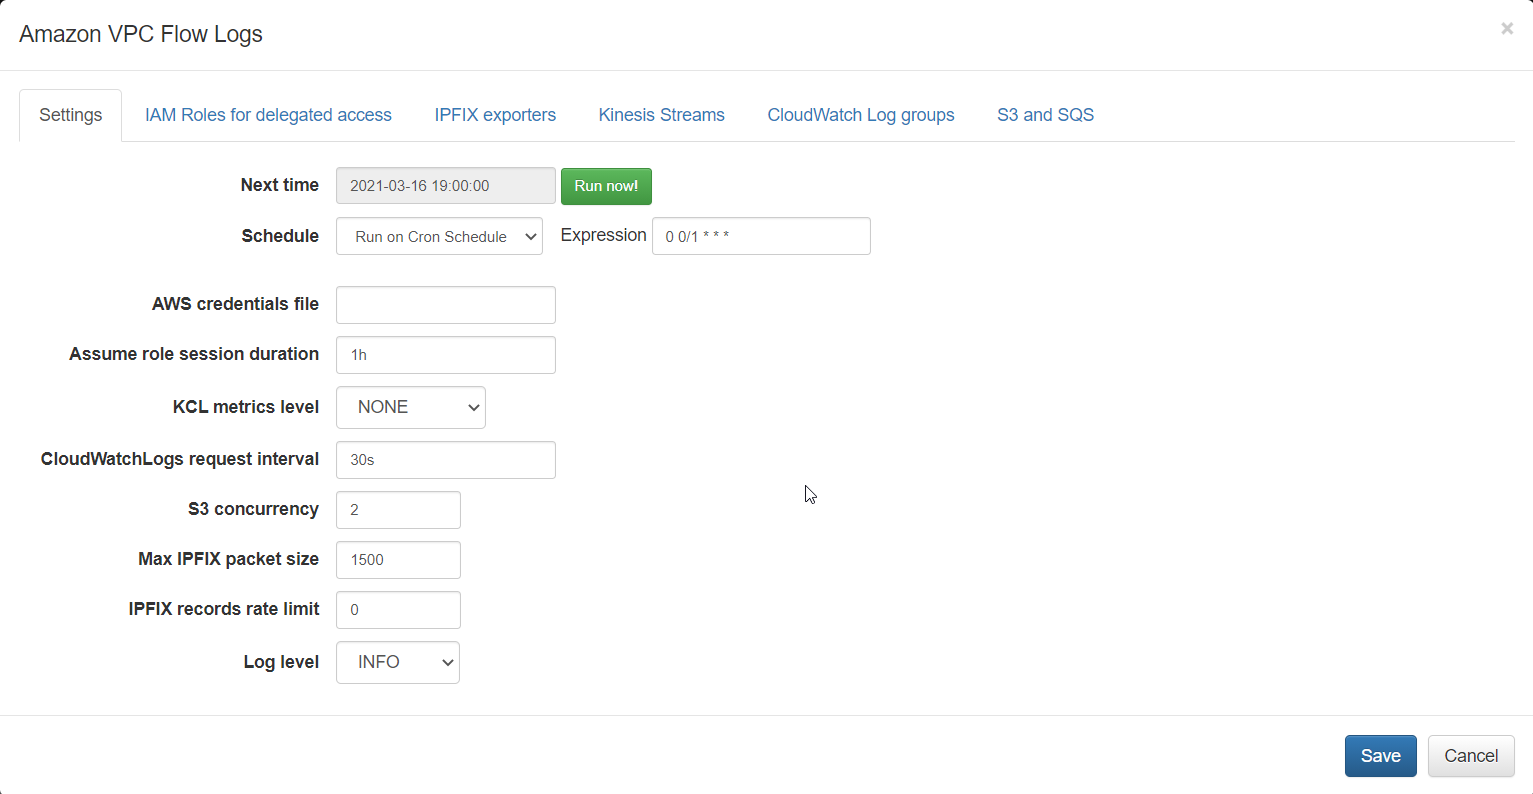
On this screen you can configure the following parameters:
Cron Schedule
NFO AWS VPC Flow Logs processing includes data enrichment with fields such as EC2 instance names, VPC names, Regions, Services, etc. This information is updated on cron schedule set here.
AWS Credentials File
There are two alternative ways to access your AWS accounts where VPC Flow Logs are configured: AWS Credentials and IAM Roles. Set path to AWS Credentials file, if you use this method to access your AWS environments. If you use IAM Roles, leave it blank.
Assume Role Session Duration
Set this parameter is you use IAM Role method to access your AWS environment. The EDFN agent uses temporary credentials for AWS access. By default, the AWS temporary session has a one hour duration. If all delegated roles have a longer or shorter session duration, you can set this parameter value from 15 minutes to 12 hours.
KCL metrics level
Set this parameter (Kinesis Client Library metrics level) to SUMMARY or DETAILED to investigate Kinesis Stream processing problems. For more information, visit Monitoring the Kinesis Client Library with Amazon CloudWatch (https://docs.aws.amazon.com/streams/latest/dev/monitoring-with-kcl.html).
CloudWatch Logs request interval
By default, VPC Flow Logs are requested every 30 seconds. Set this parameter to a frequency you want. Valid values are from 1 second to 1 day.
S3 concurrency
This parameter is used when VPC Flow Logs are ingested from S3. It may be increased (default = 2), when S3 objects are processed too slowly. This can be verified in your AWS on queue monitoring panel (SQS console – select queue – choose Monitoring tab).
Max IPFIX packet size
This is NFO internal parameter – maximum IPFIX UDP message size. It is expected to be less or equals to MTU. When NFO and EDFN are installed on the same host, the parameter may be increased up to 3900 to increase processing speed.
IPFIX records rate limit
This is NFO internal parameter – maximum IPFIX records per second. Default value 0 (means unlimited). If you see NFO server dropped messages (NetFlow Optimizer -> Status), this parameter could be set to another value, for example, 10000 records per second.
Set Access to your AWS Accounts
There are two alternative ways to access your AWS accounts where VPC Flow Logs are configured.
1. AWS Credentials
Use this method if you have a list of independent AWS accounts. Create an AWS credentials file, e.g. credentials. It should be placed on the machine where EDFN is installed. Use the IAM User public and secret access key to create a file as follows:
[account_1]
aws_access_key_id = your_access_key_id
aws_secret_access_key = your_secret_access_key
..........
[account_N]
aws_access_key_id = your_access_key_id
aws_secret_access_key = your_secret_access_key
Change file permissions to read only for root user (if EDFN is running as root): chmod 400 credentials. The Agent reads the file and takes all profiles from it. The Agent expects that each account has only one profile.
Set path to this file, for example: /root/.aws/credentials
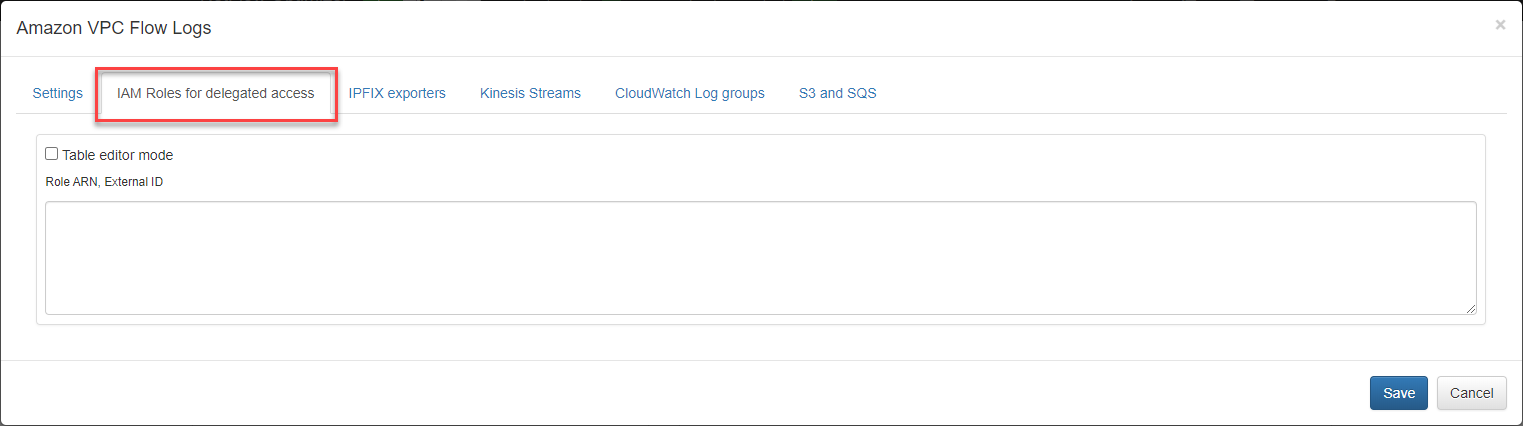
2. IAM Role
Use this method if you create IAM Role to delegate access across AWS accounts. See https://docs.aws.amazon.com/IAM/latest/UserGuide/tutorial_cross-account-with-roles.html for details.
Create a list of your ARNs and optionally External IDs as follows:
arn:aws:iam::999999999999:role/Role1,
arn:aws:iam::999999999998:role/Role1,
arn:aws:iam::999999999997:role/Role2,externalID-2
and enter it here (NOTE: do not enter ARN assigned to NFO instance):
AWS Region Configuration
When the EDFN is installed on an EC2 Instance, you can skip this section.
The EDNF agent monitors all available regions to gather information about your EC2 instances and VPCs. To retrieve the account ID and list of available regions, the agent makes API calls using “default” region.
{% hint style="danger" %} When EDNF is installed outside of Amazon, the default region must be configured! {% endhint %}
Set the AWS Region in the AWS config file on your local system, located at:
~/.aws/configon Linux, macOS, or UnixC:\Windows\System32\config\systemprofile\.aws\configon Windows
This file should contain lines in the following format:
[default]
region = your_aws_region
Substitute your desired AWS Region (for example, “us-west-2”) for your_aws_region.
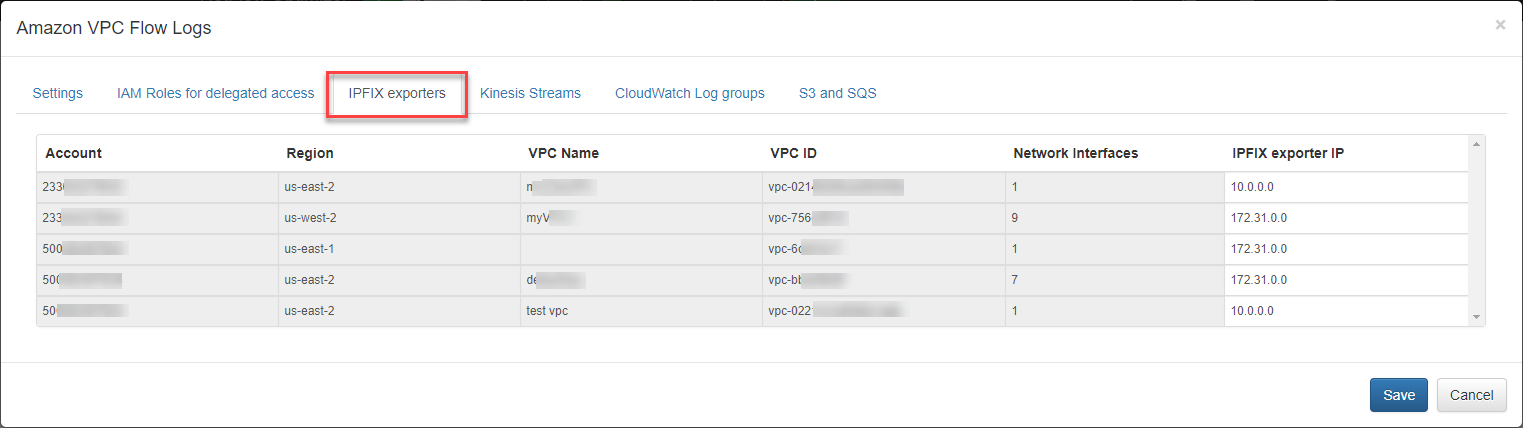
Verify AWS Access and Set IPFIX Exporters
Press the “Run now” button to retrieve the list of accounts and associated VPCs (IPFIX exporters section), Kinesis Streams, CloudWatch Log groups, and S3 buckets (with associated queues).
Open the IPFIX Exporters section to review and assign an exporter IP to each VPC. This IP will be reported as exp_ip= field in syslogs. It is used for compatibility with physical network device *flow reporting in visualizations and alerting.
Enable VPC Flow Logs Input
Depending on your AWS VPC Flow Logs collection, you can enable one or more of the following configurations.
Please note that to avoid duplicate VPC Flow logs ingestion, the EDFN Agent for each VPC will use Kinesis Stream, if configured, before attempting to get logs from the CloudWatch Log group.
Kinesis Streams
Open the Kinesis Streams section to enable VPC Flow logs ingestion using Kinesis Streams. Set Enhanced Fan-Out option, if necessary.
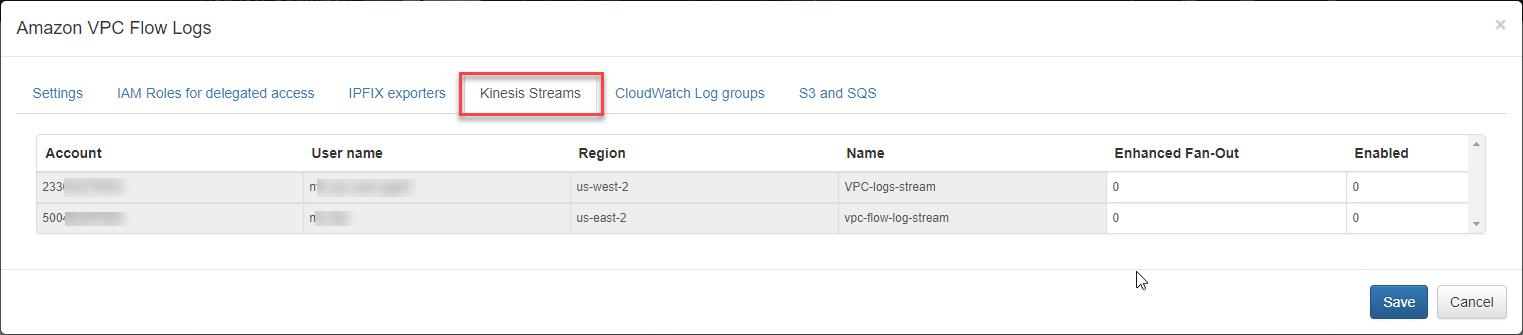
To investigate Kinesis Stream processing problems, change the parameter “KCL metrics level” – Kinesis Client Library metrics level: valid values are NONE, SUMMARY and DETAILED. For more information, visit Monitoring the Kinesis Client Library with Amazon CloudWatch (https://docs.aws.amazon.com/streams/latest/dev/monitoring-with-kcl.html).
CloudWatch Log Groups
Open the CloudWatch Log groups to enable VPC Flow logs ingestion using the CloudWatch API.
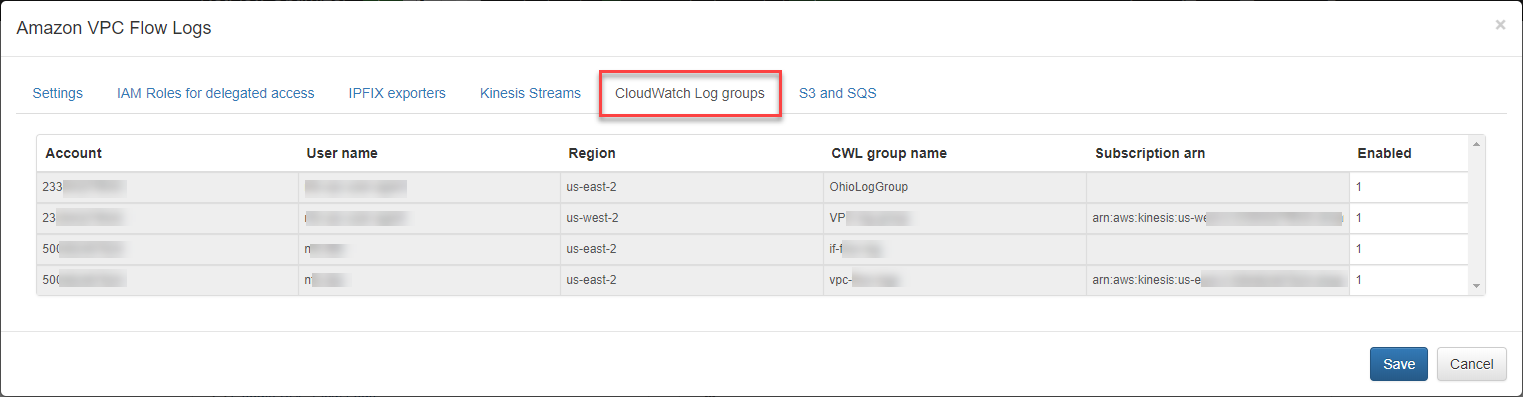
By default, VPC Flow Logs are requested every 30 seconds according to the “CloudWatchLogs request interval” parameter.
S3 and SQS
Open the “S3 and SQS” section to enable reading VPC Flow Logs from S3 using SQS messages notifications.
