Microsoft Azure NSG Flow Logs Input Configuration
Prerequisites
Azure flow logs are generated by Network Security Group (NSG). NSG can be assigned to a Virtual Network subnet or to an interface. Flow logs are stored within a storage account blob container: insights-logs-networksecuritygroupflowevent.
There are two versions of NSG flow logs. We recommend using flow logs version 2, because it contains bytes and packets. If you use version 1, but bytes and packets information will be missing.
For more information on NSG Flow Logs, visit https://docs.microsoft.com/en-us/azure/network-watcher/network-watcher-nsg-flow-logging-overview.
NSG flow log requires an Azure Storage account to store the flow logs.
To access and ingest NSG flow logs you need one of the following:
- Service principal identity
- System-assigned managed identity
Configuration Steps
- Configure NSG Flow Logs
- Configure EDFN Agent for ingestion of Azure NSG Flow Logs
- Enable and Configure NFO Modules for Azure NSG Flow Logs reporting
NSG Flow Logs configuration
For detailed instruction about NSG flow logs configuration visit following link: https://docs.microsoft.com/en-us/azure/network-watcher/network-watcher-nsg-flow-logging-portal.
Enable Network Watcher
- Open the Azure portal
- In the search box, enter Network Watcher. When Network Watcher appears in the results, select it
- From the list of subscriptions, select the subscription you want to enable the Network Watcher for. Then expand regions
- Select a region and click on the “…” to the right of the region
- Select Enable Network Watcher
Register Insights provider
- Open the Azure portal
- In the search box, enter Subscriptions. When Subscriptions appears in the results, select it
- From the list of subscriptions, select the subscription you want to enable the provider for
- Select Resource providers, under the Settings group in the left panel
- Confirm that the Status for the microsoft.insights provider is Registered. If the status is Unregistered, then select the provider and click on Register button
Storage account creation
NSG flow log data is written to an Azure Storage account. You must use StorageV2 (general purpose v2) account type.
- Open the Azure portal
- Select “+ Create a resource” at the top left corner of the portal
- Select Storage in the left panel and then Storage account
- Select the subscription, the resource group, enter the storage account name and select the region. The storage account must be in the same region as the NSG
- Select Account kind: StorageV2 (general purpose v2)
- Select a replication strategy that matches your durability requirements
- Press “Review and create” button and then “Create”
Enable NSG flow logs
- Open the Azure portal
- Navigate to Network Watcher
- Select NSG flow logs under logs group in the left panel
- From the list of NSGs, select the NSG name you want to configure flow logs for
- Switch flow logs status from Off to On
- Select flow logs version 2
- Select the storage account you’ve previously created
- Optionally you can set flow logs Retention (days) parameter
- Save settings
Storage Queue Configuration
In the previous section you’ve created the Storage Account and configure NSG flow logs. Flow logs can be found here: Azure portal -> Storage Accounts -> select the account name -> Containers, under the Blob service group in the left panel -> insights-logs-networksecuritygroupflowevent container.
Flow logs are written into a Blob Block resource. For each VM interface a separate blob is created. Blobs are rotated every hour, but blocks with NSG flow logs are committed more often. NFO doesn’t monitor a new block uploaded directly. You have to configure a Storage Queue in the same Storage account to receive events about a new block committed.
- Open the Azure portal
- Navigate to Storage accounts
- From the list of accounts, select the storage account you’ve created earlier for NSG Flow logs
- Create Storage Queue. Important: NSG flow logs container and queue must be in the same storage account
- Select Queues, under the Queue service group in the left panel
- For queue creation select “+ Queue” and enter the queue name
- Select “OK” to save the queue
- Then create the storage account event subscription:
- Select Events in the left panel and click on "+Event Subscription"
- EVENT SUBSCRIPTION DETAILS section. Enter the subscription name
- EVENT TYPES section. Filter to Event Types: Blob created
- ENDPOINT DETAILS section. Endpoint Type: Storage Queues
- ENDPOINT DETAILS section. Endpoint: Select an endpoint. Select the queue you’ve already created. The queue must be in the same storage account
- (Optionally) If the storage account is used not only for flow logs (contains containers other than insights-logs-networksecuritygroupflowevent), you have to configure filters
- Navigate to the Filter section
- Select “Enable subject filtering” checkbox
- Enter Subject Begins With: /blobServices/default/containers/insights-logs-networksecuritygroupflowevent/
- Enter Subject Ends With: .json
- Choose “Create” to save the event subscription
After these configuration steps, when a new blob block with NSG flow logs is committed, a notification message is pushed into the Storage Queue. NFO receives this message, reads flow logs from the block and deletes the message.
Authentication and Access control (IAM) configuration
NFO requires access to the Azure Resource Manager and to the Storage Account for NSG Flow Logs processing. There are two choices how this access can be configured.
- Using service principal identity - Use this option if your EDFN is installed on premises or outside of Azure. This method requires a secret access key, client ID, subscription and tenant in the credentials file
- Using system-assigned managed identity - Use this option if your EDFN is installed on an Azure Virtual Machine resource. This method does not require the credentials file.
For more details please visit https://docs.microsoft.com/en-us/azure/active-directory/managed-identities-azure-resources/overview
Service principal identity authentication
An Azure service principal is an identity created for use with applications. The EDFN agent uses this service principal for Azure resources access. Do following steps for the service principal authentication.
- Open the Azure portal
- Navigate to Azure Active Directory and select App registrations under the Mange section in the left panel
- Select “+ New registration“
- Enter Name, for example, edfn-agent
- Select “Register” to save the application. You will be navigated to the application overview page
- Select “Certificates & secrets” in the left panel
- Select “+ New client secret” and enter a name for the secret
- Select “Save” and copy the secret key value - you will need it for the service principal credentials file
Create an Azure credentials file, e.g. sp.properties as follows:
subscription=########-####-####-####-############
client=########-####-####-####-############
key=XXXXXXXXXXXXXXXX
tenant=########-####-####-####-############
managementURI=https://management.core.windows.net/
baseURL=https://management.azure.com/
authURL=https://login.microsoftonline.com/
graphURL=https://graph.windows.net/
Properties for this file may be copied from the application overview page:
- client – Application (client) ID
- tenant – Directory (tenant) ID
- key – client secret string value
- subscription – navigate to Subscriptions and copy value from the Subscription ID column. This will be the default subscription
If you have other subscriptions you want to monitor you have to give a read access to all of them it as follows:
- Navigate to Subscriptions
- From the list of subscriptions, select the subscription to be configured
- Select Access control (IAM) in the left panel
- Select “+ Add” and choose Add role assignment
- In the “Role” dropdown, choose Reader
- Leave unchanged the “Assign access to” dropdown (Azure AD user, group, or service principal)
- Enter the service principal name in the Select field (for example, ednf-agent). When the service principal appears in the results, select it
- Click “Save”
Repeat these steps for each subscription to be monitored.
The file should be placed on the machine where EDFN is installed, for example /root/.azure/sp.properties.
Change file permissions to read only for root user (if EDFN is running as root): chmod 400 sp.properties.
Storage account access for Service principal authentication
Even though EDFN may be authenticated with the “Storage account access key”, we recommend using AD authentication. The Virtual machine must have Storage Blob Data Reader and Storage Queue Data Message Processor roles to access storage account container and queue.
- Navigate to your storage account
- Select Access control (IAM) in the left panel
- Select “+ Add” and choose Add role assignment
- In the “Role” dropdown, choose Storage Blob Data Reader
- Leave unchanged the “Assign access to” dropdown (Azure AD user, group, or service principal)
- Enter the service principal name in the Select field (for example, ednf-agent). When the service principal appears in the results, select it
- Click “Save”
- Repeat steps 3-7, on the step 4 select role Storage Queue Data Message Processor
After these steps the storage container and the storage queue are processed without an access key.
System-assigned managed identity authentication
For enabling system-assigned managed identity on the EDFN installation VM read the following instruction: https://docs.microsoft.com/en-us/azure/active-directory/managed-identities-azure-resources/qs-configure-portal-windows-vm#enable-system-assigned-managed-identity-on-an-existing-vm
- Open the Azure portal
- Navigate to Virtual machines
- From the list of VMs, select the VM, where EDFN is installed
- Select Identity, under the Settings group in the left panel
- Under the System assigned tab, Status, select On and then click Save
- Confirm enable the system assigned managed identity for the VM
After system-assigned managed identity is enabled, configure VM access to a subscription.
- Navigate to Subscriptions
- From the list of subscriptions, select the subscription to be configured
- Select Access control (IAM) in the left panel
- Select “+ Add” and choose Add role assignment
- In the “Role” dropdown, choose Reader
- In the “Assign access to” dropdown, choose Virtual Machine
- In the “Subscription” dropdown, choose the subscription, where VM is placed
- Search and select the VM
- Click “Save”
Repeat previous steps for each subscription to be monitored.
Storage account access for System-assigned managed identity authentication
Even though EDFN may be authenticated with the “Storage account access key”, we recommend using AD authentication. The Virtual machine must have Storage Blob Data Reader and Storage Queue Data Message Processor roles to access storage account container and queue. Instruction how to configure managed identity access is available here: https://docs.microsoft.com/en-us/azure/active-directory/managed-identities-azure-resources/tutorial-linux-vm-access-storage#grant-your-vm-access-to-an-azure-storage-container.
- Navigate to your storage account
- Select Access control (IAM) in the left panel
- Select “+ Add” and choose Add role assignment
- In the “Role” dropdown, choose Storage Blob Data Reader
- In the “Assign access to” dropdown, choose Virtual Machine
- In the “Subscription” dropdown, choose the subscription, where VM is placed
- Search and select the VM
- Click “Save”
- Repeat steps 3-8, on the step 4 select role Storage Queue Data Message Processor
After these steps the storage container and the storage queue are processed without an access key.
Configure EDFN Agent
When you click on Microsoft Azure NSG Flow Logs in NFO Inputs page you will be presented with the the following configuration screen.
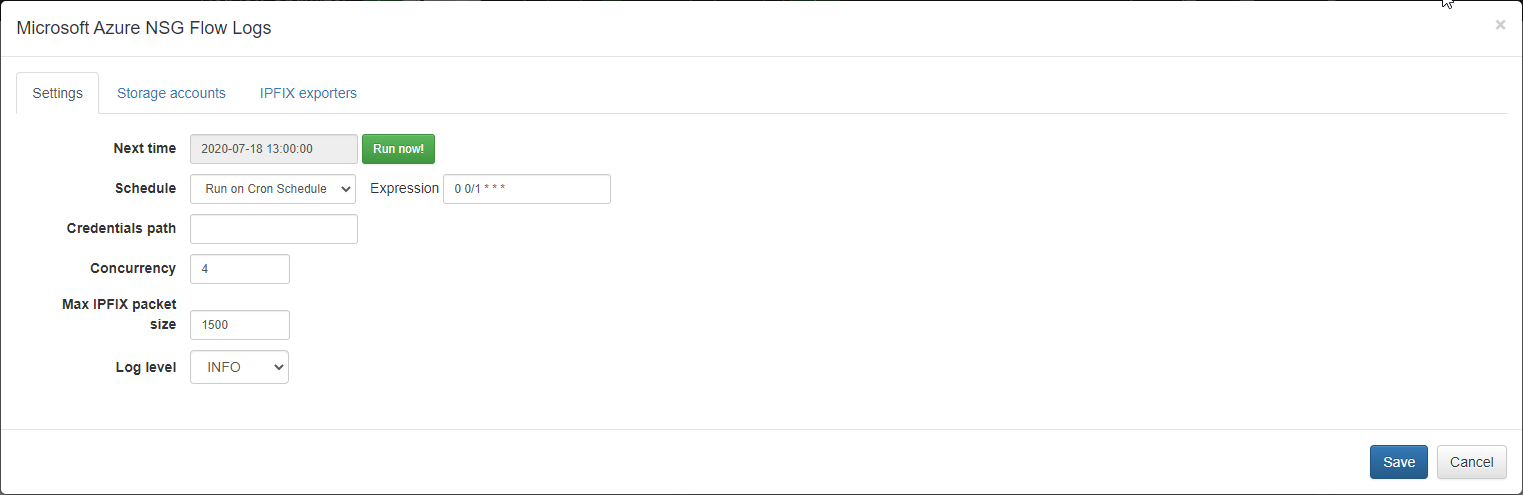
On this screen you can configure the following parameters:
Cron Schedule
NFO Azure NSG Flow Logs processing includes data enrichment with fields such as VM names, Subscription names, NSG names, Subnet names, Regions, etc. This information is updated on cron schedule set here.
Credentials path
Path, including file name, to service principal credentials file created before, e.g. /root/.azure/sp.properties
There are two alternative ways to access your Azure directory where NSG Flow Logs are configured: service principal or system-assigned managed identity. Set path to Azure service principal credentials file, if you use this method to access your Azure environments. If you use system-assigned managed identity, leave it blank.
Concurrency
The number of parallel message processors. Increase this value when blobs are consumed too slowly. Decrease this value, when NFO Server drops some input flows.
Max IPFIX packet size
This is NFO internal parameter – maximum IPFIX UDP message size. It is expected to be less or equals to MTU. When NFO and EDFN are installed on the same host, the parameter may be increased up to 3900 to increase processing speed.
Storage accounts
Open Storage accounts section to authorize access to NSG Flow logs in Azure Storage.
Storage account name and Queue name are required. Access key is optional if you use AD authentication (service principal or system-assigned managed identity) for storage account access.
The storage account has two access keys, please use the first one. The second key can be used during first key regeneration. Access keys are available on Storage account page -> Access keys in the left panel.
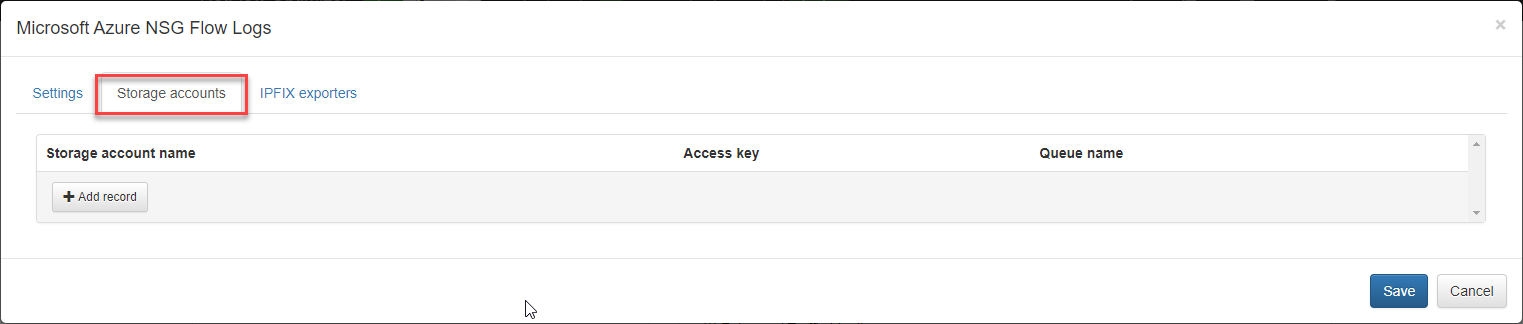
Enter Storage account name, Access key, if needed, and Queue name. Press "Save".
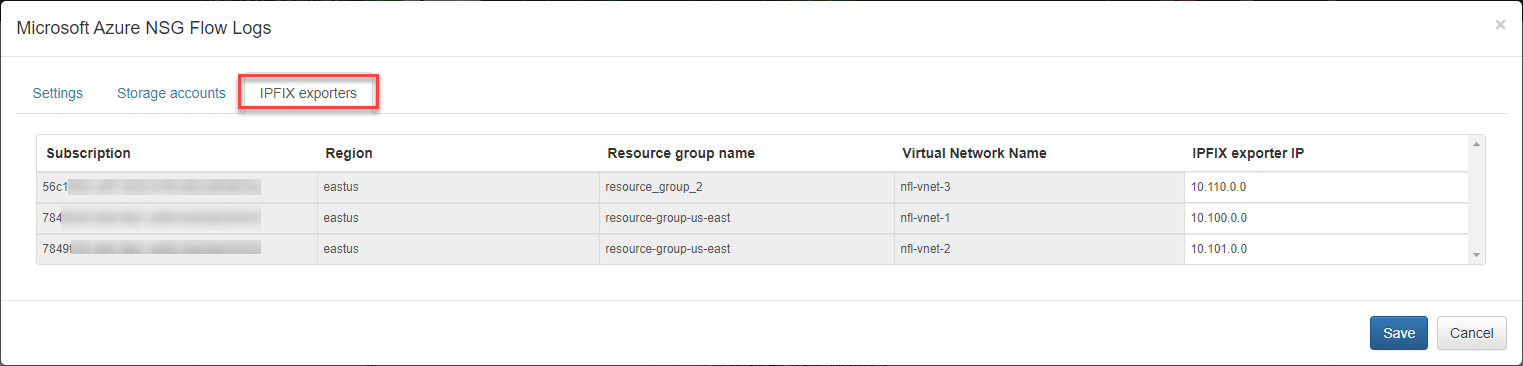
Verify Azure Access and Set IPFIX Exporters
Press the “Run now” button to retrieve the list of subscriptions and associated virtual network names (IPFIX exporters section). This action will close the input configuration. It may take from several seconds to a few minutes to retrieve the list.
Open the IPFIX Exporters section to review and assign an exporter IP to each Virtual Network Name. This IP will be reported as exp_ip= field in syslogs. It is used for compatibility with physical network device *flow reporting in visualizations and alerting.