Configuring Custom Threat List
Enriching flow data with threat lists enhances threat detection capabilities, empowering organizations to swiftly identify and mitigate potential security risks. By integrating threat intelligence into flow data, such as known malicious IP addresses or domains, organizations can proactively detect suspicious activities and block malicious traffic in real-time. This enrichment provides security teams with valuable context for analyzing network traffic, enabling them to prioritize alerts, investigate incidents efficiently, and respond effectively to security threats. Ultimately, integrating threat lists into flow data streamlines security operations, strengthens threat detection capabilities, and fortifies the overall security posture of the network environment.
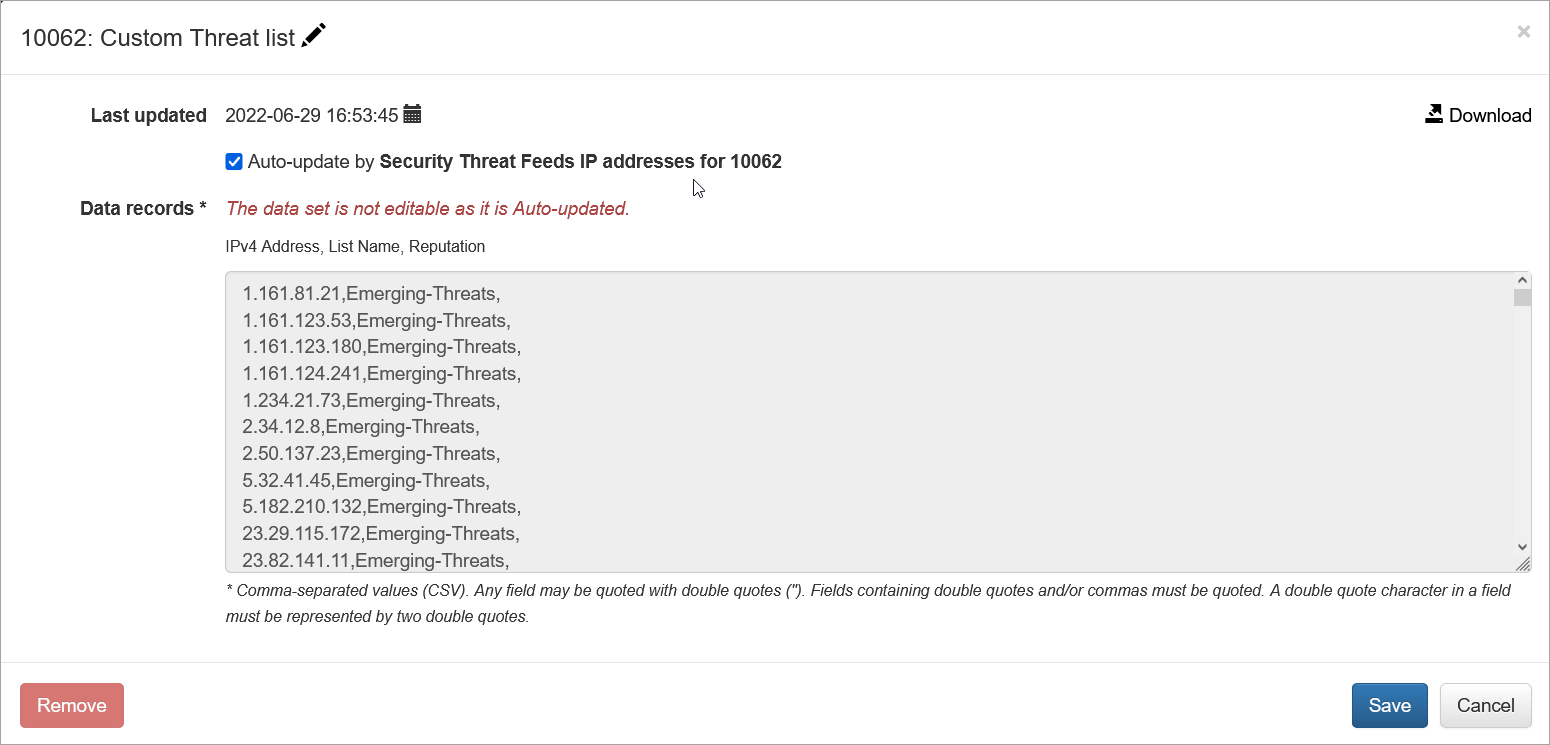
Custom Threat List is a lookup database with the following fields:
- IP address
- List name
- Reputation
Where
- IP address is provided by a threat list vendor or, for lists with malicious domain names (currently supported from AlienVault OTX), determined by NFO using reverse-DNS lookup
- List name is the name of the list specified in configuration
- Reputation is provided by a threat list vendor or, for lists with malicious domain names (currently supported from AlienVault OTX), set by NFO using malicious domain name provided by the list vendor
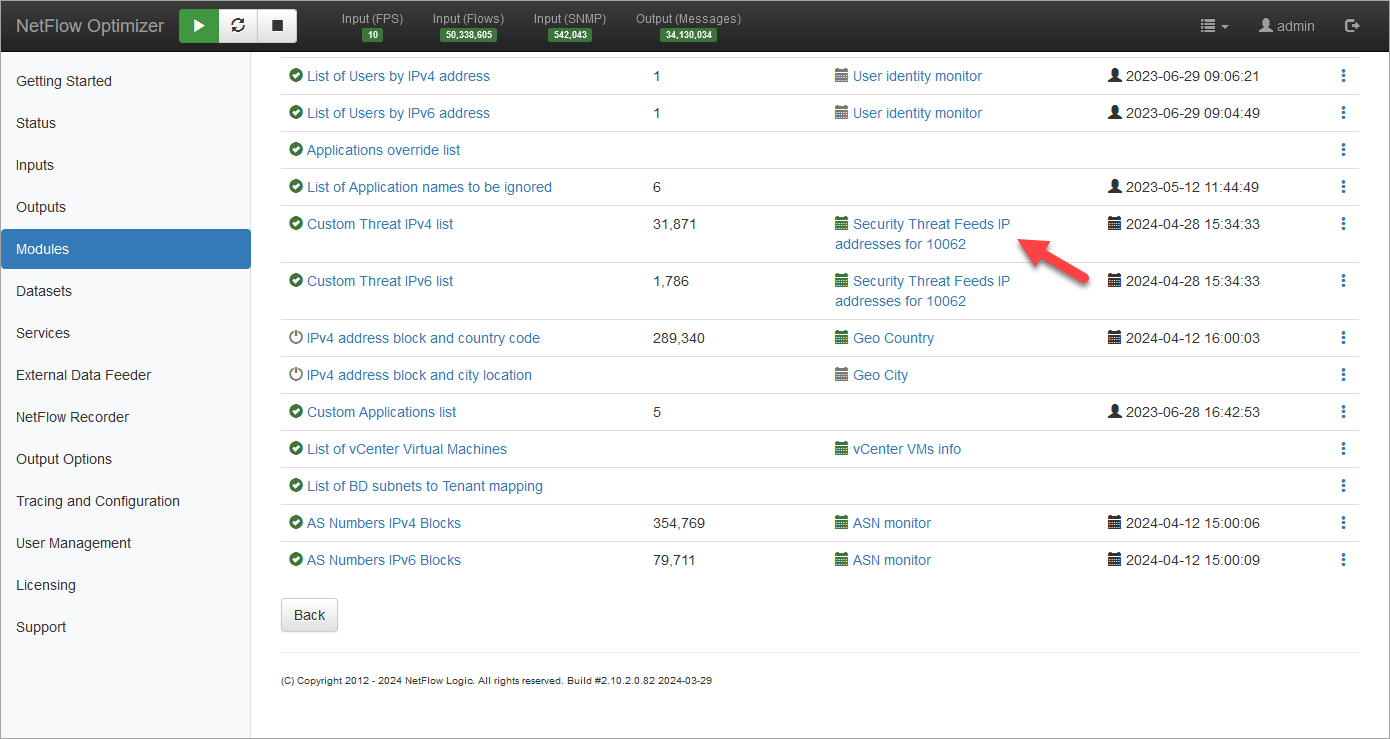
To configure integration with threat lists, on the left navigation bar select Modules, open Network Conversations Monitor set by clicking on ..., and click on Module configuration 10062: Network Conversations Monitor. Scroll down to EDFN Agent Security Threat Feeds IP addresses and click on it.
Settings Tab
You will be presented with the following configuration screen.
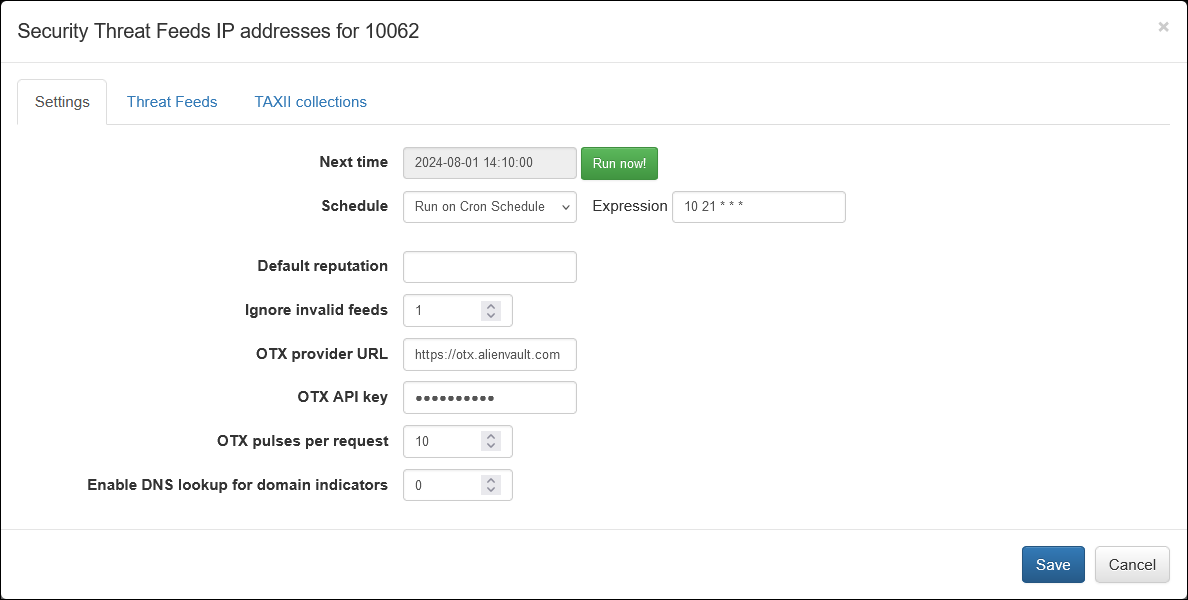
On this screen you can configure the following parameters:
Cron Schedule
All threat lists are updated on cron schedule set here.
Default Reputation
If Reputation is not provided by a threat list vendot, you can set default string here.
The following fields are used for configuration with AlienVault OTX
Ignore Invalid Feeds
If set to 1, AlienVault feeds not containing IP addresses or domain names will be ignored and not imported
OTX Provider URL
AlienVault OTX URL. Default is https://otx.alienvault.com
OTX API key
Your OTX API for OTX Pulses subscription.
All Pulses in your subscription will be imported!
OTX Pulses per Request
Set how manu pulses to import in one iterration. Default is 10.
Enable DNS lookup for OTX Domain indicators
If enabled, NFO will issue reverse DNS lookup to get IP address of malicious domains. Default is 0 (disabled)
Threat Feeds Tab
Select the next tab and configure threat feeds. Threat feeds could point to a public external source (https://...) or to a private feed converted to a file containing IP addresses and reputation (file:///path...):
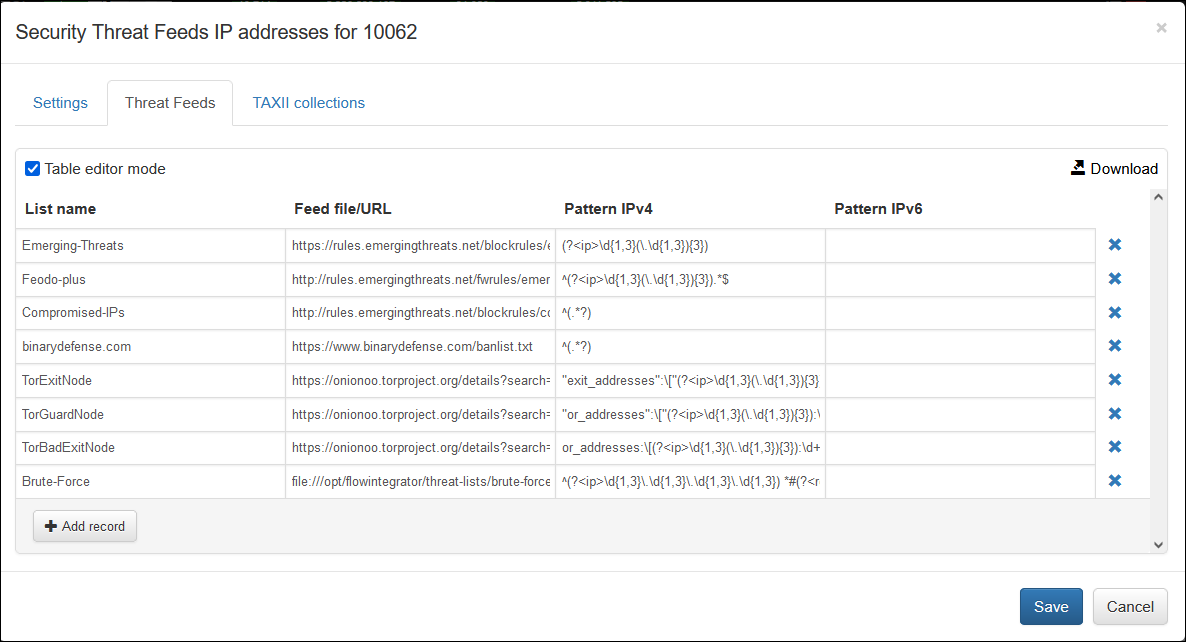
You can add as many feeds as you need by specifying the following:
- List Name
- Feed file/URL
- Pattern IPv4
- Pattern IPv6
Where:
- List name is the name of the list, reported in
threat_list_namefield - Feed file/URL is a pointer to file or URL
- Pattern IPv4 is a regex expression to extract IPv4 address and Reputation fields from the list
- Pattern IPv6 is a regex expression to extract IPv6 address and Reputation fields from the list
Pattern definition:
- Empty pattern: identifies all IP addresses in a feed.
- Line pattern: identifies all IP addresses in matched lines. For instance, the pattern "^.+&" matches all non-empty lines, while the pattern "^deny.*$" matches all lines starting with the word "deny".
- Pattern with "ip" and "reputation" named-capturing groups: IP addresses and reputations are extracted from the respective capturing groups. If pattern contains only "ip" group, the reputation is set to default value.
The capturing group has the following construct: (?<name>P) – where name may be "ip" or "reputation" and P is a regular expression.
For example:
^(?<ip>\d{1,3}\.\d{1,3}\.\d{1,3}\.\d{1,3}) *#(?<reputation>.*)$
extracts IP and reputation from lines like "<ip> #<reputation>".
(?<ip>\d{1,3}\.\d{1,3}\.\d{1,3}\.\d{1,3}),(?<reputation>[^;]*)(;|$)
matches lines containing several IP-reputation pairs separated by semicolons: "<ip>,<reputation>;<ip>,<reputation>;"...
(?<ip>(([0-9A-Fa-f]{1,4}(:[0-9A-Fa-f]{1,4}){7})|((([0-9A-Fa-f]{1,4})(:[0-9A-Fa-f]{1,4}){0,6})?::(([0-9A-Fa-f]{1,4})(:[0-9A-Fa-f]{1,4}){0,6})?)))
extracts IPv6 addresses.
You can use Table editor mode or CSV. Here is an example from above in CSV format:
Emerging-Threats,https://rules.emergingthreats.net/blockrules/emerging-botcc.rules,"(?<ip>\d{1,3}(\.\d{1,3}){3})",
Feodo-plus,http://rules.emergingthreats.net/fwrules/emerging-Block-IPs.txt,"^(?<ip>\d{1,3}(\.\d{1,3}){3}).*$",
Compromised-IPs,http://rules.emergingthreats.net/blockrules/compromised-ips.txt,^(.*?),
binarydefense.com,https://www.binarydefense.com/banlist.txt,^(.*?),
TorExitNode,https://onionoo.torproject.org/details?search=running:true%20flag:Exit,"""exit_addresses"":\[""(?<ip>\d{1,3}(\.\d{1,3}){3})""",
TorGuardNode,https://onionoo.torproject.org/details?search=running:true%20flag:Guard,"""or_addresses"":\[""(?<ip>\d{1,3}(\.\d{1,3}){3}):\d+""",
TorBadExitNode,https://onionoo.torproject.org/details?search=running:true%20flag:BadExit,"or_addresses:\[(?<ip>\d{1,3}(\.\d{1,3}){3}):\d+",
Brute-Force,file:///opt/flowintegrator/threat-lists/brute-force.txt,"^(?<ip>\d{1,3}\.\d{1,3}\.\d{1,3}\.\d{1,3}) *#(?<reputation>.*)$",
Here is an example of a file, brute-force.txt, containing IP addresses and reputation:
1.2.252.3#Brute-Force
1.6.2.217#Brute-Force
1.14.67.10#Brute-Force
1.15.84.49#Brute-Force
1.24.78.236#Brute-Force
1.34.127.180#Brute-Force
1.55.33.205#Brute-Force
1.83.125.109#Brute-Force
...
TAXII Collections Tab
The EDFN agent can request a TAXII 2.1 collection endpoint and extract STIX 2 cyber-observable objects from it. The supported objects include ipv4-addr, ipv6-addr, hostname, and domain-name. The agent can process observable objects or extract values from Indicator object patterns, supporting only the “stix” pattern type.
Official STIX and TAXII documentation is available here: https://oasis-open.github.io/cti-documentation/
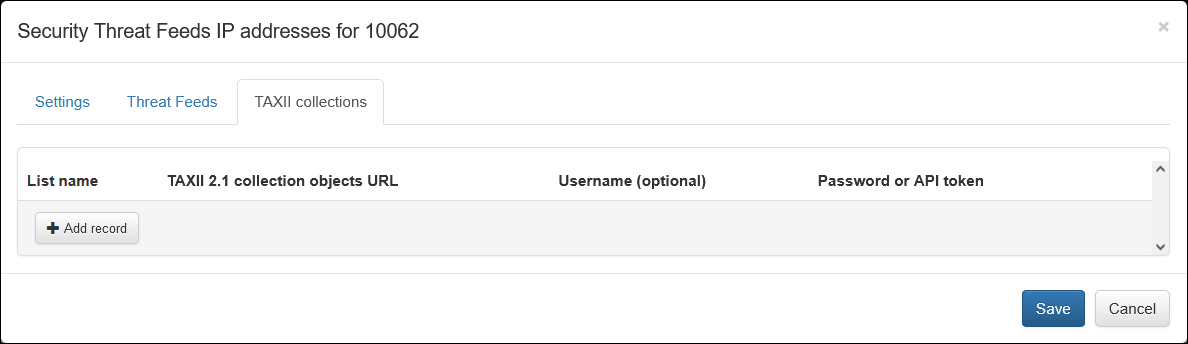
You can add as many TAXII collections as you need by specifying the following:
- List Name
- TAXII 2.1 collection objects URL
- Username
- Password or API token
Where:
-
List name: The name of the list, reported in threat_list_name field.
-
TAXII 2.1 collection objects URL: An endpoint for the TAXII envelope resource, which is a simple wrapper for STIX 2 content. The URL format is:
https://{host}/taxii2/{api-root}/collections/{id}/objects.The URL may have query parameters like limit and type, for instance,
?limit=100&match[type]=indicator. -
Username: A username for basic authorization. It may be empty in the case of bearer authorization or when the URL is available without authorization.
-
Password: A password for basic authorization or an API key for bearer authorization.
Verifying Configuration
When configuration is completed, save it, then open again and press green Run now button. You should see the list and timestamp updated:

Click on Custom Threat IPv4 list to view the list. You can also download it from here: