Configuring User Identity Enrichment
Integrating user identity data into flow data enriches the information available for analysis, expediting incident investigations and enhancing overall security measures. By enriching flow data with user identity details, such as username, organizations can swiftly identify suspicious activities, detect unauthorized access, and respond promptly to security incidents. This enrichment enables security teams to gain deeper insights into network behavior and user interactions, ultimately reducing the time required for incident response and bolstering the overall security posture of the network environment.
User identity is provided by EDFN agent User identity monitor and It builds two lookup lists:
- IPv4, idp, username
- IPv6, idp, username
Where
- idp is identity provider that reported IP address and username
- IPv4 is IP address from which the user logged on
- username is the name of the user or account name reported by identity provider
In this release the agent supports the following methods:
- Integration with Active Directory Domain Controller
- Integration with Microsoft Entra ID
- Integration with Okta
- Integration with any identity management system reporting login/logout events via syslog
Configuration Steps
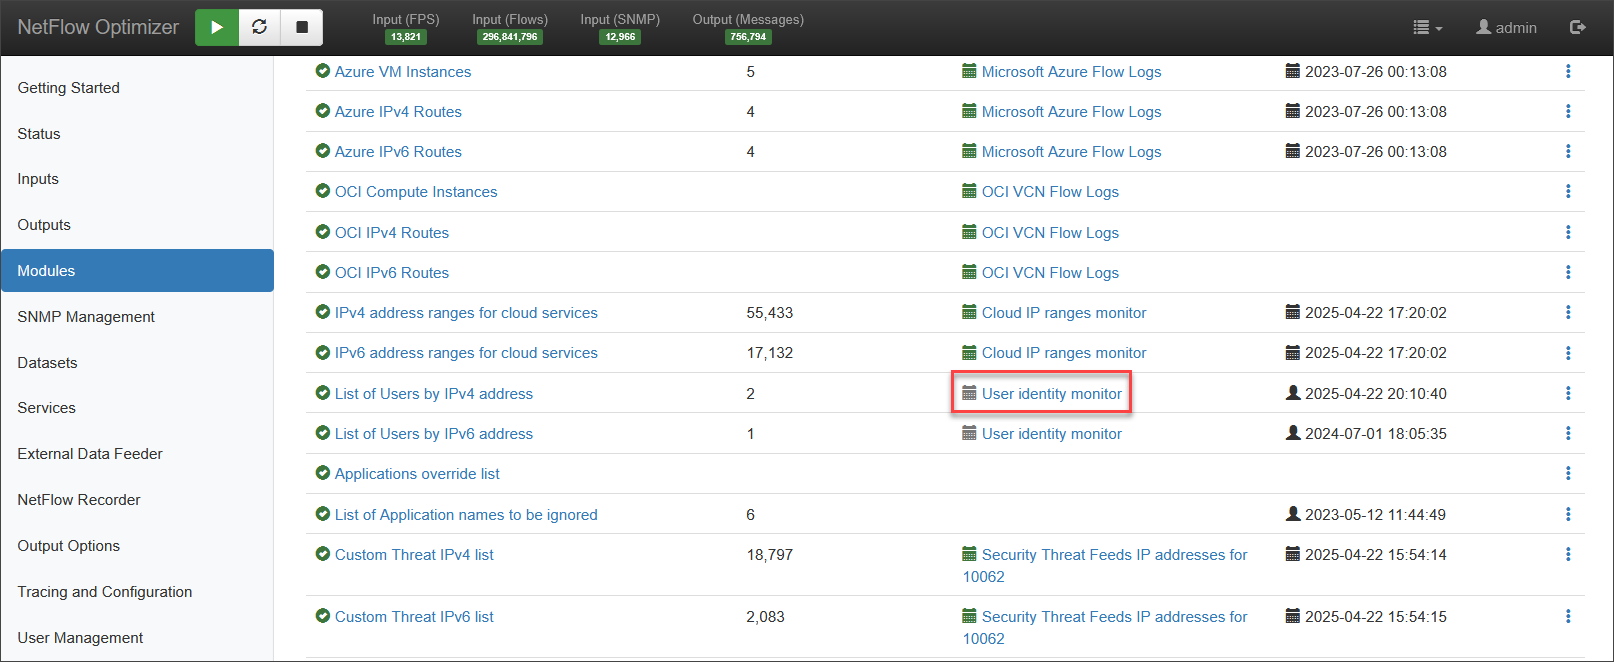
To configure integration with User Identity system, on the left navigation bar select Modules, open Network Conversations Monitor set by clicking on ..., and click on Module configuration 10062: Network Conversations Monitor. Scroll down to EDFN Agent User identity monitor and click on it.
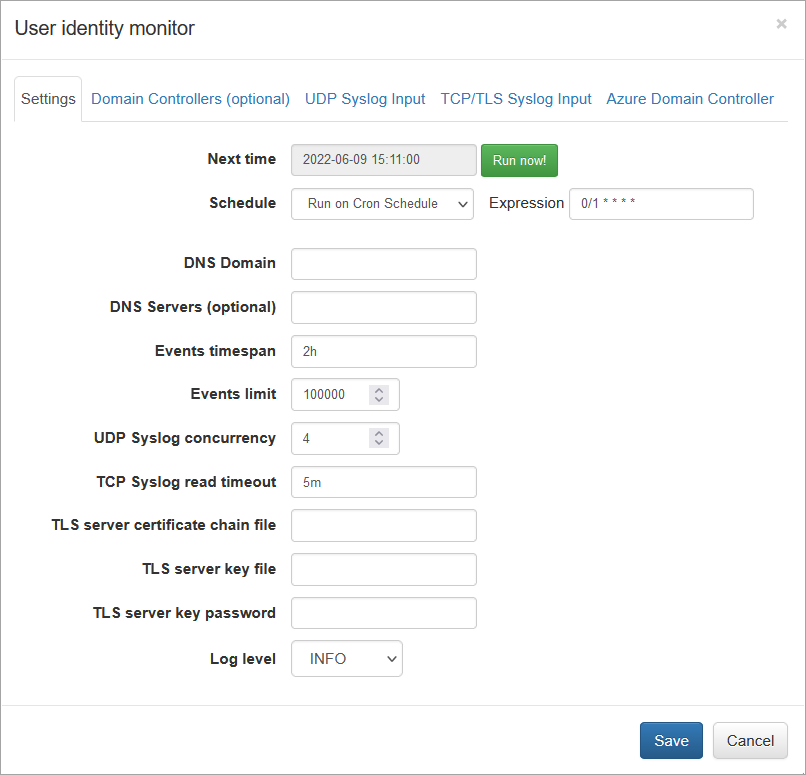
You will be presented with the following configuration screen.
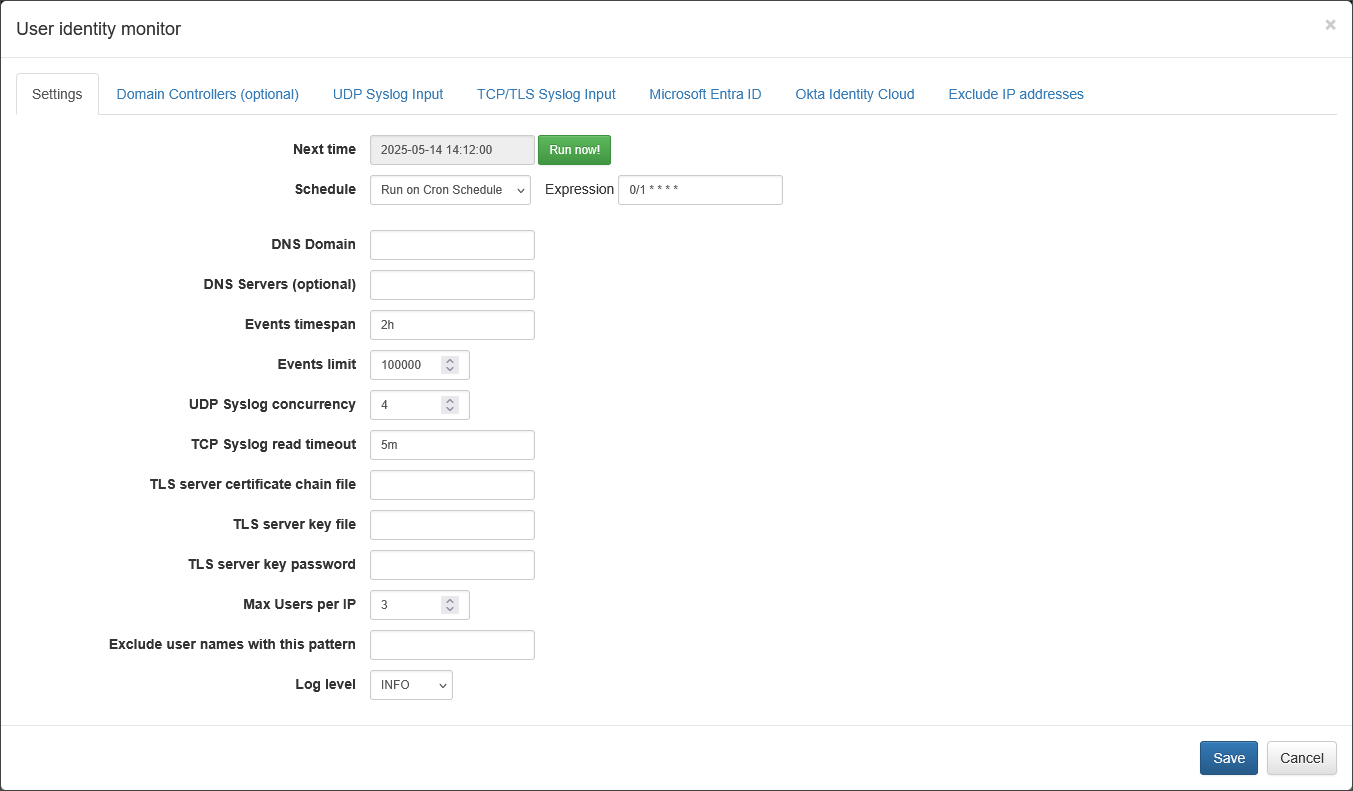
Set common parameters, and select an appropriate tab to configure the intetration with your identity systems.
Select Excluded IP addresses tab to specify IP addresses not to be included in user udentity enrichment, for example your Terminal Server IP address where multiple users are signing from.
Make sure that the user identity fields are included in the Module output.
For details, visit Network Conversations Output configuration
Configuring DCOM-based Integration with AD Domain Controller
DCOM-based WMI Integration for Active Directory is going to be deprecated and will be removed in future releases.
Due to known security vulnerabilities and high implementation complexity, NetFlow Logic strongly recommends migrating all existing deployments to Windows Event Log collection using WinRM, which will be available in the next NFO release. This aligns with modern security standards and simplifies firewall configuration.
For more detail, contact support@netflowlogic.com
For integration with Active Directory Domain Controller EDFN should be installed on a Windows host.
To enable this integration you need to install a Windows version of EDFN. You may configure it as a second EDFN or as a primary EDFN and uninstall EDFN that came with NFO linux installation. For more information, see Installing External Data Feeder for NFO and Installing Second EDFN.
EDFN, installed on Windows, is running as Local System account by default.
For accessing logon/logoff events using WMI, the EDFN service has to be logged on as a domain user with rights to read Domain Controller’s Security logs.
The EDFN User Identity Monitor agent reads these log events using Windows Management Instrumentation (WMI). Logged as a Local System account it doesn't have any WMI permissions, so a special user has to be created with appropriate rights. The following actions must be performed to allow the agent to communicate with the Domain Controller using WMI:
- Domain user configuration. Create a domain user and make it a member of two groups:
- Distributed COM Users
- Event Log Readers
- Domain Controller configuration. Enable “Enable Account” and “Remote Enable” access permissions for the WMI namespace “Root\CIMV2” on each Domain Controller
- Windows Firewall settings. Enable WMI traffic through Windows Firewall on each Domain Controller
- EDFN host configuration:
- Permit the user write access to EDFN’s log directory and conf/.cacerts trusted certificates store
- Change EDFN service to Log on as the domain user
- Agent configuration. Enter domain name for Domain Controllers auto detection or manually set the list of Domain Controllers
More details are provided in the sections bellow.
Domain User Configuration
Create the Active Directory user via Active Directory Users and Computers tool. The EDFN service will be log on as this user.
All next steps may be applied to this user or you can create a special group, if you’re going to support several users with the same permissions.
The user or group has to be a member of the following groups:
- Distributed COM Users
- Event Log Readers
For more details, visit https://docs.microsoft.com/en-us/windows/win32/wmisdk/securing-a-remote-wmi-connection#setting-dcom-security-to-allow-a-user-to-access-a-computer-remotely
Domain Controller: WMI Namespace Permissions
Provide access to the namespace Root/CIMV2. For detailed information, visit https://docs.microsoft.com/en-us/windows/win32/wmisdk/access-to-wmi-namespaces and https://docs.microsoft.com/en-us/windows/win32/wmisdk/setting-namespace-security-with-the-wmi-control
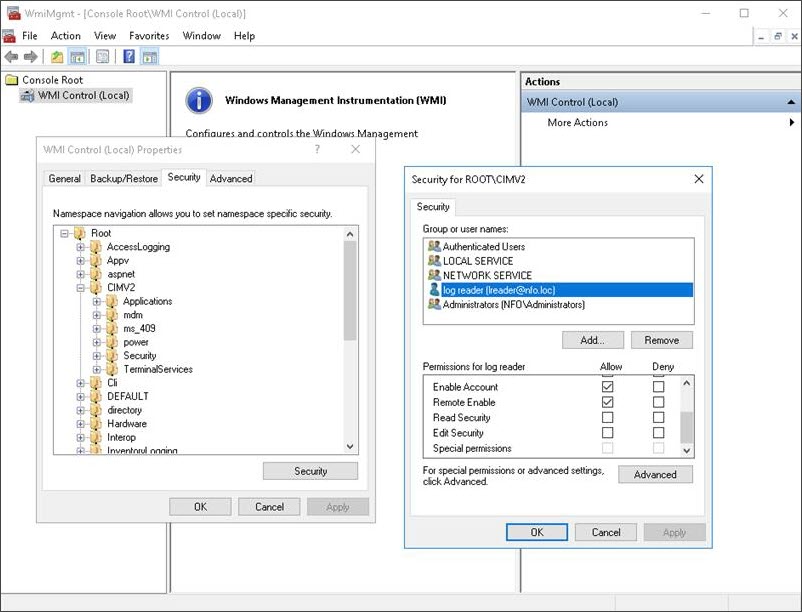
- Open wmimgmt.msc
- Select the Properties of WMI Control (local)
- Navigate to the Security tab
- In the Namespace navigation, expand Root and click CIMV2
- Click Security button
- Add the user or group for access configuration
- Select Allow checkboxes:
- Remote Enable
- Enable Account
- Click OK to save and then close WmiMgmt
Domain Controller: Windows Firewall Settings
Remote access to a WMI namespace may require Windows Firewall configuration adjustments.
To enable or disable WMI traffic using firewall GUI:
-
Open Windows Firewall on the domain controller
-
Enable Inbound Rules for the required profiles:
-
Windows Management Instrumentation (DCOM-In):
- Service: rpcss
- Protocol: TCP
- Local port: 135
-
Windows Management Instrumentation (WMI-In):
- Service: winmgmt
- Protocol: TCP
- Local port: any
-
-
Further reading:
- For details, visit https://docs.microsoft.com/en-us/windows/win32/wmisdk/connecting-to-wmi-remotely-starting-with-vista
- To set up a fixed port for WMI connections, follow the instructions provided in https://learn.microsoft.com/en-us/windows/win32/wmisdk/setting-up-a-fixed-port-for-wmi
PowerShell Configuration Verification
If domain user, WMI namespace permissions and firewall settings are set up correctly, you can check the configuration using PowerShell:
-
Run Windows PowerShell on the EDFN host as a domain user configured earlier (right click, Run as different user)
-
Get the last 5 minutes timestamp in CIM datetime format:
$timestamp = [System.Management.ManagementDateTimeConverter]::ToDmtfDateTime((Get-Date).AddMinutes(-5))
- Request Security logs for the last 5 minutes:
Get-WmiObject -Namespace "root\cimv2" -Impersonation 3 -ComputerName \<domain-controller\> `
-Query "select * from win32_ntlogevent where logfile = 'Security' and TimeWritten > '$timestamp'"
- If configuration is correct, security logs are printed.
Troubleshooting
- Get-WmiObject : The RPC server is unavailable. (Exception from HRESULT: 0x800706BA) – Indicates that DCOM or port 135 is blocked.
- Get-WmiObject : No such interface supported – Suggests that WMI traffic is being blocked by the firewall
- Get-WmiObject : Access denied – Occurs if the domain user lacks permissions to access the Root/CIMV2 namespace
EDFN Windows Host Configuration
When EDFN agent is logged on as Local System account, no additional configurations are required. But for Domain Controllers integration, the service has to be logged on as the domain user.
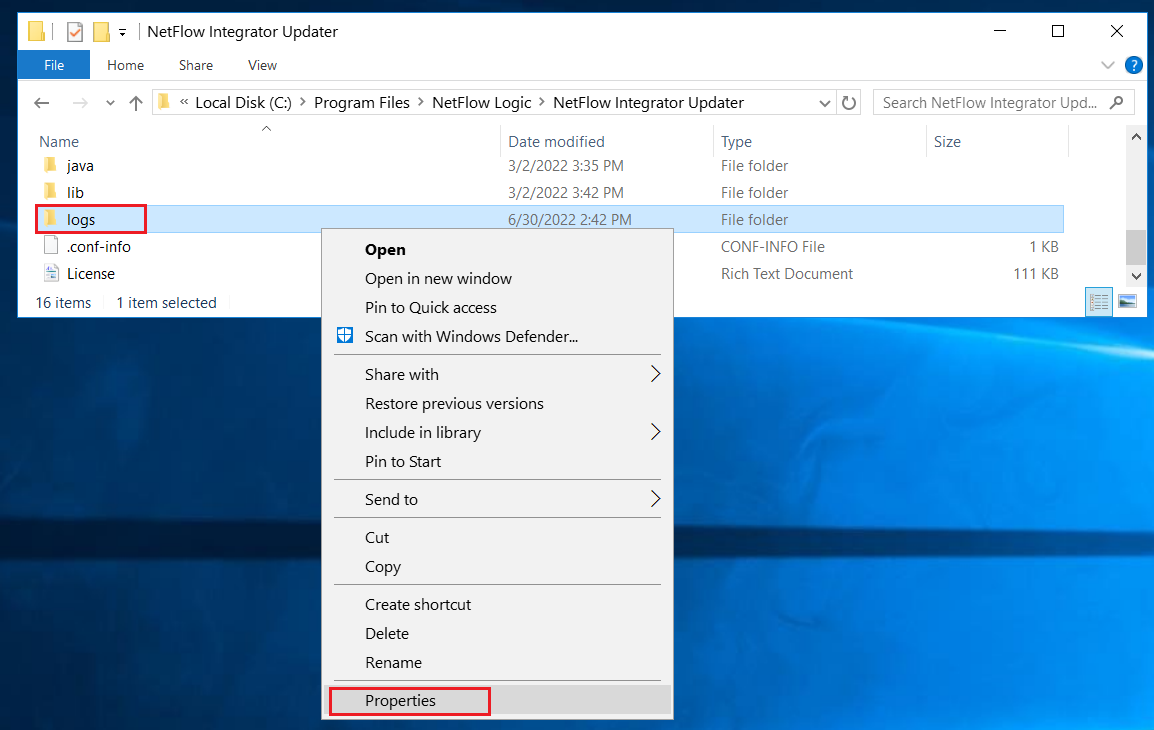
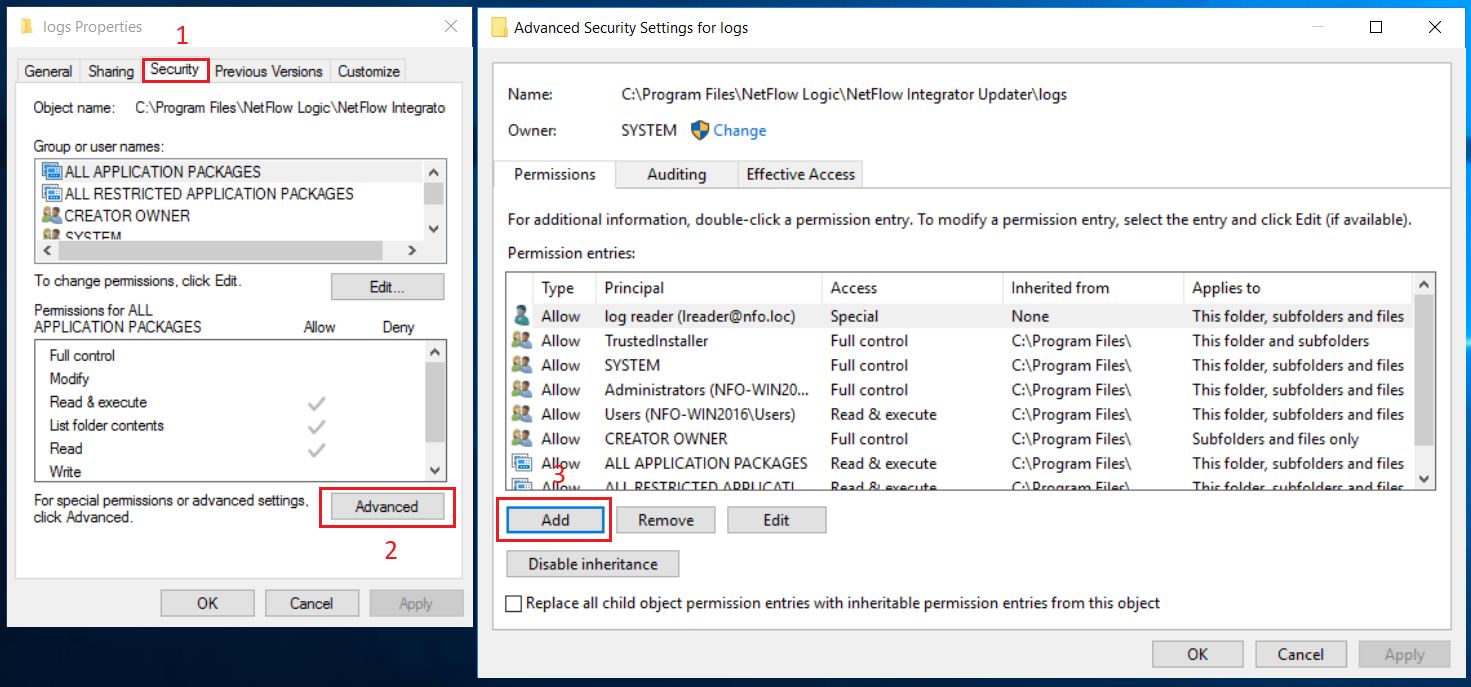
EDFN and its agent write internal logs into the directory C:\Program Files\NetFlow Logic\NFI Updater\logs\. The domain user or group may have restricted permissions to this directory, and additional permissions have to be granted. Navigate in File Explorer to C:\Program Files\NetFlow Logic\NFI Updater\logs\, right click directory logs then click Properties in the context menu.
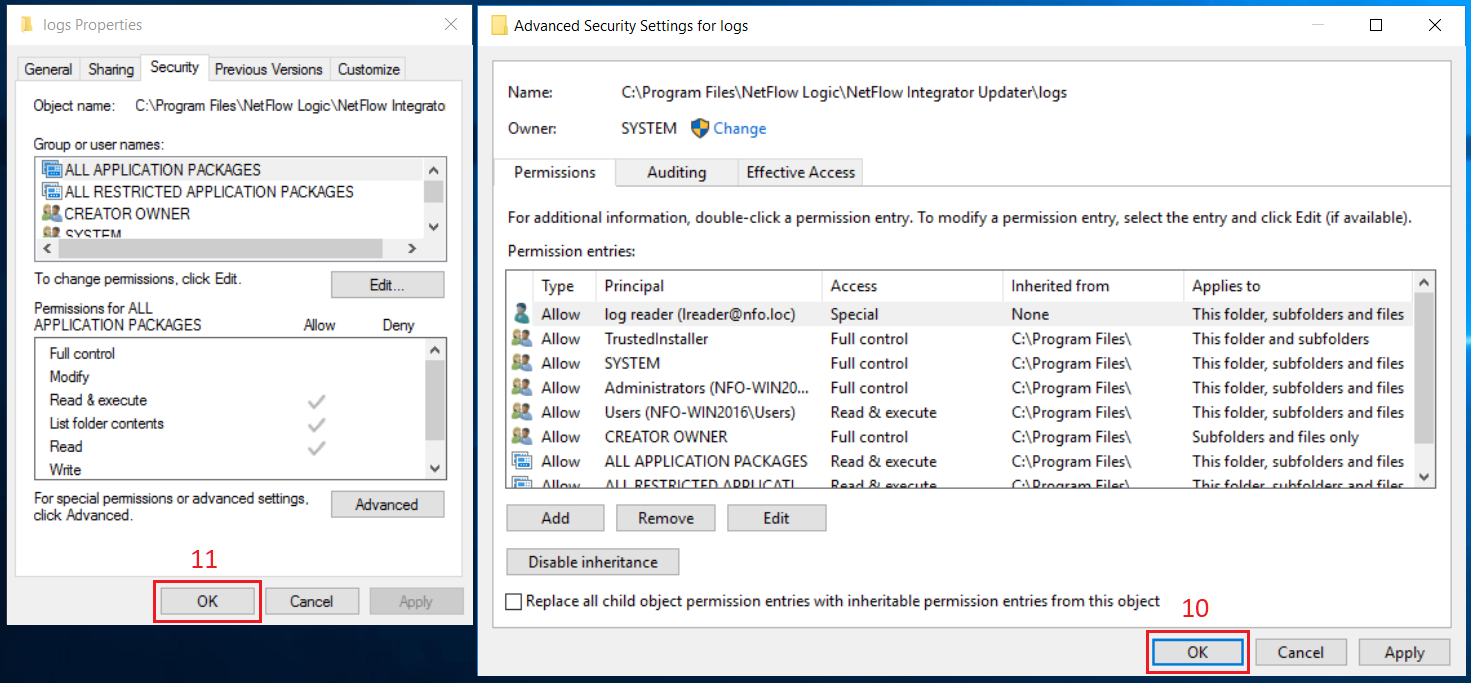
In Properties dialog box, select Security tab (1), click Advanced button (2). Advanced Security Settings dialog box opens. Click Add button (3) in this box.
In Security Entry dialog box, click ‘Select a principal’ link (4). A dialog box for a user selection opens. Type the corresponding username (5) then click OK button (6).
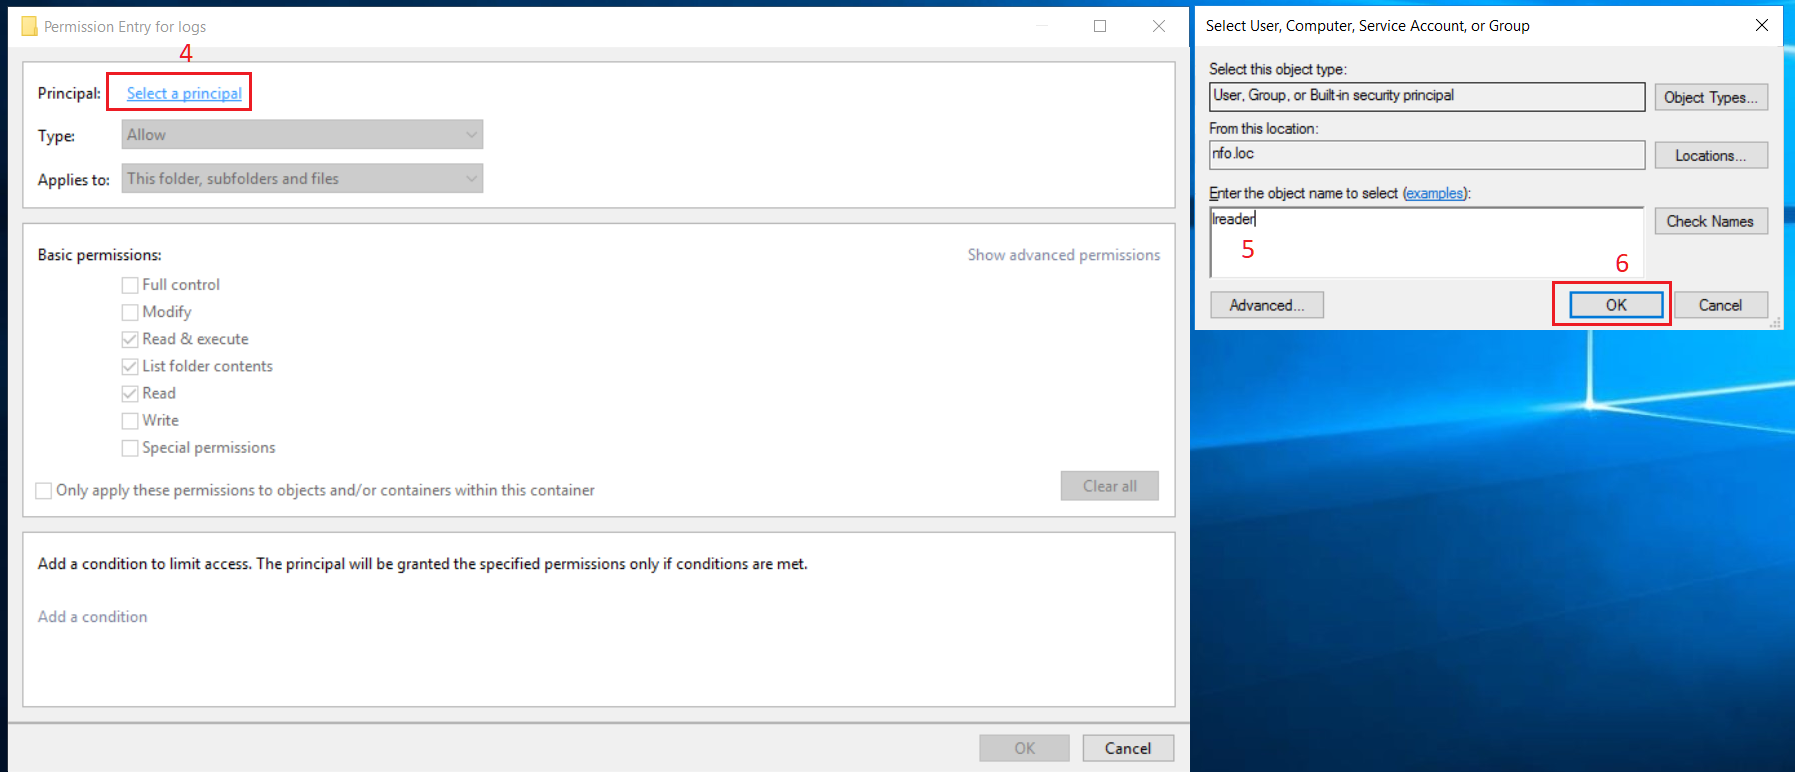
A user search is available in this dialog box.
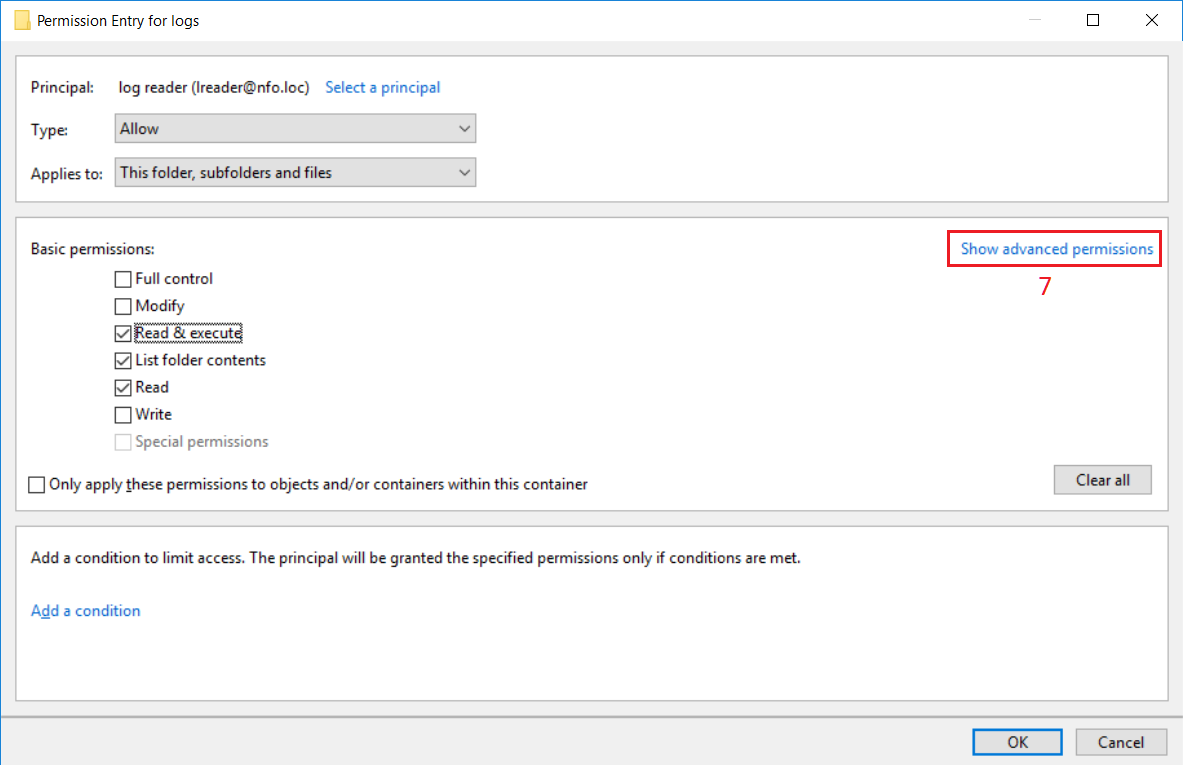
In Security Entry dialog box, click ‘Show advanced permission’ link (7) for a selected principal.
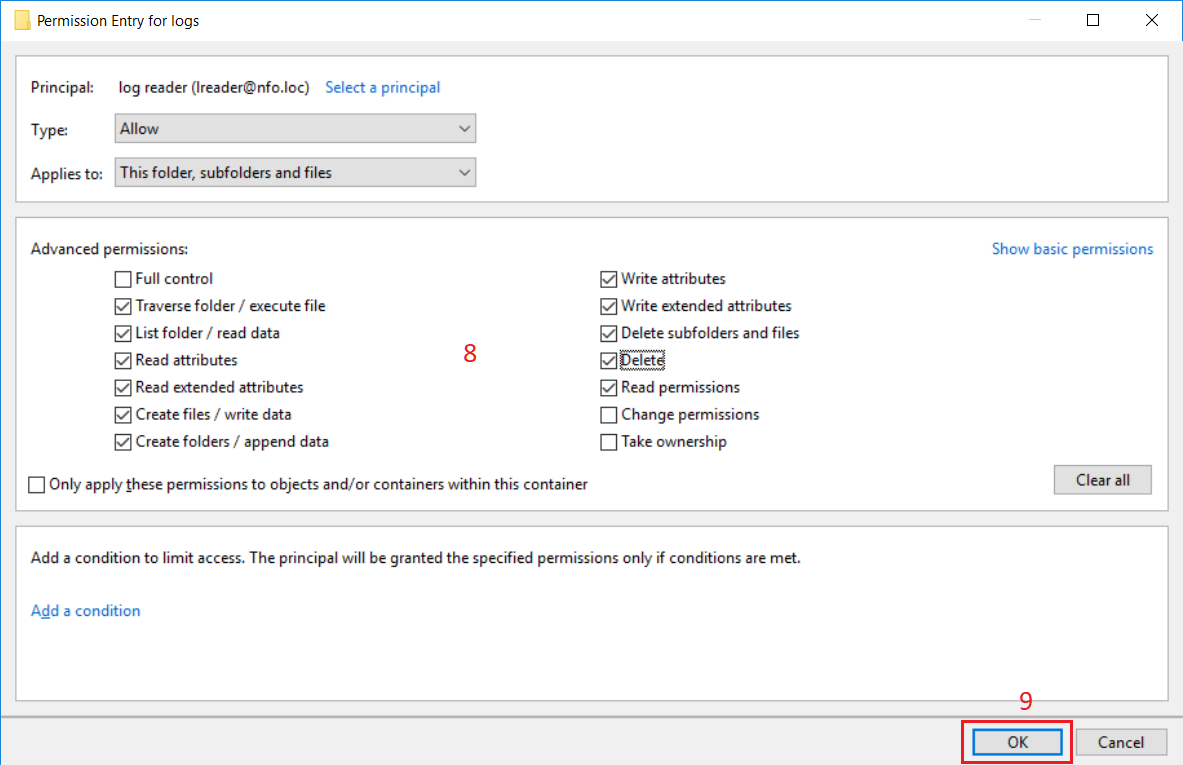
Select permissions according to the picture below (8) then click OK button (9).
Click OK button (10) in Advanced Security Settings dialog box then click OK button (11) in Properties dialog box.
Also you may need to grant write permission to the trusted certificates store: C:\Program Files\NetFlow Logic\NFI Updater\conf\.cacerts.
Set this permission in the way as for logs directory.
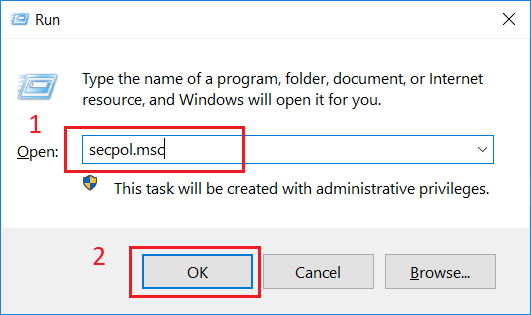
In order to start EDFN service on behalf of the domain user, this user should be granted additional privileges to log on as a service. Press Win-R shortcut on keyboard. Run dialog box opens.
In Run dialog box, type secpol.msc in Open drop-down list (1) and click OK button (2).
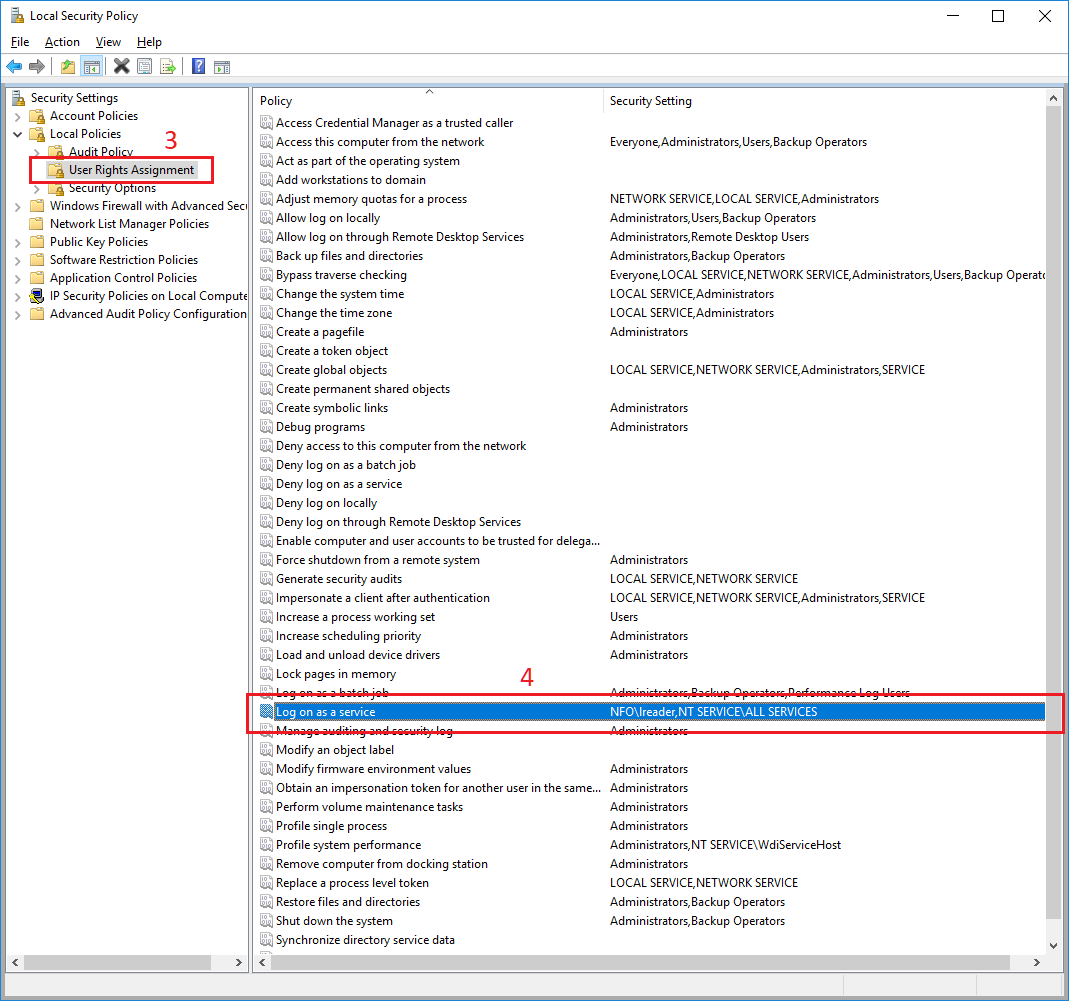
Local Security Policy window opens. Navigate to Security Settings/Local Policies/User Rights Assignment (3) in the left pane. Double click Log on as a service policy in the right pane (4).
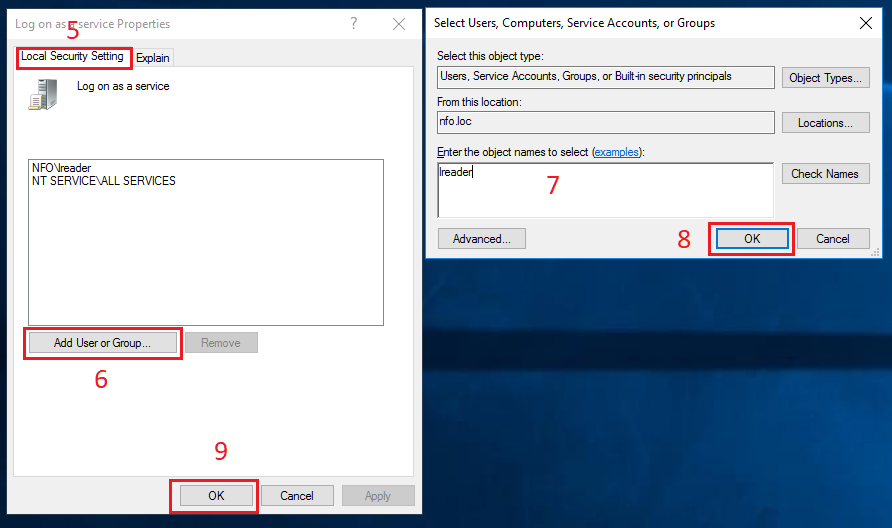
In Properties dialog box, select Local Security Settings tab (5), click Add User or Group button (6). Advanced Security Settings dialog box opens. Click Add button (3) in this box. A dialog box for a user selection opens. Type the corresponding username (7) then click OK button (8).
A user search is available in this dialog box.
Click OK button in Properties dialog box (9). Close Local Security Policy window.
After that change EDFN service will logon as the domain user. Press Win-R shortcut on keyboard. Run dialog box opens.
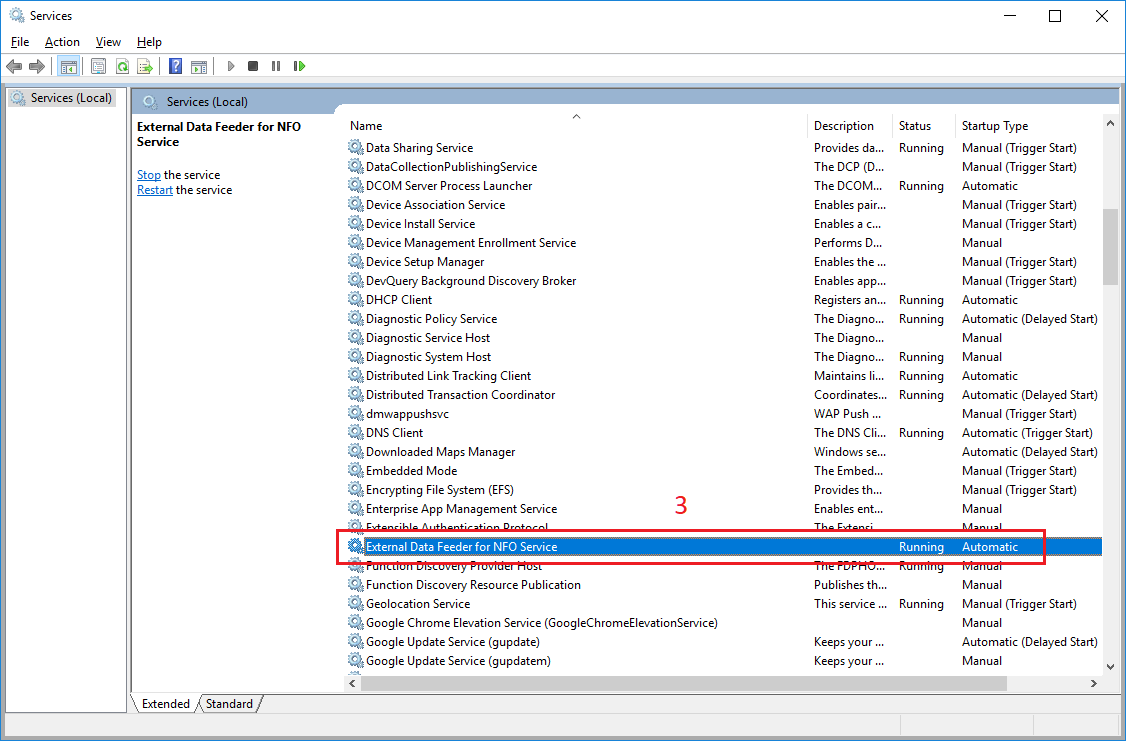
In Run dialog box, type services.msc in Open drop-down list (1) and click OK button (2).

Services window opens. Double click External Data Feeder for NFO Service in the right pane (3).
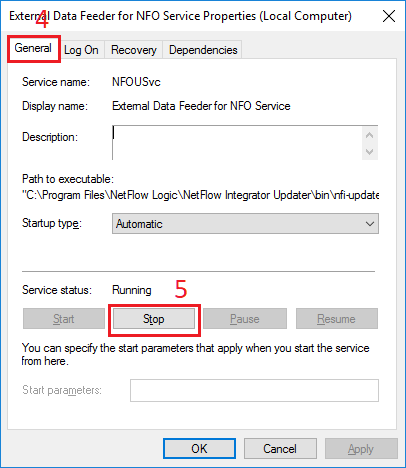
In Properties dialog box, select General tab (4), click Stop button (5).
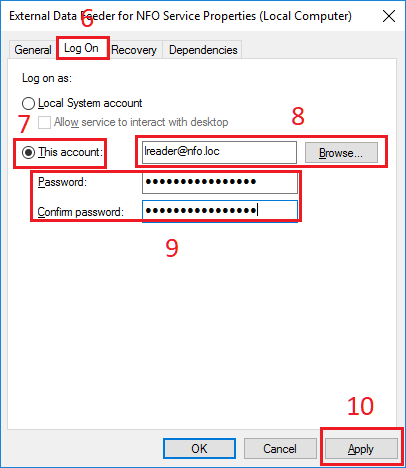
After the service has stopped in Properties dialog box, select Log on tab (6). In Log on as section, select This account option (7). Type username in the corresponding textbox or select user using Browse button (8). Enter then confirm a password of the user (9) then click Apply button (10).
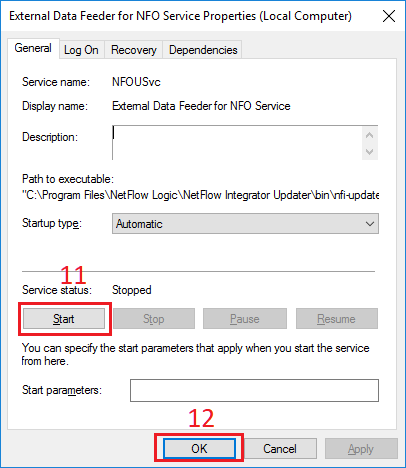
In Properties dialog box, select General tab (4), click Start button (11). After the service has started click OK button (12). Close Services window.
User Identity Agent Configuration
When the domain user has been created, Domain Controller and EDFN host have been configured, the EDFN User identity monitor agent has to be configured using NFO GUI:
Open NFO web interface and navigate to External Data Feeder page or to the Network Conversations Monitor module’s page, and perform the following:
- Open User Identity Monitor agent configuration window
- Change schedule cron expression or leave default. The agent executed every minute by default: security event logs are requested every minute and user identity watch list is updated accordingly
- Enter DNS domain field for Domain Controllers auto-detection, like mydomain.com. Alternatively you can leave it blank and manually configure the list of Domain Controllers on “Domain Controllers (optional)” tab
- Optionally enter DNS Servers – comma separated list of DNS servers for Domain Controllers request
- Enter Events timespan field value – time interval for event logs request and for events obsolescence. Default value is 2 hours, minimum 1 minute, and maximum 24 hours. We recommend to set this value to a maximum user Group Policy refresh interval (default value is 90m ± 30m, so maximum is 2 hours). Special value is “0”, when the obsolescence of events is disabled
- Enter Events limit – maximum number of events to be requested during the WMI query execution. Default value is 100,000 events, minimum 1000, maximum 500,000
- Click Save to submit configuration changes
When agent’s parameters are saved, configuration can be validated by pressing “Run Now” green button from the agent configuration window. The User Identity monitoring agent is scheduled if module is enabled.
Configuring Integration with Microsoft Entra ID
To enable this integration you need to configure EDFN agent to access the Microsoft Entra ID audit sign-in logs.
There are two choices how this access can be configured.
- Using service principal identity - Use this option if your EDFN is installed on premises or outside of Azure. This method requires an application credentials:
tenant ID,application (client) ID, and asecret access key - Using system-assigned managed identity - Use this option if your EDFN is installed on an Azure Virtual Machine resource. This method does not require an application credentials
For more details please visit https://docs.microsoft.com/en-us/azure/active-directory/managed-identities-azure-resources/overview
Service Principal Identity Authentication
This authentication method requires a secret access key, application (client) ID and tenant ID. An Azure service principal is an identity created for use with applications. The EDFN agent uses this service principal for Azure resources access. Do following steps for the service principal creation.
- Open the Azure portal
- Navigate to
Microsoft Entra IDand selectApp registrationsunder the Mange section in the left panel - Select “+ New registration“
- Enter Name, for example,
edfn-agent - Select “Register” to save the application. You will be navigated to the application overview page
- Select "API permissions" in the left panel
- Select "+ Add Permission", then "Microsoft Graph", then "Application permissions" and check
AuditLog.Read.Allpermission - Click "Save permissions" to save changes
- Select “Certificates & secrets” in the left panel
- Select “+ New client secret” and enter a name for the secret
- Select “Save” and copy the secret key value
Properties from the application overview page will be required for User Identity agent configuration:
- client – Application (client) ID
- tenant – Directory (tenant) ID
- key – client secret string value
System-assigned Managed Identity Authentication
For enabling system-assigned managed identity on the EDFN installation VM read the following instruction: https://docs.microsoft.com/en-us/azure/active-directory/managed-identities-azure-resources/qs-configure-portal-windows-vm#enable-system-assigned-managed-identity-on-an-existing-vm
- Open the Azure portal
- Navigate to
Virtual machines - From the list of VMs, select the VM, where EDFN is installed
- Select
Identityunder the Settings group in the left panel - Under the
System assignedtab, Status, selectOnand then click Save - Confirm enable the system assigned managed identity for the VM
After system-assigned managed identity is enabled, configure VM access to the Microsoft Graph API. The main idea is described here: https://docs.microsoft.com/en-us/azure/app-service/scenario-secure-app-access-microsoft-graph-as-app?tabs=azure-powershell#grant-access-to-microsoft-graph
- Navigate to the Virtual Machine Identity page
- Copy Object (principal) ID value
- Open Cloud Shell console end execute the following set of commands:
spId="Object (principal) ID value"
graphResourceId=$(az ad sp list --display-name "Microsoft Graph" --query [0].objectId --out tsv)
appRoleId=$(az ad sp list --display-name "Microsoft Graph" --query "[0].appRoles[?value=='AuditLog.Read.All' && contains(allowedMemberTypes, 'Application')].id" --output tsv)
uri=https://graph.microsoft.com/v1.0/servicePrincipals/$spId/appRoleAssignments
body="{'principalId':'$spId','resourceId':'$graphResourceId','appRoleId':'$appRoleId'}"
az rest --method post --uri $uri --body $body --headers "Content-Type=application/json"
- After these steps VM will have access to Microsoft Graph API:
AuditLog.Read.All.
User Identity Agent Configurations
Open NFO web interface and navigate to External Data Feeder page or to the Network Conversations Monitor module’s page, and perform the following:
- Open User Identity Monitor agent configuration window
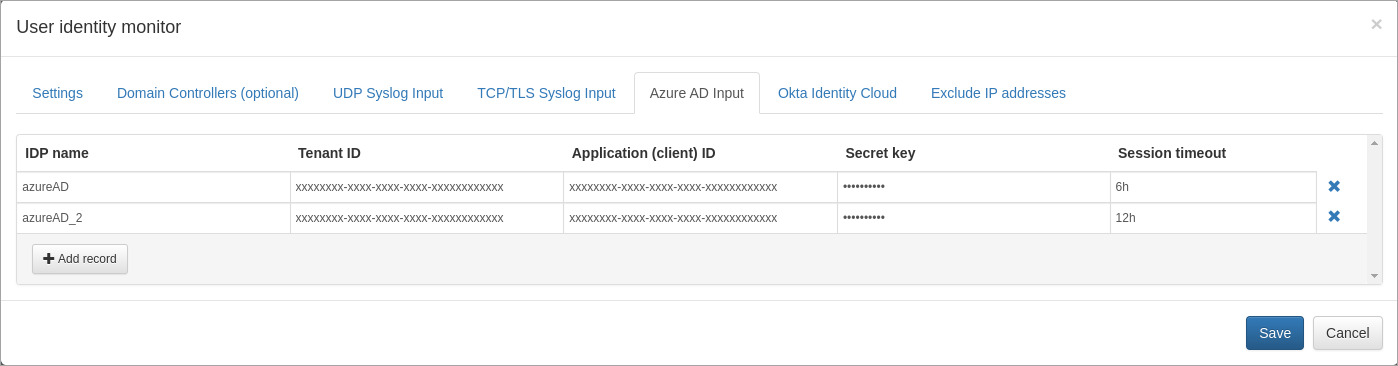
- Select
Microsoft Entra ID Inputtab and add a new record. Enter the following properties:- IDP: Identity Provider name is put into "idp" output field
- Tenant ID: Directory (tenant) ID. If you use system-assigned managed identity, leave it blank. If you use service principal identity, open Azure portal > navigate to Microsoft Entra ID > select App Registrations > select application created before, e.g. edfn-agent > copy Directory (tenant) ID from the Overview page.
- Application (client) ID: Application (client) ID. If you use system-assigned managed identity, leave it blank. If you use service principal identity, open Azure portal > navigate to Microsoft Entra ID > select App Registrations > select application created before, e.g. edfn-agent > copy Application (client) ID from the Overview page.
- Secret key: Application (client) secret key. Paste secret key created before. If you use system-assigned managed identity, leave it blank. If you haven't created a client secret yet, open Azure portal > navigate to Microsoft Entra ID > select App Registrations > select application created before, e.g. edfn-agent > select Certificates & secrets > click on Client secrets tab and then create a new one.
- Session timeout: if there are no sign-in logs during timeout period, user session expected to be closed. Format example: 1d 2h 5m 10s - 1 day, 2 hours 5 minutes, 10 seconds
If default authentication endpoint or Microsoft Graph endpoint have to be overwritten, you have to create the file $EDFN_HOME/conf/azure-ad.properties with the following content:
[idp-name]
authURL=https://login.microsoftonline.com/
microsoftGraphEndpoint=https://graph.microsoft.com/v1.0
microsoftGraphScopes=https://graph.microsoft.com/.default
The agent may request logs from different Microsoft Entra IDs. Please add separate configuration record for each Microsoft Entra ID.
Save the agent changes. The agent will request new sign-in logs and update the watch list according to the scheduler expression: every minute by default.
Configuring Integration with Okta
To enable Okta integration you need to generate Okta API token and configure EDFN agent.
You don't have to do any special configuration in Okta. Only API token has to be generated and user who generates the token must have read System Logs permission (for example, user may have role “Report Administrator”). For API token generation:
- Sign in to your Okta organization
- Navigate to Admin Console > Security > API > Token tab
- Click Create Token
- Enter token name and click Create Token button
- Record the token value
For more details about API token and how to generate it, visit the following link: https://developer.okta.com/docs/guides/create-an-api-token/main/
User Identity Agent Configuration
Open NFO web interface and navigate to External Data Feeder page or to the Network Conversations Monitor module’s page, and perform the following:
-
Open User Identity Monitor agent configuration window
-
Select
Okta Identity Cloudtab and add a new record. Enter the following properties:- IDP: Identity Provider name to be reported in
idpoutput syslog field - Okta domain: Okta organization URL, like
https://<org>.okta.com - API token: Okta API token to authenticate EDFN agent’s requests
- Session timeout: if there are no logs during timeout period, user session expected to be closed. Format example:
1d 2h 5m 10sindicates 1 day, 2 hours 5 minutes, 10 seconds
- IDP: Identity Provider name to be reported in
We recommend to set Session timeout equals to Maximum Okta session lifetime. If this value is No time limit, set it to 12h. Maximum Okta session lifetime value is available on Okta organization Admin console > Security > Authentication > Sign On tab > select Policy and expand rule to view the value.
The agent may request logs from different Okta organizations. Please add separate configuration record for each Okta organization.
Save the agent changes. The agent will request new event logs and update the watch list according to the scheduler expression: every minute by default.
Implementation Details
EDFN agent reads Okta logs via the System Log API: https://developer.okta.com/docs/reference/api/system-log/
During first agent execution, all logs no older than session timeout are requested. After that only logs since last event are requested.
The agent reads only success events where event types starts with user., filter: eventType sw "user." and outcome.result eq "SUCCESS". All event types are available here: https://developer.okta.com/docs/reference/api/event-types/
There are three different groups of event types:
- New user session or session prolongation events:
user.session.startand other events except types from next two items - Session close events:
user.session.endoruser.session.expire - Close all user sessions:
user.session.clear,user.lifecycle.deactivate, oruser.lifecycle.suspend
User name is read from actor json section or from target section. IP address is taken from client section.
Configuring Integration with IDP via Syslog
To enable this integration you need to configure EDFN agent to receive and parse syslog messages with Login / Logout events.
User Identity Agent Configuration
Open NFO web interface and navigate to External Data Feeder page or to the Network Conversations Monitor module’s page, and perform the following:
-
Open User Identity Monitor agent configuration window
-
Change schedule cron expression or leave default. The agent executed every minute by default: security event logs are requested every minute and user identity watch list is updated accordingly
-
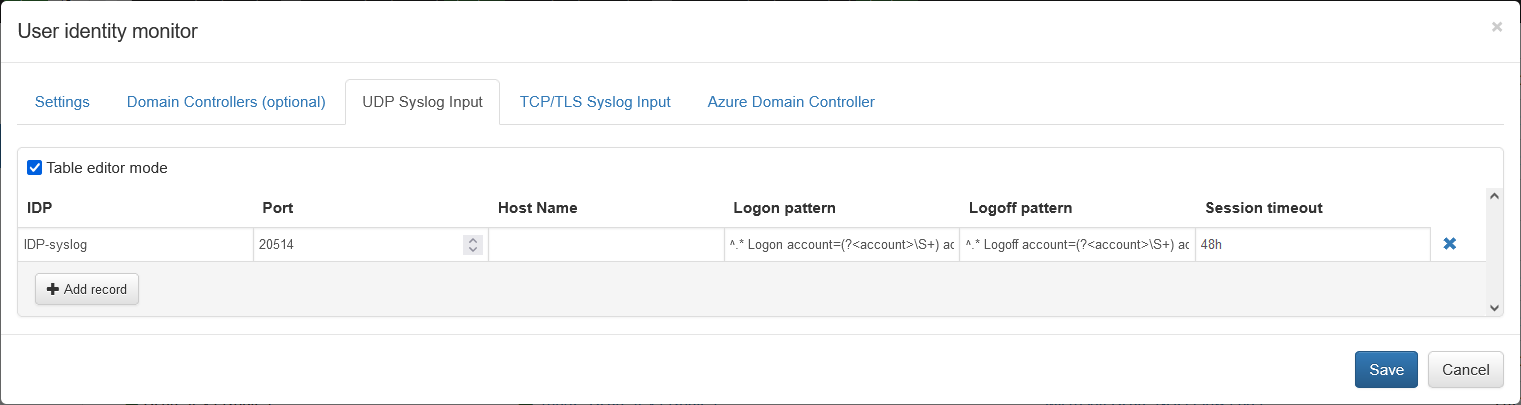
Select
UDP Syslog Inputtab if you send Login events via UDP and/orTCP/TLS Syslog Inputtab if you send Login events via TCP -
Click
 and provide the following fields
- IDP: Identity Provider name
- Port: Input listening port for syslogs sent to NFO by the identity provider
- Host Name: (optional) Host name of the identity provider. if left blank syslogs from any host will be received
- Logon pattern: REGEX expression to parse Logon events, for example
^.* Logon account=(?<account>\S+) address=(?<address>\S+)$ - Logoff pattern: REGEX expression to parse Logoff events, for example
^.* Logoff account=(?<account>\S+) address=(?<address>\S+)$ - Session timeout: expiration time to keep mapping between user name and IP address after the login event is received
- (TCP only) TLS: check the checkbox if your identity provider sends syslog over TCP with TLS encryption
- (TCP only) TLS client certificates file: path to TLS client certificates file
When agent’s parameters are saved, configuration can be validated by pressing “Run Now” green button from the agent configuration window. The User Identity monitoring agent is scheduled if module is enabled.