Integration with Active Directory Domain Controller
The EDFN User Identity agent supports two distinct integration methods with a Domain Controller to collect user logon/logoff events.
- Distributed COM (DCOM): This integration method is available exclusively for Windows installations.
- Windows Remote Management (WinRM): A modern, cross-platform solution, this method works for both Windows and Linux-based agents.
While both integrations use Windows Management Instrumentation (WMI) to query the Domain Controller, they rely on different underlying protocols to facilitate this communication.
Method 1: WinRM-based WMI Integration (Linux or Windows based EDFN)
This section helps you to configure integration with Domain Controller using Windows Remote Management (WinRM) instead of DCOM, thus eliminating the need for a separate Windows EDFN installation.
Windows Remote Management (WinRM) is Microsoft's modern, recommended protocol for remotely managing Windows machines. It's an implementation of the Web Services for Management (WS-Management) standard, which is based on SOAP (Simple Object Access Protocol). WinRM uses standard web protocols like HTTP and HTTPS, typically on ports 5985 and 5986, to send and receive management data in an XML format.
WinRM is considered a significant improvement over its predecessor, Distributed Component Object Model (DCOM), for several key reasons, including better firewall compatibility, security, and a more straightforward architecture.
Domain User Configuration
Create the Active Directory user via Active Directory Users and Computers tool. The EDFN agent will be log on as this user.
All next steps may be applied to this user or you can create a special group, if you’re going to support several users with the same permissions.
The user or group has to be a member of the Event Log Readers group. There are several options how to assign users to these groups:
- Using the GUI (Active Directory Users and Computers)
- Using PowerShell
Using the GUI (Active Directory Users and Computers):
- On a domain controller or a computer with the Remote Server Administration Tools (RSAT) installed, open Active Directory Users and Computers (ADUC). You can do this by pressing Win + R, typing dsa.msc, and pressing Enter.
- In the console tree on the left, navigate to the Users container.
- In the main pane, double-click the user you want to assign to.
- In the properties window, go to the "Member Of" tab.
- Click the "Add..." button.
- In the new window, type the group name: Event Log Readers.
- Then click "Check Names" to verify the group exists.
- Once the name is underlined, click "OK".
- Click "OK" on all open windows to apply the changes.
Using PowerShell:
- Open an elevated PowerShell prompt (Run as Administrator).
- Use the Add-ADGroupMember cmdlet. Replace "lreader" with the SAM account name of the user you want to add.
Add-ADGroupMember -Identity "Event Log Readers" -Members "lreader"
Domain Controller: WMI Namespace Permissions
Provide access to the namespace Root/CIMV2. For detailed information, visit:
https://docs.microsoft.com/en-us/windows/win32/wmisdk/access-to-wmi-namespaces
and
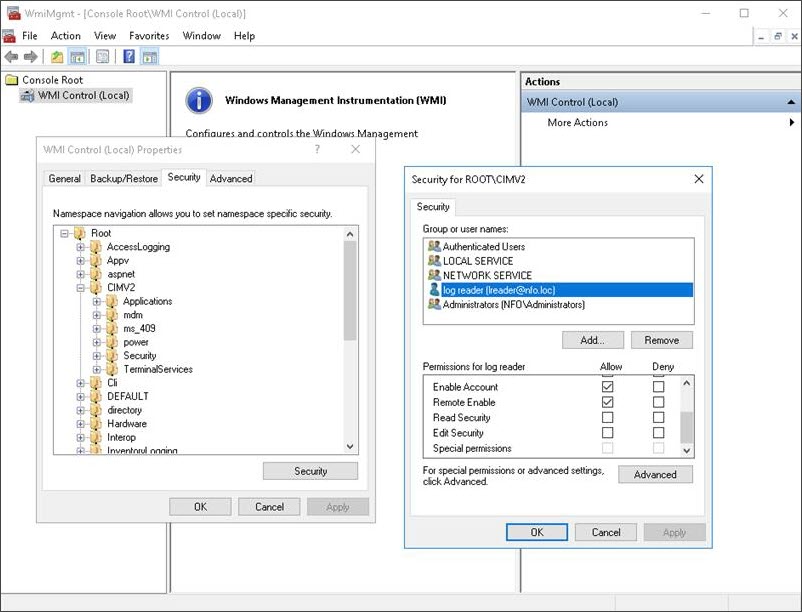
- Open the WMI Control console by pressing Win + R, typing wmimgmt.msc, and pressing Enter.
- Right-click on "WMI Control (Local)" in the left pane and select Properties.
- In the new window, navigate to the Security tab.
- In the Namespace navigation, expand Root and then click on CIMV2.
- Click Security button
- Click Add... to select the user or group that needs access.
- In the permissions list, check the "Allow" box for both "Remote Enable" and "Enable Account".
- Click "OK" on all open windows to apply the changes and then close WmiMgmt.
Domain Controller WinRM Configuration
This section helps you configure a WinRM HTTPS listener on a Windows Domain Controller for secure remote management. For detailed information about WinRM configuration, visit:
and
-
WinRM Service Configuration
The EDFN User Identity agent requires specific WinRM configuration settings on the Domain Controller to function correctly. You must ensure the following properties are configured as specified below:
- Negotiate: true
- CbtHardeningLevel: Relaxed
- AllowRemoteAccess: true
To check the current values, execute the following command in a command prompt or PowerShell:
winrm get wsman/config/serviceThis command will display the full WinRM service configuration, allowing you to quickly check the required values.
Service
   RootSDDL = O:NSG:BAD:P(A;;GA;;;BA)(A;;GR;;;IU)S:P(AU;FA;GA;;;WD)(AU;SA;GXGW;;;WD)
   MaxConcurrentOperations = 4294967295
   MaxConcurrentOperationsPerUser = 1500
   EnumerationTimeoutms = 240000
   MaxConnections = 300
   MaxPacketRetrievalTimeSeconds = 120
   AllowUnencrypted = false [Source="GPO"]
   Auth
      Basic = false [Source="GPO"]
      Kerberos = true [Source="GPO"]
      Negotiate = true [Source="GPO"]
      Certificate = false
      CredSSP = false [Source="GPO"]
      CbtHardeningLevel = Relaxed [Source="GPO"]
   DefaultPorts
      HTTP = 5985
      HTTPS = 5986
   IPv4Filter = * [Source="GPO"]
   IPv6Filter = * [Source="GPO"]
   EnableCompatibilityHttpListener = false [Source="GPO"]
   EnableCompatibilityHttpsListener = false [Source="GPO"]
   CertificateThumbprint = ff ff ff ff ff ff ff ff ff ff ff ff ff ff ff ff ff ff ff ff
   AllowRemoteAccess = true [Source="GPO"]
You can configure the WinRM service properties centrally for all Domain Controllers (DCs) using a Group Policy Object (GPO) linked to the Domain Controllers Organizational Unit (OU).
-
Open Group Policy Management (gpmc.msc)
-
Navigate to Forest > Domains > YourDomain
-
Right-click the Domain Controllers OU. Crucial: By linking the GPO to the dedicated Domain Controllers OU, you ensure the rule only applies to your DCs.
-
Select Create a GPO in this domain, and Link it here...
-
Give the new GPO a descriptive name, such as "WinRM Policy".
-
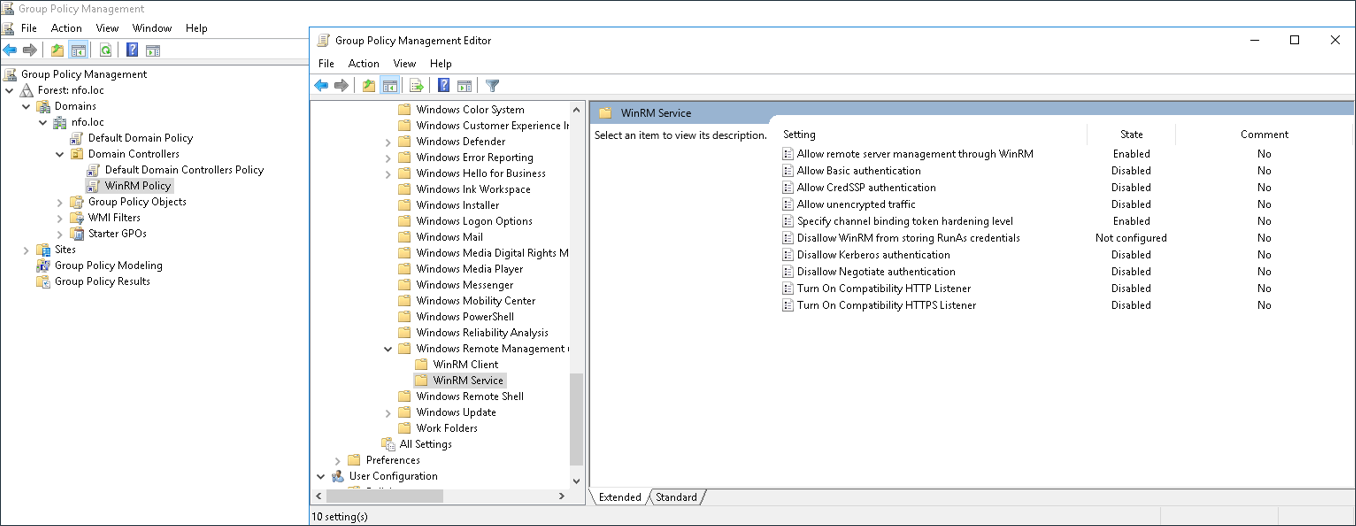
Right-click the new GPO and select Edit... to open the Group Policy Management Editor.
-
Navigate to the following path: Computer Configuration > Policies > Administrative Templates > Windows Components > Windows Remote Management (WinRM) > WinRM Service
-
Configure the following settings as specified:
i. Allow remote server management throw WinRM:
- Enabled
- IPv4 filter: *
- IPv6 filter: *
ii. Specify channel binding token hardening level:
- Enabled
- Hardening Level: Relaxed
iii. Disallow Negotiate authentication: Disabled
-
To ensure the policy applies immediately, on one of your Domain Controllers, open an elevated command prompt or PowerShell and run:
gpupdate /force -
Verify the policy has been applied by running winrm get wsman/config/service on the DC and checking the configuration status.
-
Check for an Existing Listener
First, check if an HTTPS listener is already configured to avoid duplicating effort.
- Open an elevated Command Prompt or PowerShell.
- Run the following command:
winrm enumerate winrm/config/listener- If an HTTPS listener is listed, you can skip the certificate generation steps and proceed directly to Step 6.
-
Generate a Certificate Request
To obtain a secure certificate, you'll create a certificate signing request (CSR) using a configuration file.
- Create a file named winrm_request.inf with the following content. Make sure to replace "your.domain.com" with the actual Fully Qualified Domain Name (FQDN) of your Domain Controller.
[Version]
Signature=$Windows NT$

[NewRequest]
Subject = "CN=your.domain.com"
KeySpec = AT_KEYEXCHANGE
KeyLength = 256
Exportable = TRUE
KeyUsage = "CERT_KEY_ENCIPHERMENT_KEY_USAGE | CERT_DIGITAL_SIGNATURE_KEY_USAGE"
ProviderName = "Microsoft Software Key Storage Provider"
ProviderType = 12
RequestType = PKCS10
KeyAlgorithm = ECDSA_P256

[EnhancedKeyUsageExtension]
OID = 1.3.6.1.5.5.7.3.1 ; Server Authentication

[RequestAttributes]
CertificateTemplate = WebServer -
Submit the Certificate Request Next, submit the configuration file to your Certificate Authority (CA) to get the signed certificate.
- Run the certreq command to generate and submit the request:
certreq -new request.ini winrm_request.csr
certreq -submit -attrib "CertificateTemplate:WebServer" winrm_request.csr winrm_signed.cer- This will create two files: a .csr file to send to a CA (if needed) and a .cer file containing the signed certificate from your CA. The certificate and its private key will be installed in the machine's certificate store.
-
Configure the HTTPS Listener Now, configure WinRM to use the newly installed certificate.
- Run the following command to set up the HTTPS listener. This command automatically associates the listener with the certificate and configures it on port 5986.
winrm quickconfig -transport:https- To verify the setup, you can run:
winrm get winrm/config
winrm enumerate winrm/config/listener
You should see a listener on port 5986 with
Transport = HTTPS.- If the automated method fails or you need to specify a particular certificate, you can manually create the listener using a certificate's thumbprint. Open Command Prompt (not PowerShell) and use the certutil command to list installed certificates and find the thumbprint of the certificate you want to use:
certutil -store myNote the Cert Hash(sha1) value of the certificate you want to use. This is the thumbprint. Do not include any spaces when using it in the next step.
- Create the HTTPS Listener. Run the following command, replacing "
your.domain.com" with your Domain Controller's Fully Qualified Domain Name (FQDN) and "thumbprint" with the certificate thumbprint you found in the previous step.
winrm create winrm/config/Listener?Address=*+Transport=HTTPS @{Hostname=”your.domian.com";CertificateThumbprint="thumbprint"}- Modify an Existing Listener. If a listener already exists and you need to update its certificate, use the
winrm setcommand instead ofwinrm create.
winrm set winrm/config/Listener?Address=*+Transport=HTTPS @{Hostname=”your.domian.com";CertificateThumbprint="thumbprint"}
winrm set winrm/config/Service @{CertificateThumbprint="thumbprint"} -
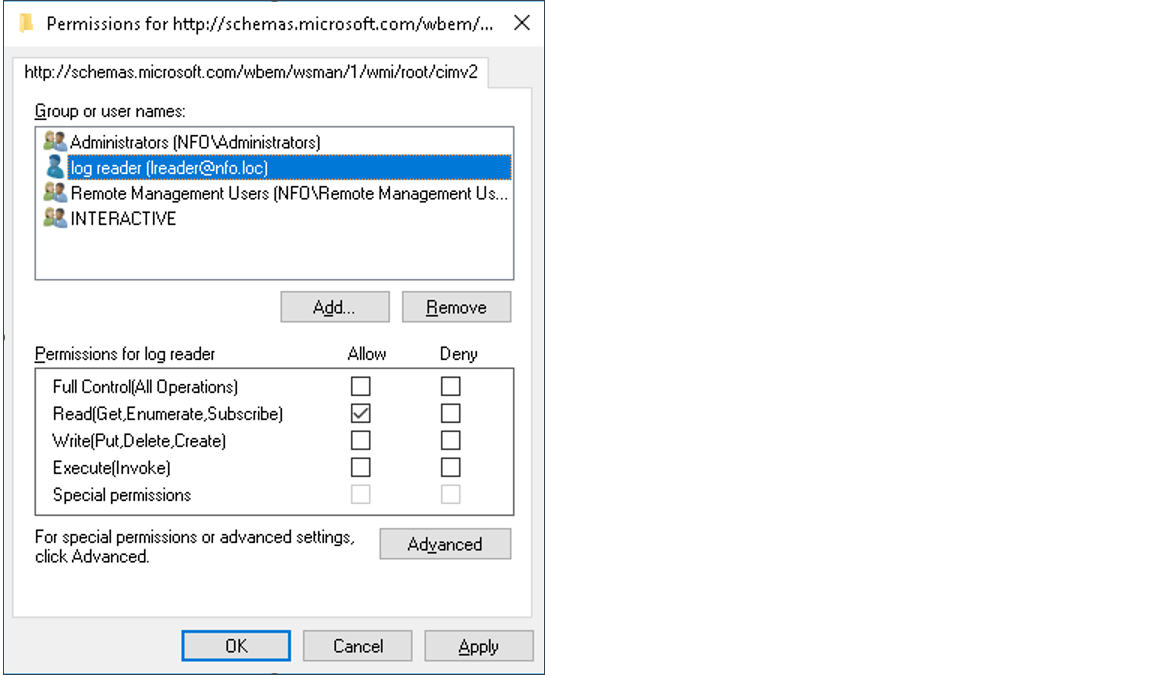
WMI Plug-in Configuration: Setting Permissions To allow non-administrator users or groups to access WMI data via the WinRM service, you must explicitly grant them permissions on the WMI namespace. This is achieved by modifying the security descriptor for the root/cimv2 namespace of the WMI plug-in.
- Run the following command. This will open the graphical permissions editor for the WMI plug-in.
winrm configSDDL http://schemas.microsoft.com/wbem/wsman/1/wmi/root/cimv2- In the permissions editor window that appears, click the "Add..." button.
- In the selection window, type the user or group that requires access.
- Then click "Check Names" to verify the user or group exists.
- Once the name is underlined, click "OK".
- In the permissions list, check the "Allow" box for "Read (Get, Enumerate, Subscribe)".
- Click "OK" to apply the changes.
-
Firewall Configuration You have two primary options for opening the firewall port for WinRM (HTTPS): using a centralized Group Policy Object (GPO) or using the Command Line for local, immediate configuration.
-
Centralized Configuration via Group Policy (Recommended) This method applies the firewall rule consistently to all Domain Controllers (DCs) by using the existing WinRM GPO.
- Open Group Policy Management (gpmc.msc)
- Navigate to Forest > Domains > YourDomain > Domain Controllers
- Right-click the GPO you created for WinRM configuration (e.g., WinRM Policy) and select Edit...
- Navigate to Computer Configuration > Policies > Windows Settings > Security Settings > Windows Firewall with Advanced Security > Inbound Rules
- Right-click Inbound Rules and select New Rule... This opens the New Inbound Rule Wizard.
- In the New Inbound Rule Wizard, use the following settings:
- Rule Type: Port
- Protocol: TCP
- Specify local ports: 5986
- Action: Allow the connection
- Profile: Domain
- Name, for instance, Windows Remote Management (HTTPS-In)
- Apply the Policy. On one of your Domain Controllers, open an elevated command prompt or PowerShell and run:
gpupdate /force -
Local Configuration via Command Line (Alternative). This method immediately adds the rule to the local firewall on a single Domain Controller.
netsh advfirewall firewall add rule name="Windows Remote Management (HTTPS-In)" dir=in action=allow protocol=TCP localport=5986 program=System
-
-
Test the Connection Finally, test the connection from a remote host to ensure WinRM is working correctly over HTTPS.
- From a remote Windows host, open PowerShell and run the following command. Replace "your.domain.com" with your Domain Controller's FQDN and domain\user with a valid domain user account.
Test-WSMan -ComputerName "your.domain.com" -Credential domain\user -Authentication Negotiate -UseSSL- A successful response indicates a secure and working WinRM connection.
User Identity Agent Configuration
When the domain user has been created, Domain Controller and EDFN host have been configured, the EDFN User identity monitor agent has to be configured using NFO GUI:
Open NFO web interface and navigate to External Data Feeder page or to the Network Conversations Monitor module’s page, and perform the following:
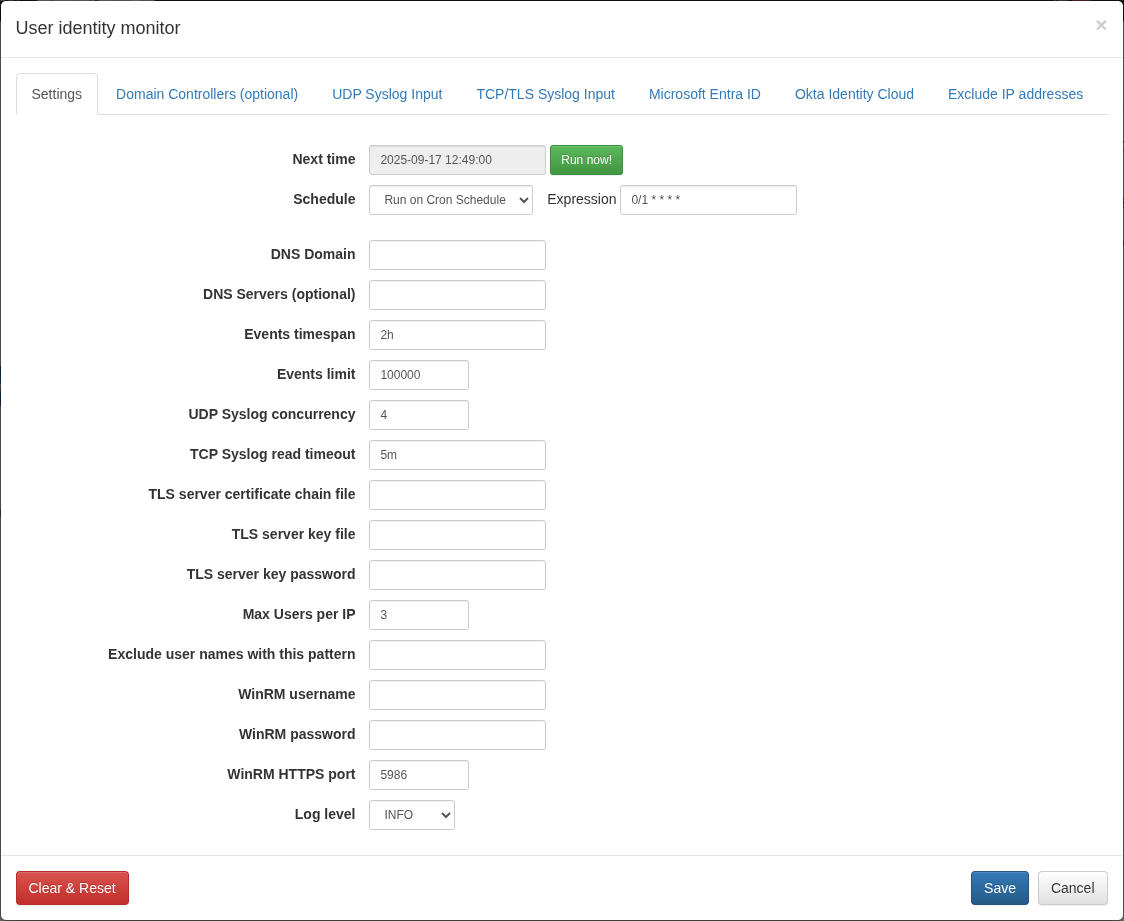
- Open User Identity Monitor agent configuration window
- Change schedule cron expression or leave default. The agent executed every minute by default: security event logs are requested every minute and user identity watch list is updated accordingly
- Enter DNS domain field for Domain Controllers auto-detection, like mydomain.com. Alternatively you can leave it blank and manually configure the list of Domain Controllers on “Domain Controllers (optional)” tab
- Optionally enter DNS Servers – comma separated list of DNS servers for Domain Controllers request
- Enter Events timespan field value – time interval for event logs request and for events obsolescence. Default value is 2 hours, minimum 1 minute, and maximum 24 hours. We recommend to set this value to a maximum user Group Policy refresh interval (default value is 90m ± 30m, so maximum is 2 hours). Special value is “0”, when the obsolescence of events is disabled
- Enter Events limit – maximum number of events to be requested during the WMI query execution. Default value is 100,000 events, minimum 1000, maximum 500,000
- Enter WinRM parameters:
- WinRM username – enter the domain username for authentication. Use either the User Principal Name (UPN) format (e.g.,
user@domain.com) or the pre-Windows 2000 logon name format (e.g., domain\user) - WinRM password – enter the corresponding password for the specified username
- WinRM HTTPS port – enter the port number configured for the WinRM HTTPS listener. The default port is 5986.
- WinRM username – enter the domain username for authentication. Use either the User Principal Name (UPN) format (e.g.,
- Click Save to submit configuration changes
When agent’s parameters are saved, configuration can be validated by pressing “Run Now” green button from the agent configuration window. The User Identity monitoring agent is scheduled if module is enabled.
You must install your Root Certificate Authority (CA) certificate in EDFN to establish a trusted connection. Download the root CA certificate and then follow the import instructions located in the EDFN Administration Guide > Import HTTPS Certificates
The EDFN User Identity agent may fail to connect to a WinRM HTTPS listener if the certificate's Subject Common Name (CN) or Subject Alternative Name (SAN) does not match the Domain Controller's Fully Qualified Domain Name (FQDN). This can happen if the agent connects using the Domain Controller's IP address or a synonym not included in the certificate.
To disable hostname verification and allow the agent to connect in these cases, you must modify the agent's startup options.
- Create a new file at
/opt/nfi-updater/bin/setenv.shwith the following content:
JAVA_OPTS="${JAVA_OPTS} -DwinrmHostnameVerifierEnable=false"
- Apply the changes by restarting the service.
systemctl restart nfi_updd.service
Method 2: DCOM-based WMI Integration (Only Windows-based EDFN)
Method 2: DCOM-based WMI Integration for Active Directory is deprecated and will be removed in a future release.
Due to known security vulnerabilities and high implementation complexity, NFO strongly recommends migrating all existing deployments to Method 1: Windows Event Log collection using WinRM. This aligns with modern security standards and simplifies firewall configuration.
For this integration method, the EDFN agent must be installed on a Windows host.
To enable this integration you need to install a Windows version of EDFN. You may configure it as a second EDFN or as a primary EDFN and uninstall EDFN that came with NFO linux installation. For more information, see Installing External Data Feeder for NFO and Installing Second EDFN.
EDFN, installed on Windows, is running as Local System account by default.
For accessing logon/logoff events using WMI, the EDFN service has to be logged on as a domain user with rights to read Domain Controller’s Security logs.
The EDFN User Identity Monitor agent reads these log events using Windows Management Instrumentation (WMI). Logged as a Local System account it doesn't have any WMI permissions, so a special user has to be created with appropriate rights. The following actions must be performed to allow the agent to communicate with the Domain Controller using WMI:
- Domain user configuration. Create a domain user and make it a member of two groups:
- Distributed COM Users
- Event Log Readers
- Domain Controller configuration. Enable “Enable Account” and “Remote Enable” access permissions for the WMI namespace “Root\CIMV2” on each Domain Controller
- Windows Firewall settings. Enable WMI traffic through Windows Firewall on each Domain Controller
- EDFN host configuration:
- Permit the user write access to EDFN’s log directory and conf/.cacerts trusted certificates store
- Change EDFN service to Log on as the domain user
- Agent configuration. Enter domain name for Domain Controllers auto detection or manually set the list of Domain Controllers
More details are provided in the sections bellow.
Domain User Configuration
Create the Active Directory user via Active Directory Users and Computers tool. The EDFN service will be log on as this user.
All next steps may be applied to this user or you can create a special group, if you’re going to support several users with the same permissions.
The user or group has to be a member of the following groups:
- Distributed COM Users
- Event Log Readers
For more details, visit https://docs.microsoft.com/en-us/windows/win32/wmisdk/securing-a-remote-wmi-connection#setting-dcom-security-to-allow-a-user-to-access-a-computer-remotely
Domain Controller: WMI Namespace Permissions
Provide access to the namespace Root/CIMV2. For detailed information, visit https://docs.microsoft.com/en-us/windows/win32/wmisdk/access-to-wmi-namespaces and https://docs.microsoft.com/en-us/windows/win32/wmisdk/setting-namespace-security-with-the-wmi-control
- Open wmimgmt.msc
- Select the Properties of WMI Control (local)
- Navigate to the Security tab
- In the Namespace navigation, expand Root and click CIMV2
- Click Security button
- Add the user or group for access configuration
- Select Allow checkboxes:
- Remote Enable
- Enable Account
- Click OK to save and then close WmiMgmt
Domain Controller: Windows Firewall Settings
Remote access to a WMI namespace may require Windows Firewall configuration adjustments.
To enable or disable WMI traffic using firewall GUI:
-
Open Windows Firewall on the domain controller
-
Enable Inbound Rules for the required profiles:
-
Windows Management Instrumentation (DCOM-In):
- Service: rpcss
- Protocol: TCP
- Local port: 135
-
Windows Management Instrumentation (WMI-In):
- Service: winmgmt
- Protocol: TCP
- Local port: any
-
-
Further reading:
- For details, visit https://docs.microsoft.com/en-us/windows/win32/wmisdk/connecting-to-wmi-remotely-starting-with-vista
- To set up a fixed port for WMI connections, follow the instructions provided in https://learn.microsoft.com/en-us/windows/win32/wmisdk/setting-up-a-fixed-port-for-wmi
PowerShell Configuration Verification
If domain user, WMI namespace permissions and firewall settings are set up correctly, you can check the configuration using PowerShell:
-
Run Windows PowerShell on the EDFN host as a domain user configured earlier (right click, Run as different user)
-
Get the last 5 minutes timestamp in CIM datetime format:
$timestamp = [System.Management.ManagementDateTimeConverter]::ToDmtfDateTime((Get-Date).AddMinutes(-5))
- Request Security logs for the last 5 minutes:
Get-WmiObject -Namespace "root\cimv2" -Impersonation 3 -ComputerName \<domain-controller\> `
-Query "select * from win32_ntlogevent where logfile = 'Security' and TimeWritten > '$timestamp'"
- If configuration is correct, security logs are printed.
Troubleshooting
- Get-WmiObject : The RPC server is unavailable. (Exception from HRESULT: 0x800706BA) – Indicates that DCOM or port 135 is blocked.
- Get-WmiObject : No such interface supported – Suggests that WMI traffic is being blocked by the firewall
- Get-WmiObject : Access denied – Occurs if the domain user lacks permissions to access the Root/CIMV2 namespace
EDFN Windows Host Configuration
When EDFN agent is logged on as Local System account, no additional configurations are required. But for Domain Controllers integration, the service has to be logged on as the domain user.
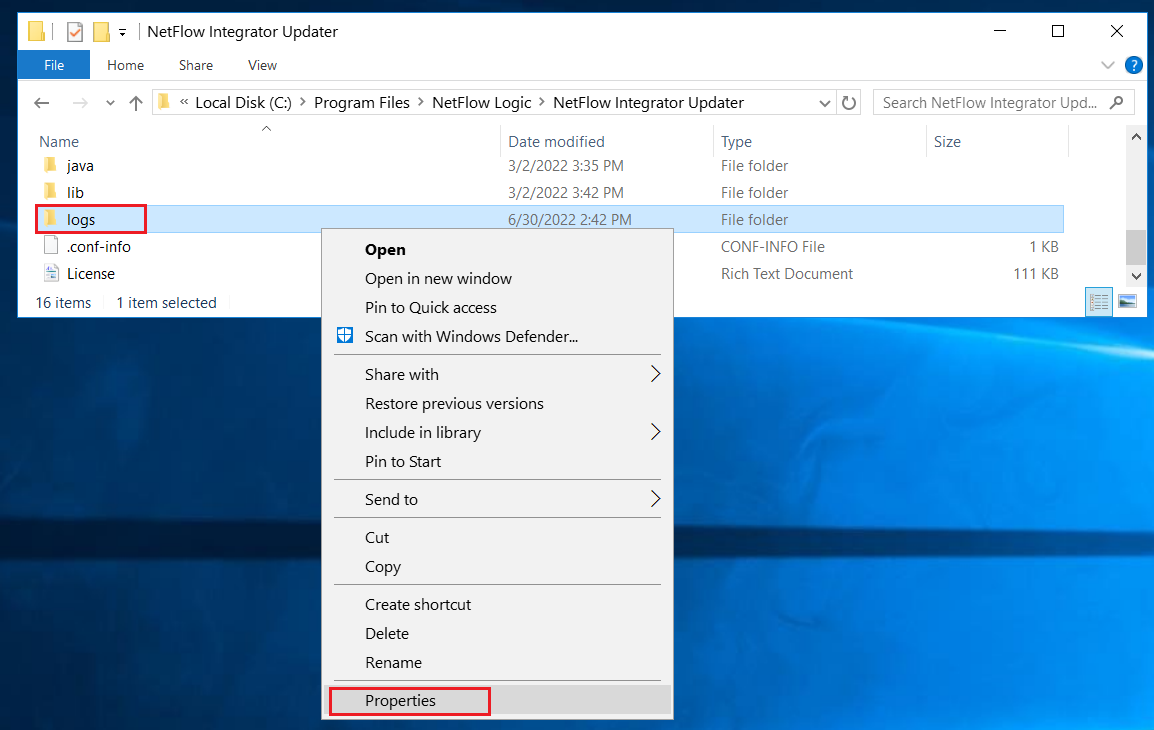
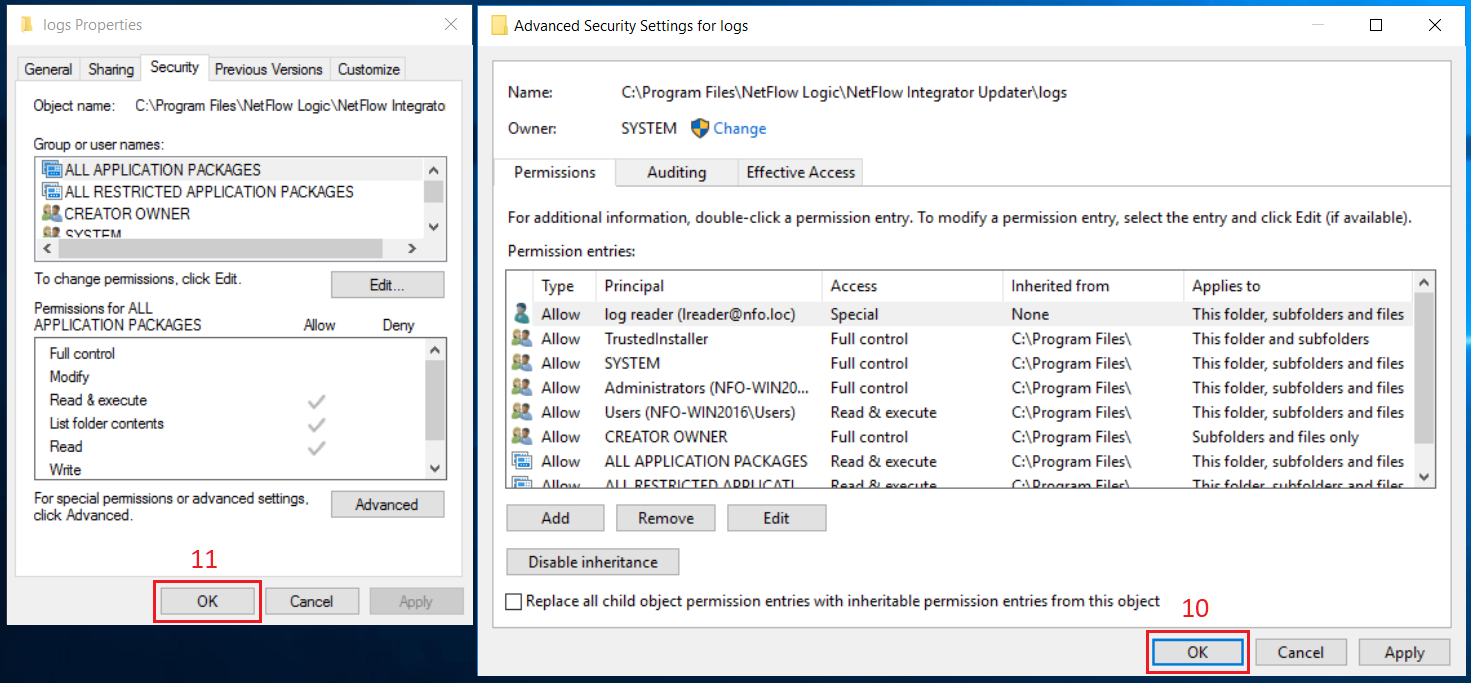
EDFN and its agent write internal logs into the directory C:\Program Files\NetFlow Logic\NFI Updater\logs\. The domain user or group may have restricted permissions to this directory, and additional permissions have to be granted. Navigate in File Explorer to C:\Program Files\NetFlow Logic\NFI Updater\logs\, right click directory logs then click Properties in the context menu.
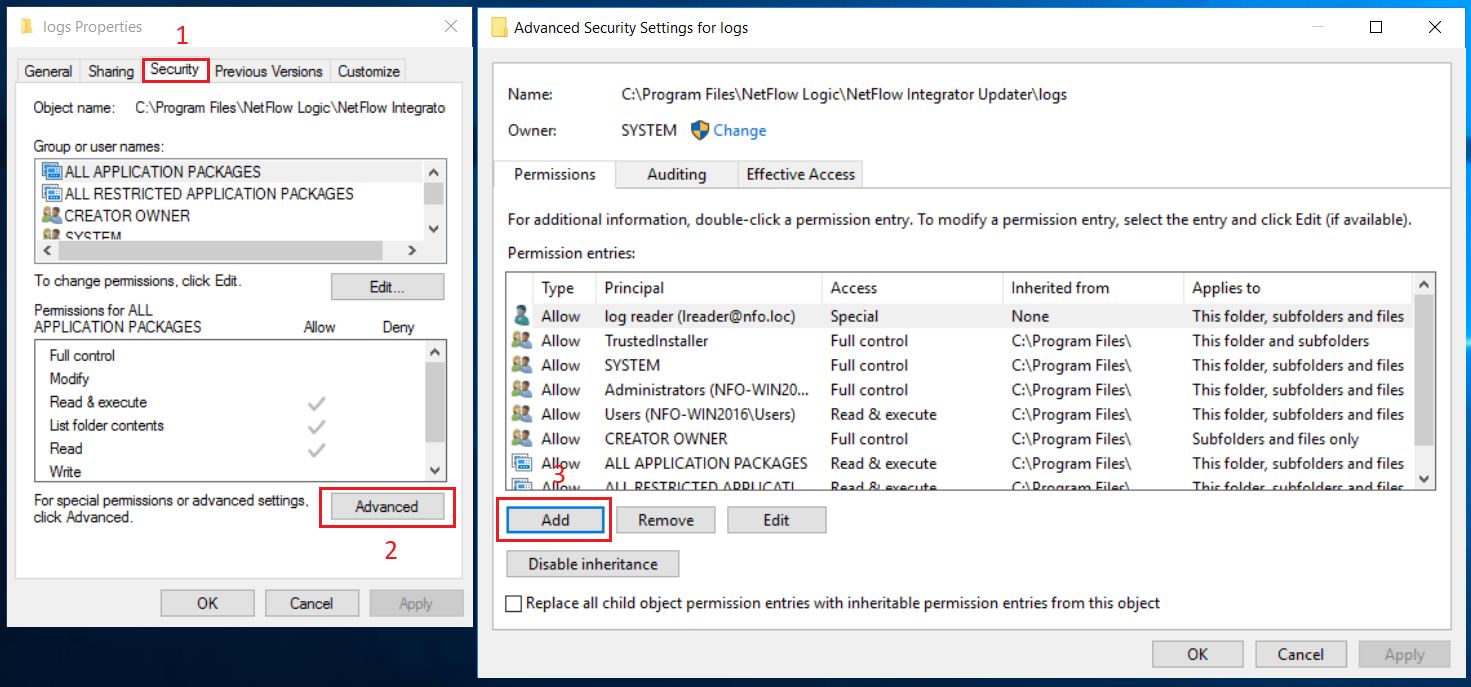
In Properties dialog box, select Security tab (1), click Advanced button (2). Advanced Security Settings dialog box opens. Click Add button (3) in this box.
In Security Entry dialog box, click ‘Select a principal’ link (4). A dialog box for a user selection opens. Type the corresponding username (5) then click OK button (6).
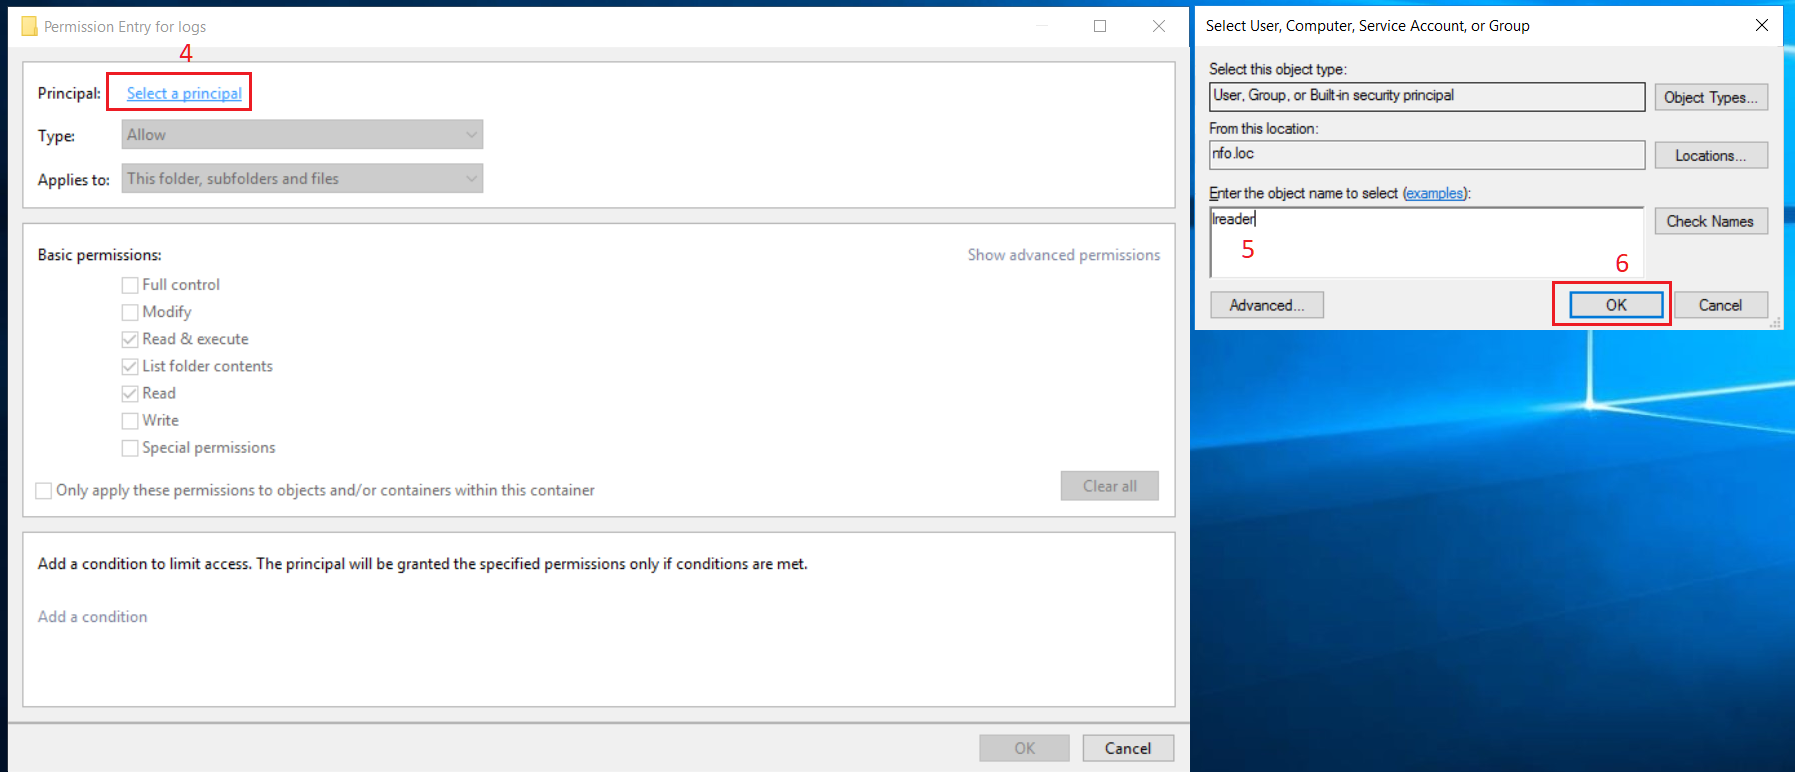
A user search is available in this dialog box.
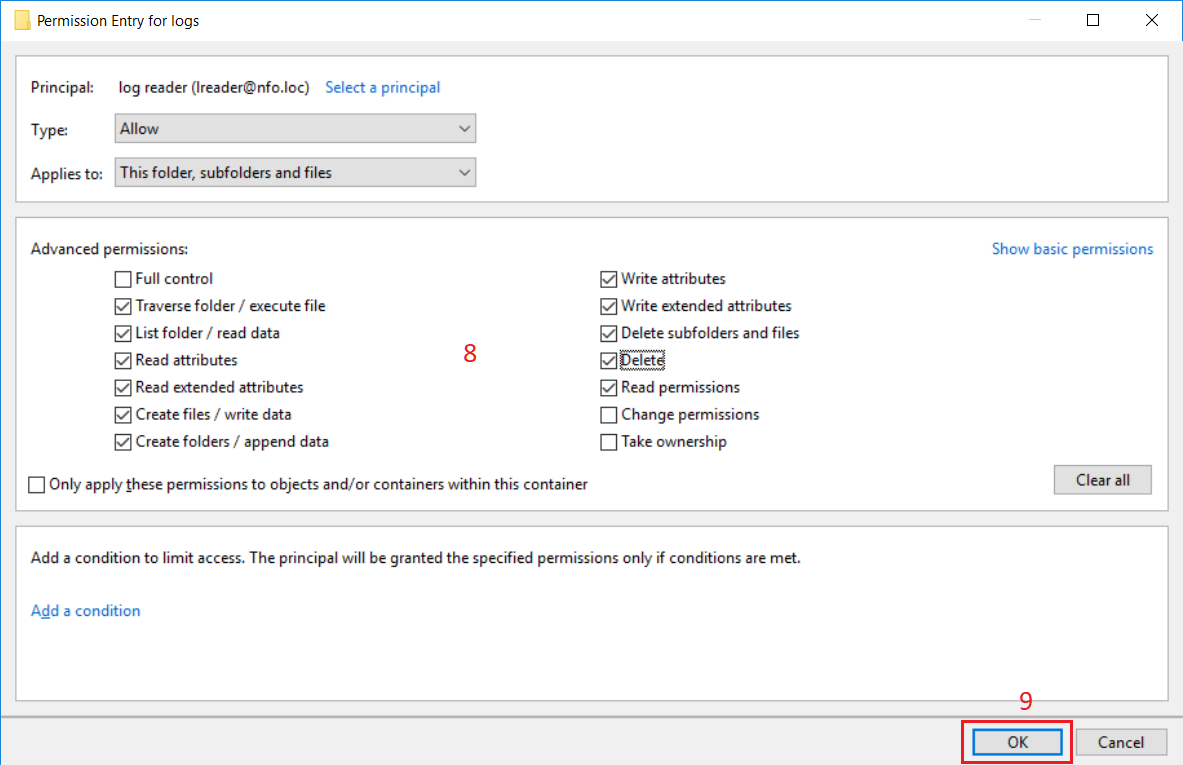
In Security Entry dialog box, click ‘Show advanced permission’ link (7) for a selected principal.
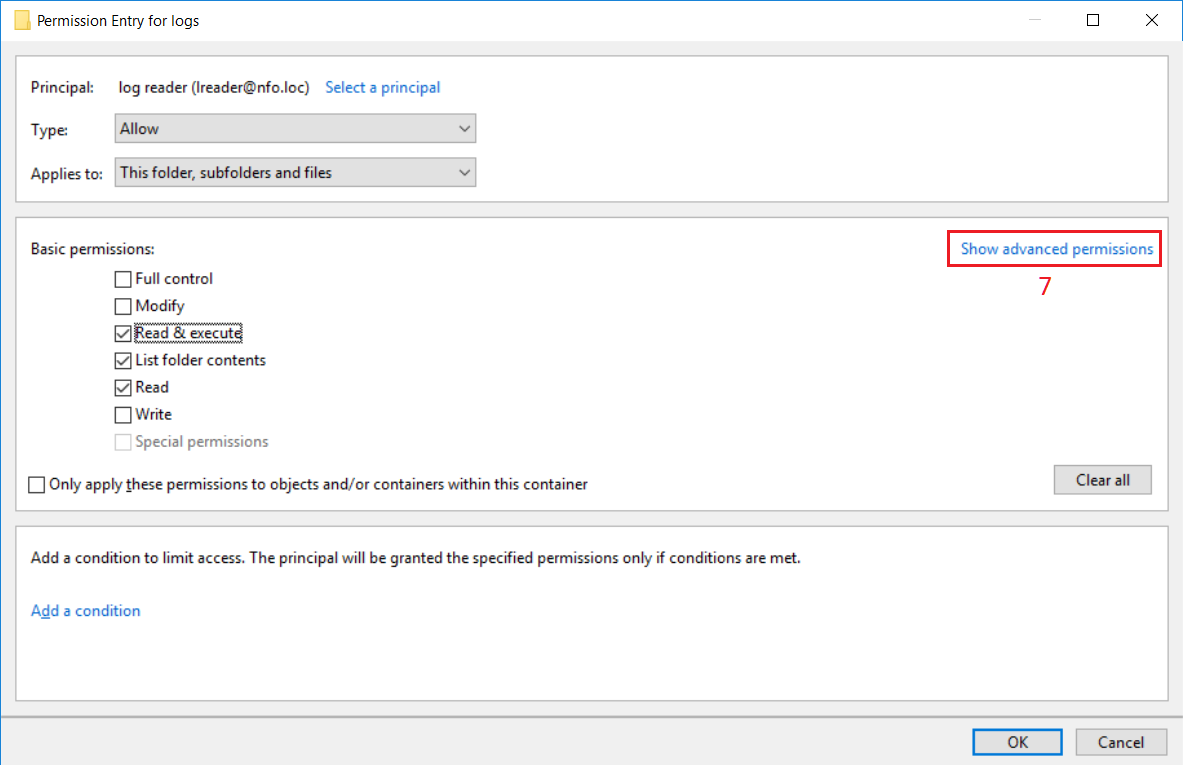
Select permissions according to the picture below (8) then click OK button (9).
Click OK button (10) in Advanced Security Settings dialog box then click OK button (11) in Properties dialog box.
Also you may need to grant write permission to the trusted certificates store: C:\Program Files\NetFlow Logic\NFI Updater\conf\.cacerts.
Set this permission in the way as for logs directory.
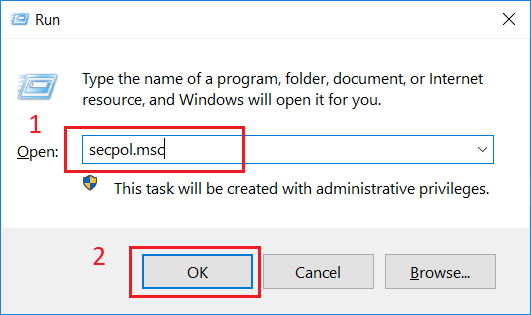
In order to start EDFN service on behalf of the domain user, this user should be granted additional privileges to log on as a service. Press Win-R shortcut on keyboard. Run dialog box opens.
In Run dialog box, type secpol.msc in Open drop-down list (1) and click OK button (2).
Local Security Policy window opens. Navigate to Security Settings/Local Policies/User Rights Assignment (3) in the left pane. Double click Log on as a service policy in the right pane (4).
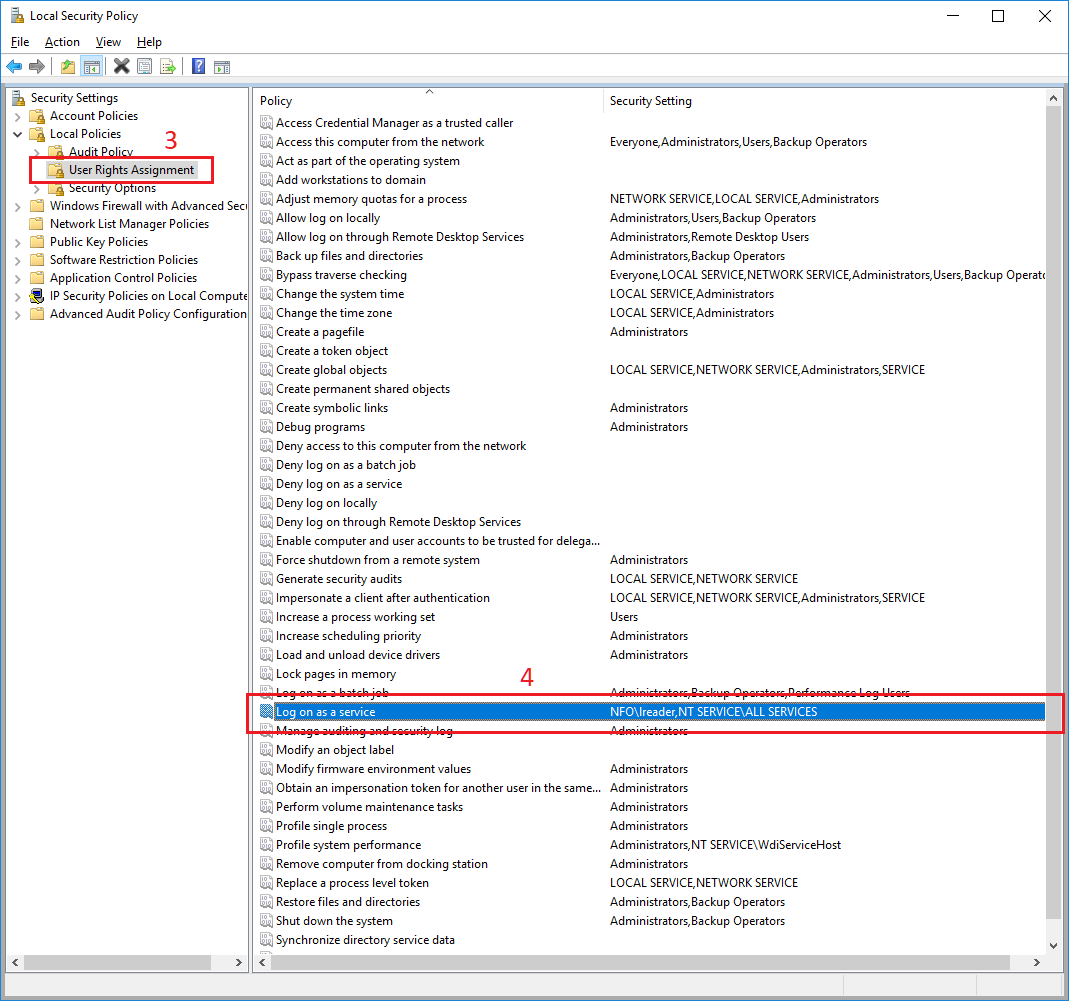
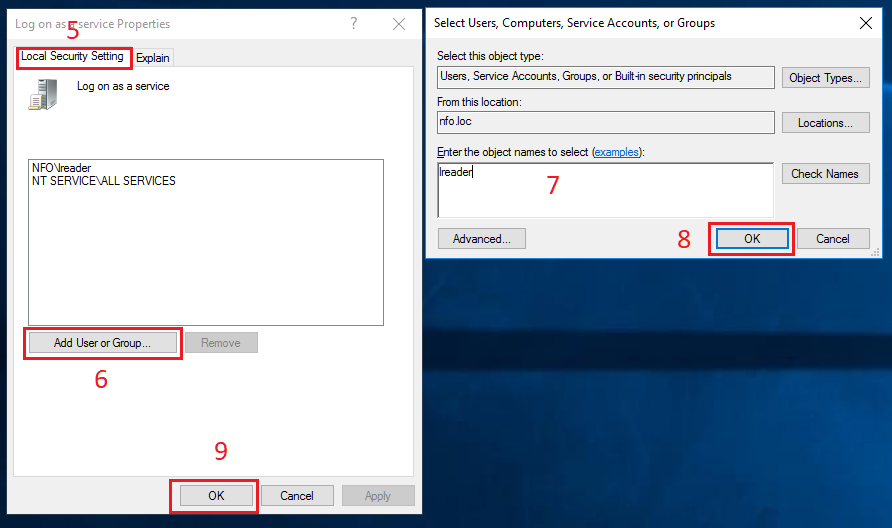
In Properties dialog box, select Local Security Settings tab (5), click Add User or Group button (6). Advanced Security Settings dialog box opens. Click Add button (3) in this box. A dialog box for a user selection opens. Type the corresponding username (7) then click OK button (8).
A user search is available in this dialog box.
Click OK button in Properties dialog box (9). Close Local Security Policy window.
After that change EDFN service will logon as the domain user. Press Win-R shortcut on keyboard. Run dialog box opens.
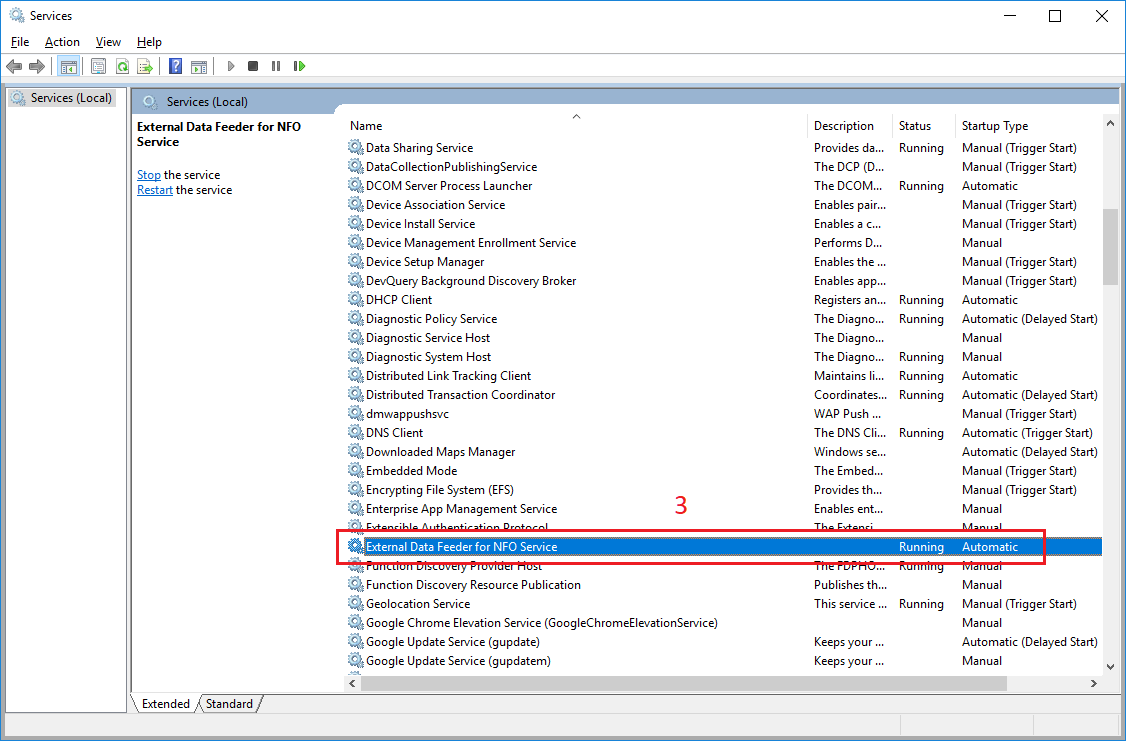
In Run dialog box, type services.msc in Open drop-down list (1) and click OK button (2).

Services window opens. Double click External Data Feeder for NFO Service in the right pane (3).
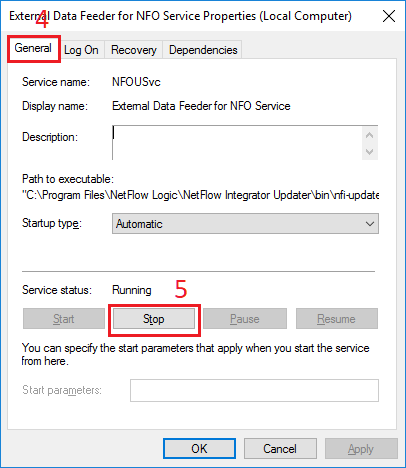
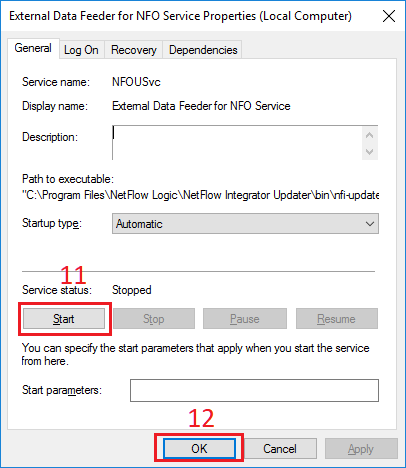
In Properties dialog box, select General tab (4), click Stop button (5).
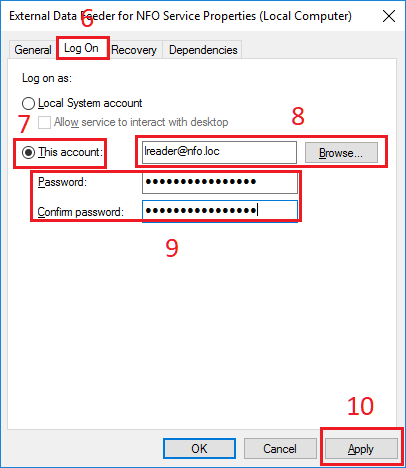
After the service has stopped in Properties dialog box, select Log on tab (6). In Log on as section, select This account option (7). Type username in the corresponding textbox or select user using Browse button (8). Enter then confirm a password of the user (9) then click Apply button (10).
In Properties dialog box, select General tab (4), click Start button (11). After the service has started click OK button (12). Close Services window.
User Identity Agent Configuration
When the domain user has been created, Domain Controller and EDFN host have been configured, the EDFN User identity monitor agent has to be configured using NFO GUI:
Open NFO web interface and navigate to External Data Feeder page or to the Network Conversations Monitor module’s page, and perform the following:
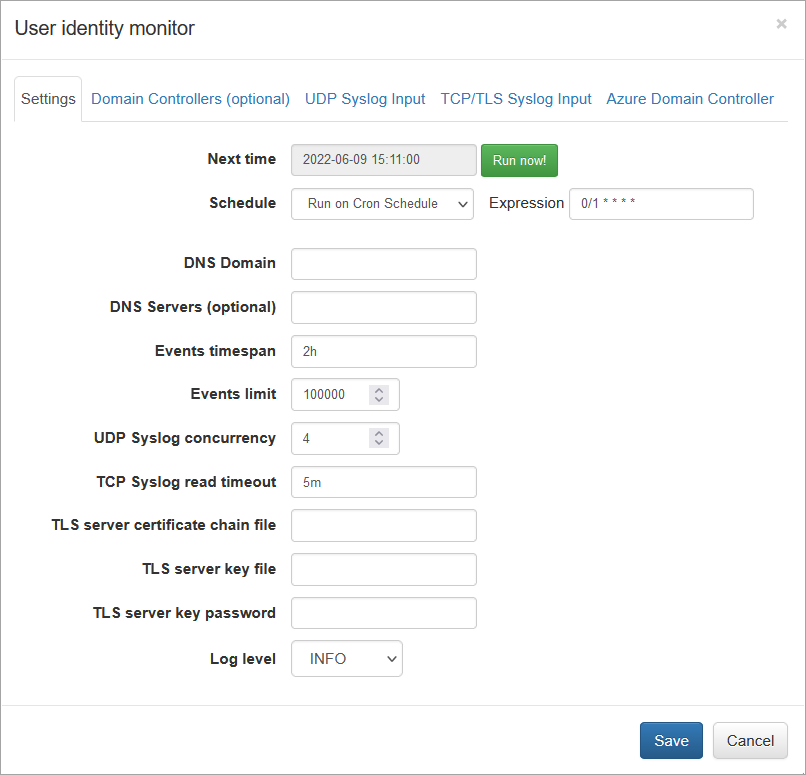
- Open User Identity Monitor agent configuration window
- Change schedule cron expression or leave default. The agent executed every minute by default: security event logs are requested every minute and user identity watch list is updated accordingly
- Enter DNS domain field for Domain Controllers auto-detection, like mydomain.com. Alternatively you can leave it blank and manually configure the list of Domain Controllers on “Domain Controllers (optional)” tab
- Optionally enter DNS Servers – comma separated list of DNS servers for Domain Controllers request
- Enter Events timespan field value – time interval for event logs request and for events obsolescence. Default value is 2 hours, minimum 1 minute, and maximum 24 hours. We recommend to set this value to a maximum user Group Policy refresh interval (default value is 90m ± 30m, so maximum is 2 hours). Special value is “0”, when the obsolescence of events is disabled
- Enter Events limit – maximum number of events to be requested during the WMI query execution. Default value is 100,000 events, minimum 1000, maximum 500,000
- Click Save to submit configuration changes
When agent’s parameters are saved, configuration can be validated by pressing “Run Now” green button from the agent configuration window. The User Identity monitoring agent is scheduled if module is enabled.