Integration with Microsoft Entra ID
To enable this integration you need to configure EDFN agent to access the Microsoft Entra ID audit sign-in logs.
There are two choices how this access can be configured.
- Using service principal identity - Use this option if your EDFN is installed on premises or outside of Azure. This method requires an application credentials:
tenant ID,application (client) ID, and asecret access key - Using system-assigned managed identity - Use this option if your EDFN is installed on an Azure Virtual Machine resource. This method does not require an application credentials
For more details please visit https://docs.microsoft.com/en-us/azure/active-directory/managed-identities-azure-resources/overview
Service Principal Identity Authentication
This authentication method requires a secret access key, application (client) ID and tenant ID. An Azure service principal is an identity created for use with applications. The EDFN agent uses this service principal for Azure resources access. Do following steps for the service principal creation.
- Open the Azure portal
- Navigate to
Microsoft Entra IDand selectApp registrationsunder the Mange section in the left panel - Select “+ New registration“
- Enter Name, for example,
edfn-agent - Select “Register” to save the application. You will be navigated to the application overview page
- Select "API permissions" in the left panel
- Select "+ Add Permission", then "Microsoft Graph", then "Application permissions" and check
AuditLog.Read.Allpermission - Click "Save permissions" to save changes
- Select “Certificates & secrets” in the left panel
- Select “+ New client secret” and enter a name for the secret
- Select “Save” and copy the secret key value
Properties from the application overview page will be required for User Identity agent configuration:
- client – Application (client) ID
- tenant – Directory (tenant) ID
- key – client secret string value
System-assigned Managed Identity Authentication
For enabling system-assigned managed identity on the EDFN installation VM read the following instruction: https://docs.microsoft.com/en-us/azure/active-directory/managed-identities-azure-resources/qs-configure-portal-windows-vm#enable-system-assigned-managed-identity-on-an-existing-vm
- Open the Azure portal
- Navigate to
Virtual machines - From the list of VMs, select the VM, where EDFN is installed
- Select
Identityunder the Settings group in the left panel - Under the
System assignedtab, Status, selectOnand then click Save - Confirm enable the system assigned managed identity for the VM
After system-assigned managed identity is enabled, configure VM access to the Microsoft Graph API. The main idea is described here: https://docs.microsoft.com/en-us/azure/app-service/scenario-secure-app-access-microsoft-graph-as-app?tabs=azure-powershell#grant-access-to-microsoft-graph
- Navigate to the Virtual Machine Identity page
- Copy Object (principal) ID value
- Open Cloud Shell console end execute the following set of commands:
spId="Object (principal) ID value"
graphResourceId=$(az ad sp list --display-name "Microsoft Graph" --query [0].objectId --out tsv)
appRoleId=$(az ad sp list --display-name "Microsoft Graph" --query "[0].appRoles[?value=='AuditLog.Read.All' && contains(allowedMemberTypes, 'Application')].id" --output tsv)
uri=https://graph.microsoft.com/v1.0/servicePrincipals/$spId/appRoleAssignments
body="{'principalId':'$spId','resourceId':'$graphResourceId','appRoleId':'$appRoleId'}"
az rest --method post --uri $uri --body $body --headers "Content-Type=application/json"
- After these steps VM will have access to Microsoft Graph API:
AuditLog.Read.All.
User Identity Agent Configurations
Open NFO web interface and navigate to External Data Feeder page or to the Network Conversations Monitor module’s page, and perform the following:
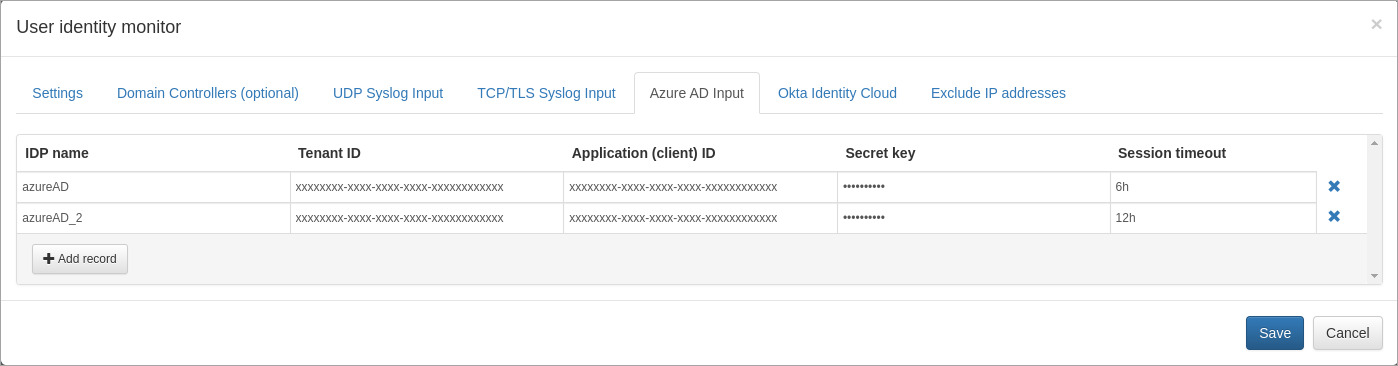
- Open User Identity Monitor agent configuration window
- Select
Microsoft Entra ID Inputtab and add a new record. Enter the following properties:- IDP: Identity Provider name is put into "idp" output field
- Tenant ID: Directory (tenant) ID. If you use system-assigned managed identity, leave it blank. If you use service principal identity, open Azure portal > navigate to Microsoft Entra ID > select App Registrations > select application created before, e.g. edfn-agent > copy Directory (tenant) ID from the Overview page.
- Application (client) ID: Application (client) ID. If you use system-assigned managed identity, leave it blank. If you use service principal identity, open Azure portal > navigate to Microsoft Entra ID > select App Registrations > select application created before, e.g. edfn-agent > copy Application (client) ID from the Overview page.
- Secret key: Application (client) secret key. Paste secret key created before. If you use system-assigned managed identity, leave it blank. If you haven't created a client secret yet, open Azure portal > navigate to Microsoft Entra ID > select App Registrations > select application created before, e.g. edfn-agent > select Certificates & secrets > click on Client secrets tab and then create a new one.
- Session timeout: if there are no sign-in logs during timeout period, user session expected to be closed. Format example: 1d 2h 5m 10s - 1 day, 2 hours 5 minutes, 10 seconds
If default authentication endpoint or Microsoft Graph endpoint have to be overwritten, you have to create the file $EDFN_HOME/conf/azure-ad.properties with the following content:
[idp-name]
authURL=https://login.microsoftonline.com/
microsoftGraphEndpoint=https://graph.microsoft.com/v1.0
microsoftGraphScopes=https://graph.microsoft.com/.default
The agent may request logs from different Microsoft Entra IDs. Please add separate configuration record for each Microsoft Entra ID.
Save the agent changes. The agent will request new sign-in logs and update the watch list according to the scheduler expression: every minute by default.